Shopify的WhatsApp客户通知
到这个时候,你应该已经完成了level 2.3并为Shopify定制了部分WhatsApp聊天工具流程。现在是时候设置客户关怀通知信息了(WhatsApp模板信息)。如果你想通知任何客户,WhatsApp是特别有用的,因为用户对WhatsApp信息的打开率可以达到90%。
在本节中,您将学习如何设置订单确认和订单更新信息。
默认的WhatsApp模板提交
在您完成了2.3级的WhatsApp Shopify整合后。"订单确认"和 "订单更新" WhatsApp模板将被自动创建。

自定义WhatsApp模板创建
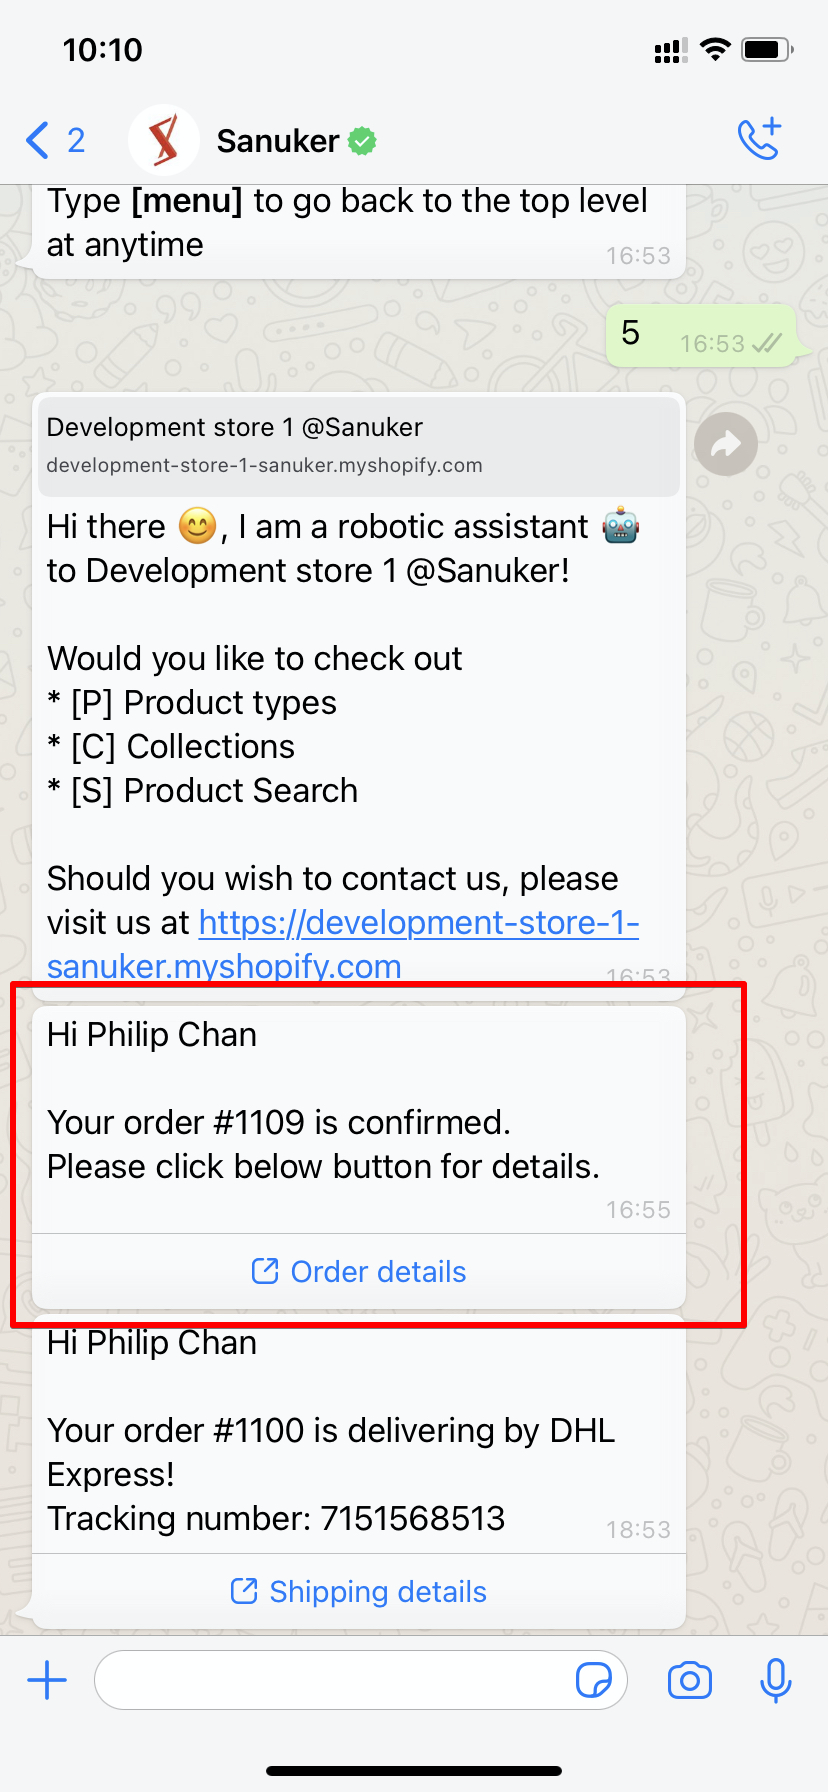
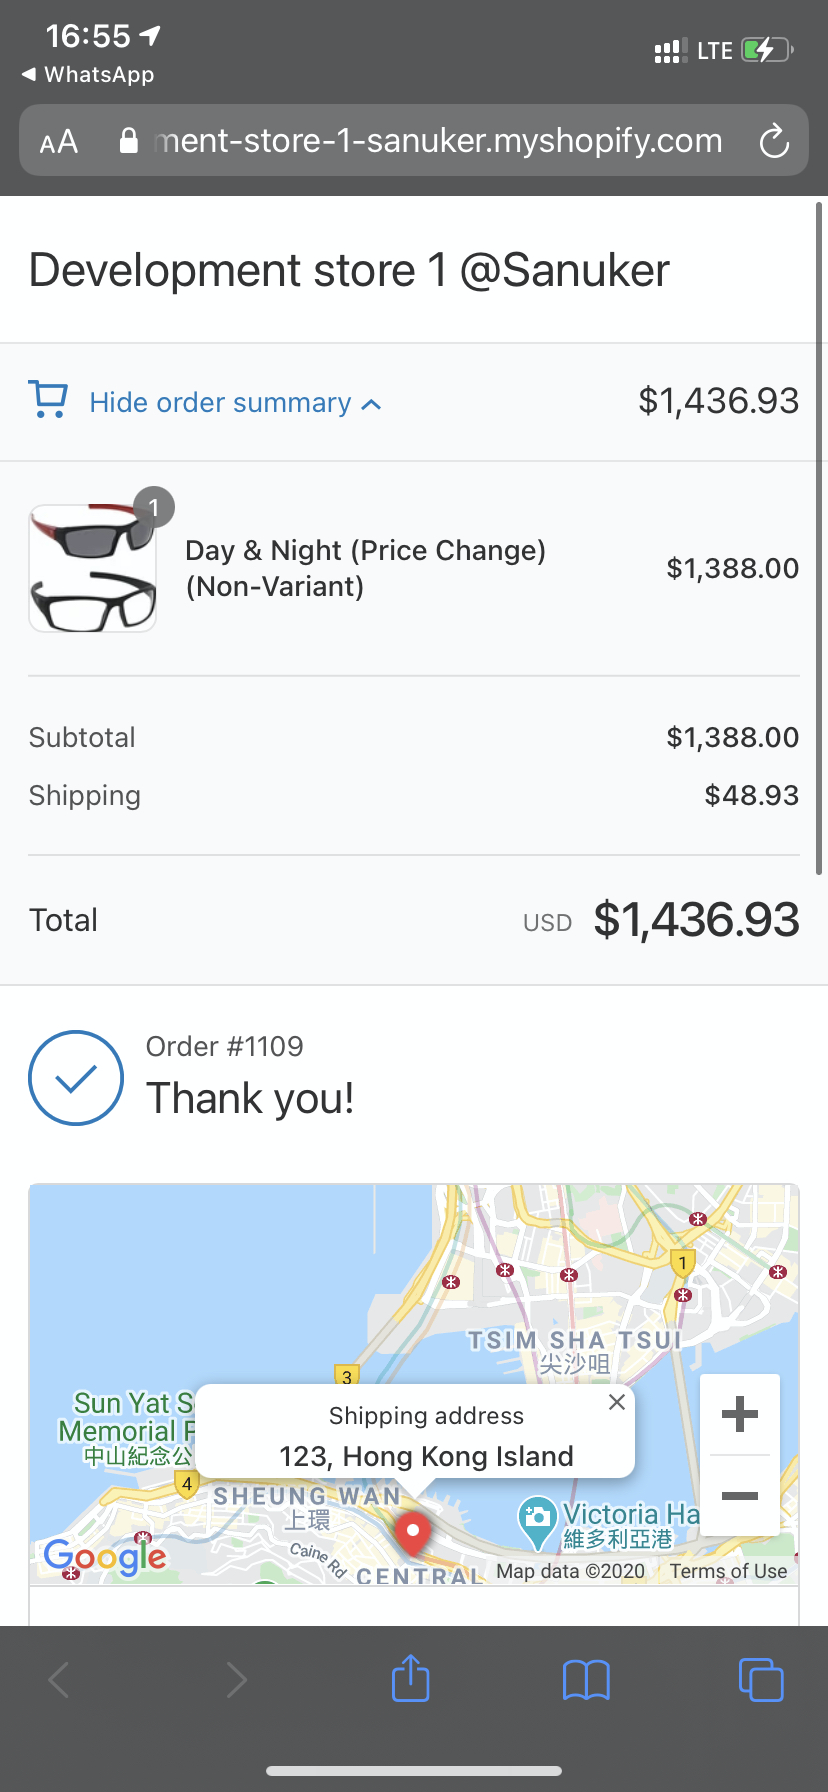
订单确认
预期结果
动手试试看
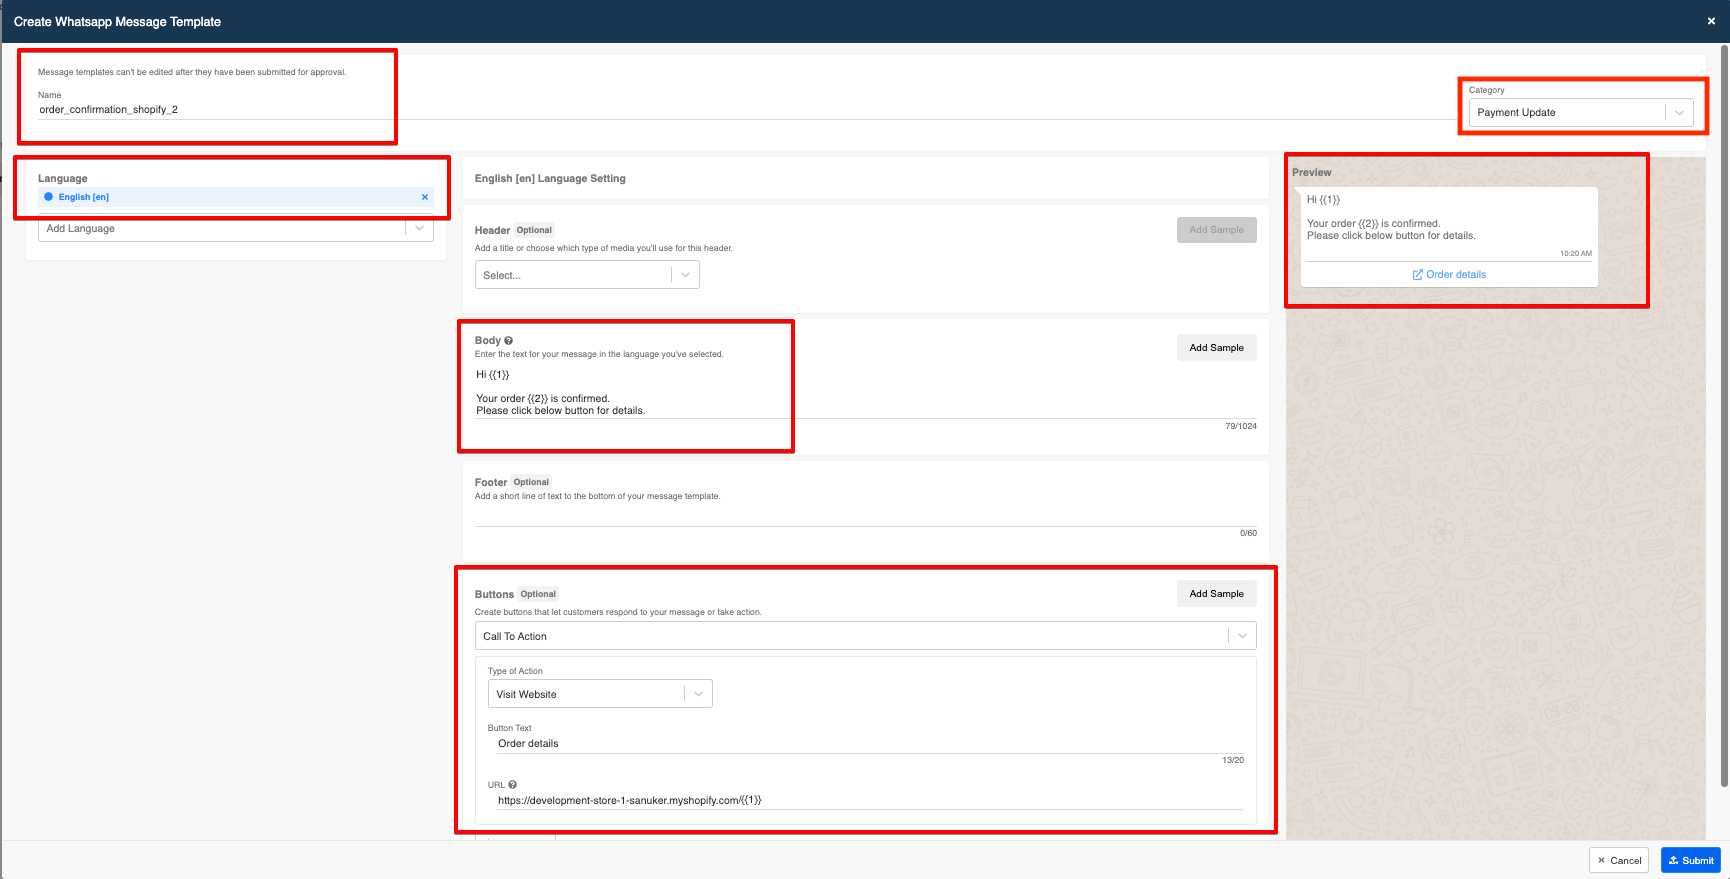
提交WhatsApp模板信息 - 订单确认
您首先需要让您的WhatsApp模板信息的内容得到WhatsApp的认可。关于支持的信息内容类型,请参考政策这里。
- 在您的WhatsApp频道中点击 "信息模板"。
你会看到你的WABA下的信息模板概览。选择正确的WABA集成。
点击 "创建"来创建一个新的信息模板。一个新的窗口将弹出。
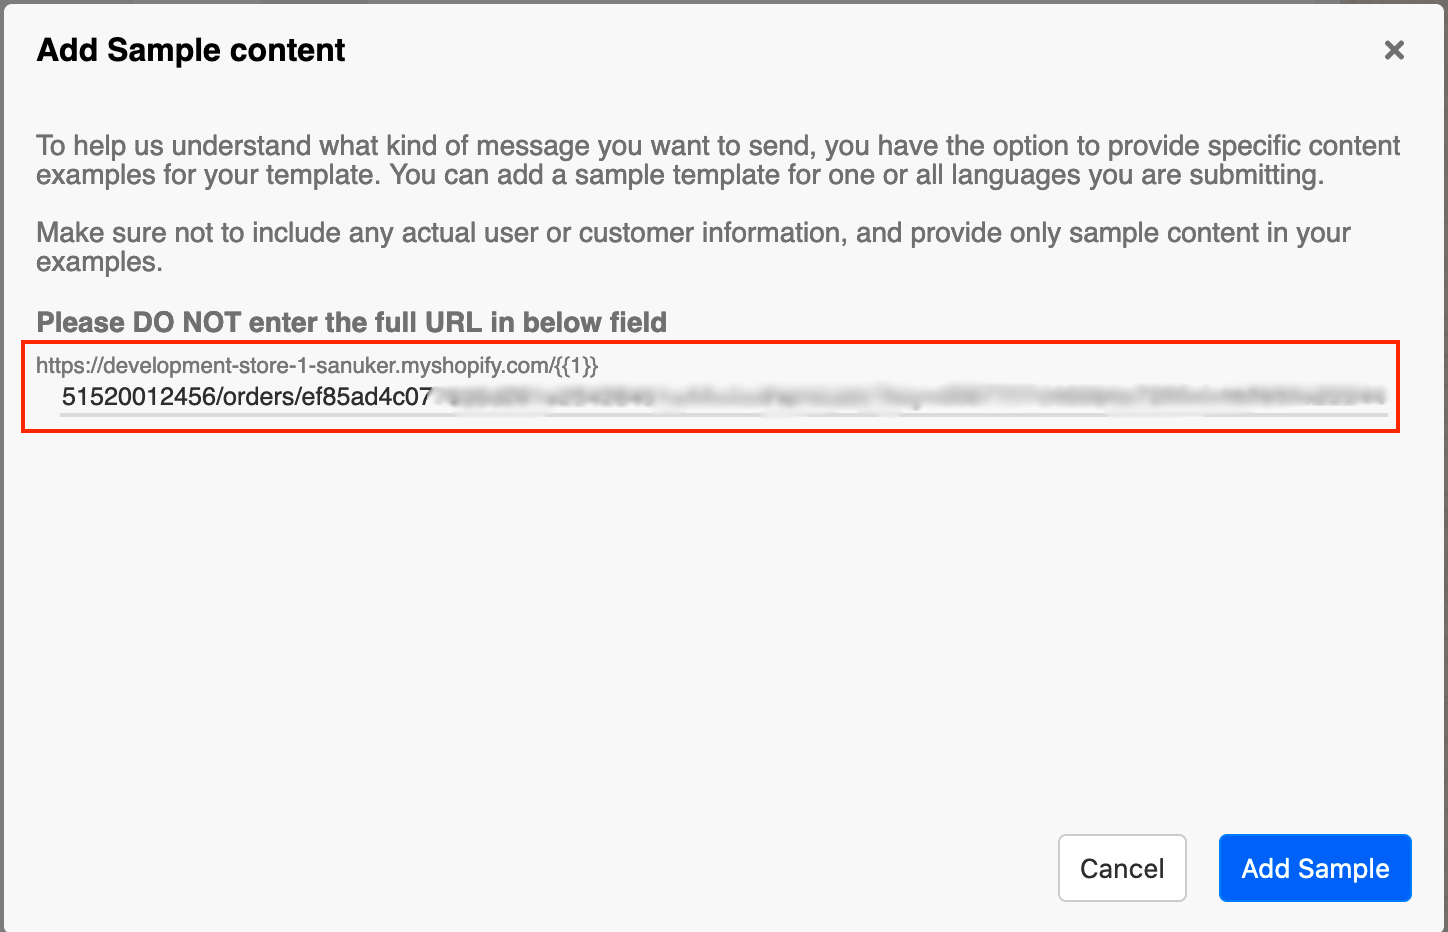
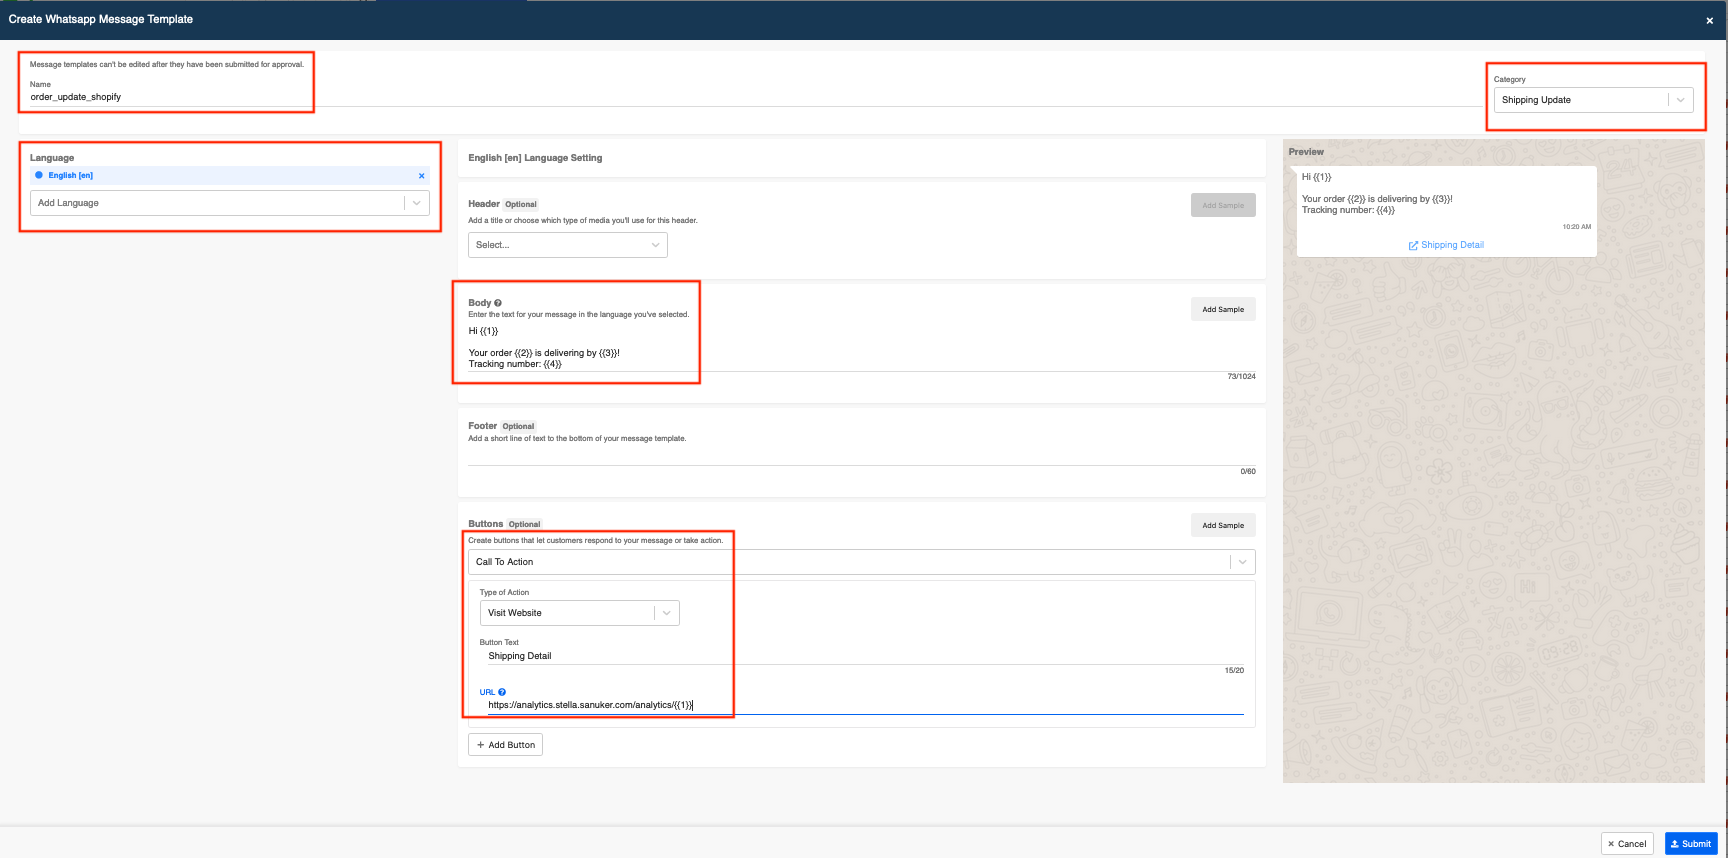
- 填写此信息模板的必要细节。你可以查看示例模板或WhatsApp文档。对于任何带有`{{1}}等参数的媒体或文本,您需要添加样本作为审查过程的一部分。
以下是订单确认的变量,WhatsApp模板信息提交。
| WhatsApp提交的变量 | 内容 | 变量编号 |
|---|---|---|
| {{firstName}} | WhatsApp资料中的firstName | {{1}} |
| {{orderId}} | 来自Shopify商店的订单ID(#xxxx)。 | {{2}} |
| {{order_status_url}} | 来自Shopify商店的订单状态网址(为了嵌入按钮,商店的网址被删除)。 | {{1}} |
上表中的变量编号仅作参考。很明显,你可以根据你的实际信息重新安排变量编号的位置/顺序。
- 点击 "提交"来提交你的信息模板。一旦提交,将创建一个新行。
创建响应对象 - 订单确认
一旦模板信息被批准(绿色),你将需要把信息的实际代码复制到你的配置图中。
要生成这个代码,请前往 "响应"生成器。你可以在随机树节点中访问它,或者前往顶部面板上 "资源"下的 "回复**"。
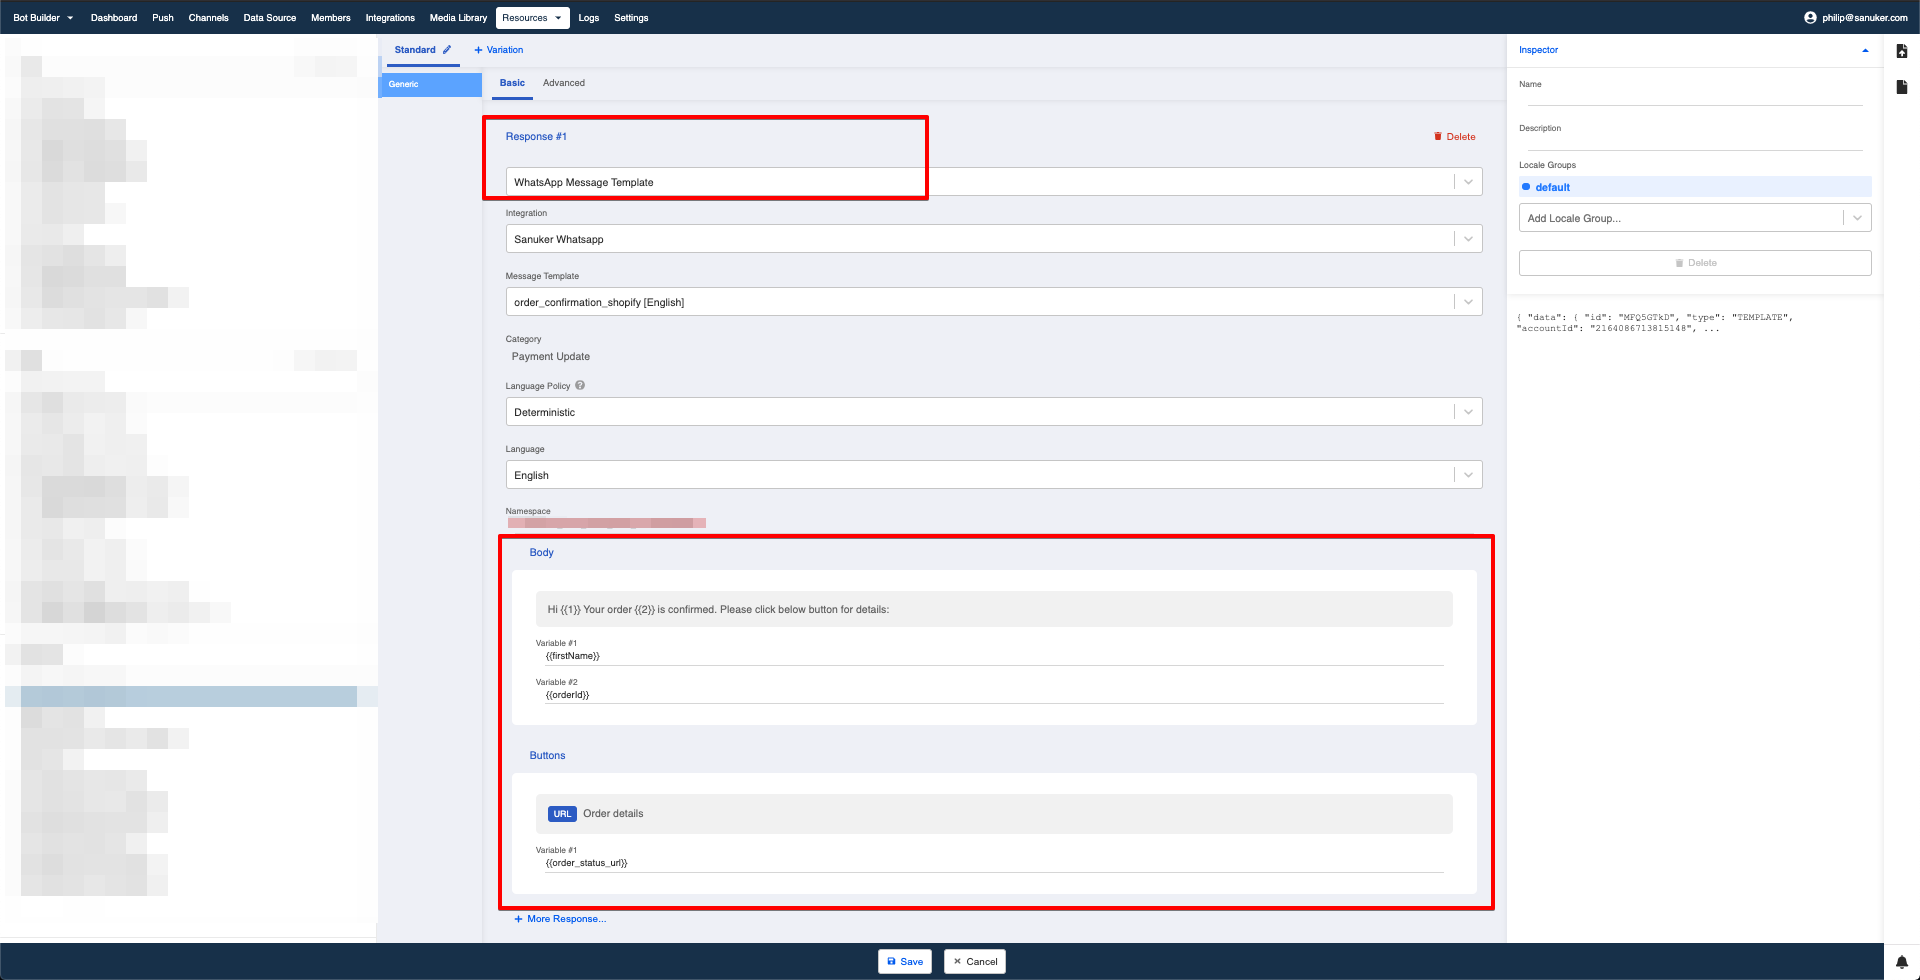
创建一个新的反应并填写以下信息。
- 选择您已经成功[提交]的 "**信息模板"(/docs/en/standard-procedures-shopify-whatsapp-template#submitting-a-whatsapp-template-message--order-confirmation)。
- 在 "Body"下,将 "Variable #1"填写为"{{firstName}}","Variable #2"填写为"{{orderId}"。
- 在 "按钮 "下,将 "变量#1**"填写为"{{订单_状态_url}}"。
响应生成器中的变量将按照您在提交WhatsApp模板消息时标记变量编号的方式排序。请根据您的需要调整或重新安排内容。
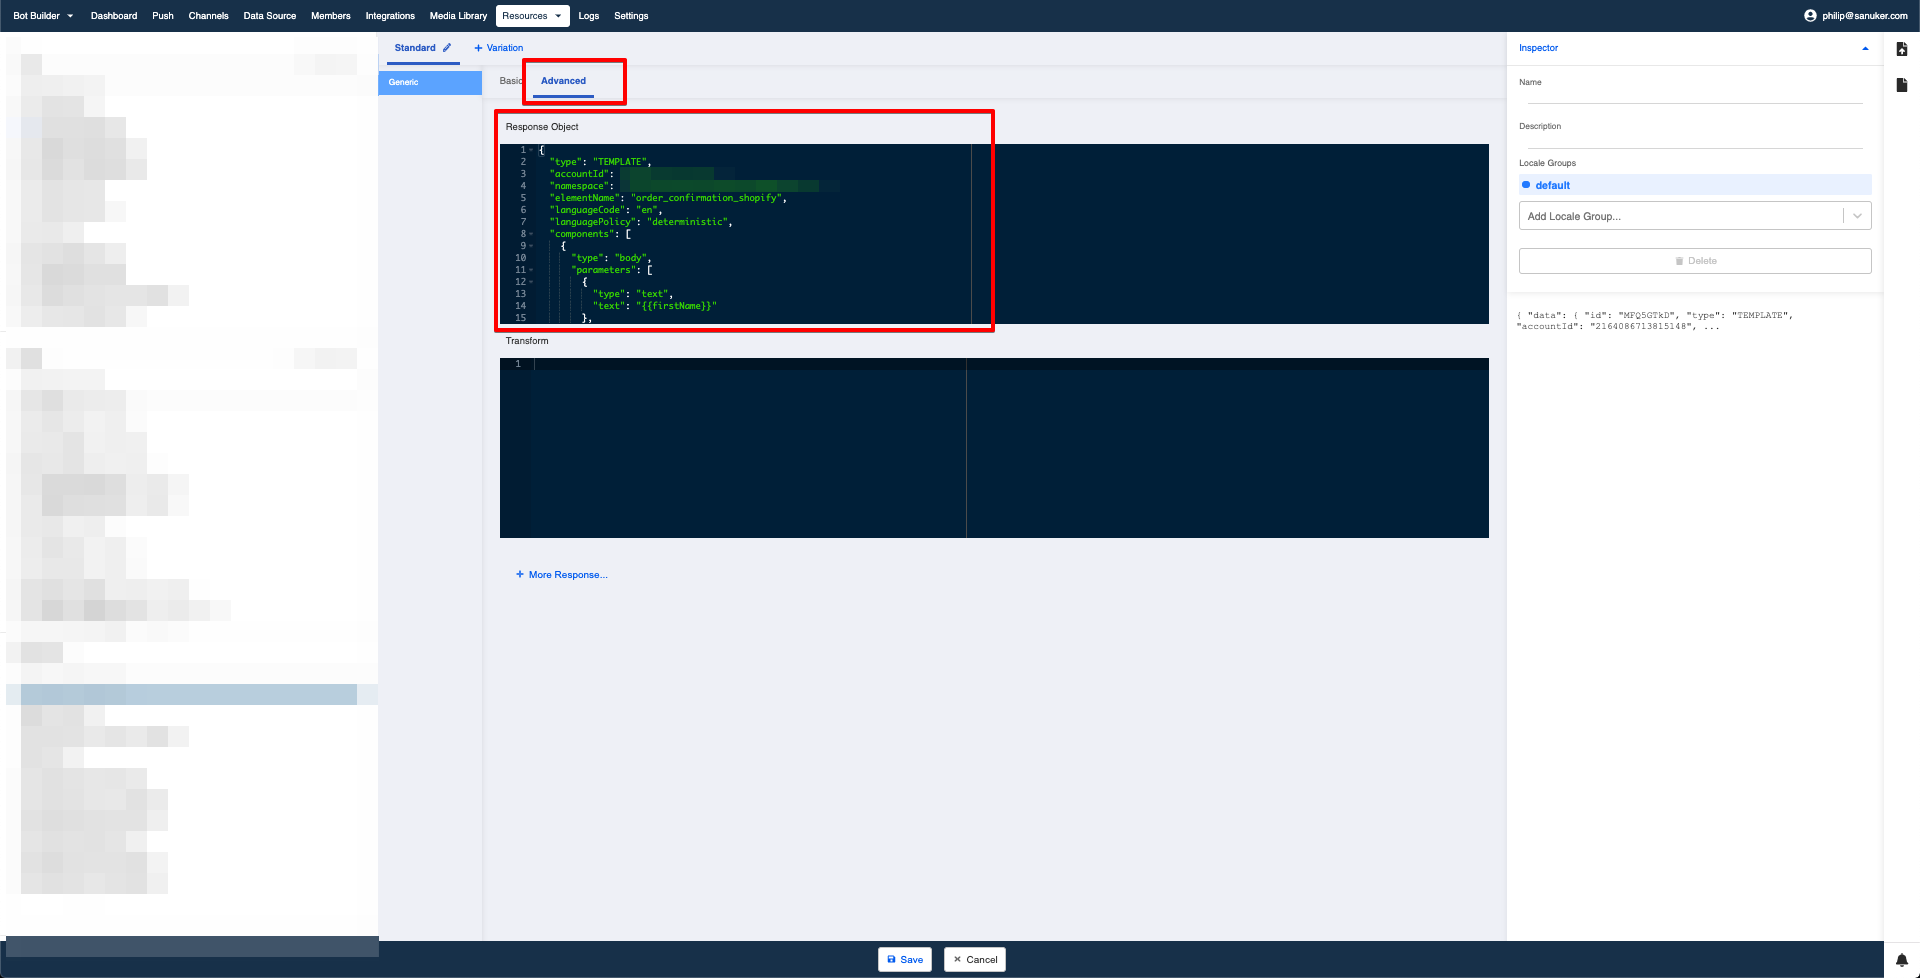
- 切换到 "高级"标签,寻找 "响应对象"下的代码块。
以下是订单确认的**响应对象的完整样本。
{
  "type": "TEMPLATE",
  "accountId": "1234566778899",
  "namespace": "bc2ac4dd_123123123_123123_123",
  "elementName": "order_confirmation_shopify",
  "languageCode": "en",
  "languagePolicy": "deterministic",
  "components": [
    {
      "type": "body",
      "parameters": [
        {
          "type": "text",
          "text": "{{firstName}}"
        },
        {
          "type": "text",
          "text": "{{orderId}}"
        }
      ]
    },
    {
      "type": "button",
      "sub_type": "url",
      "index": "0",
      "parameters": [
        {
          "type": "text",
          "text": "{{order_status_url}}"
        }
      ]
    }
  ]
}
- 从响应对象中复制以下**字段的内容。
accountIdnamespaceelementNamelanguageCodecomponentsarray (Applicable when the message has button). Copy starting from the[sign after"components":to the second last line of].paramsarray (Applicable when the message does not have button) Copy starting from the[sign after"params":to the second last line of].
下面是一个 "组件 "数组的示例代码。
点击查看
[
    {
      "type": "body",
      "parameters": [
        {
          "type": "text",
          "text": "{{firstName}}"
        },
        {
          "type": "text",
          "text": "{{orderId}}"
        }
      ]
    },
    {
      "type": "button",
      "sub_type": "url",
      "index": "0",
      "parameters": [
        {
          "type": "text",
          "text": "{{order_status_url}}"
        }
      ]
    }
  ]
编辑配置图 - 订单确认
- 将复制的内容相应地粘贴到你在level 2.3中创建的代理树的**配置图中(记得将
组件数组放入OrderCreateComponents或将params数组放入OrderCreateParameters)。
| 字段 | 内容 | 必要? |
|---|---|---|
| accountId | WhatsApp模板 accountId | 是 |
| namespace | WhatsApp模板 namespace | 是 |
| OrderCreateElementName | 用于**订单创建的WhatsApp模板元素名称;将elementName放入 OrderCreateElementName | 是 |
| OrderCreateLanguageCode | WhatsApp模板元素语言代码用于订单创建; 将languageCode放入OrderCreateLanguageCode中。 | 是 |
| OrderCreateComponents | WhatsApp模板元素组件用于订单的创建;{{firstName}}是**用户的名字** <br/>{{orderId}}是订单的ID{{status_url}}是**用户的名字。是用户的名字 {{orderId}}是shopify商店的**订单ID**<br/>{{order_status_url}}是shopify商店的订单状态URL `是shopify商店的订单状态网址 | 是 |
| OrderCreateParameters | WhatsApp模板元素params用于订单创建;{{firstName}}是**用户的名字**<br/>{{orderId}}是shopify商店的订单id{{order_status_url}}是shopify商店的订单状态url需要 OrderCreateComponents或OrderCreateParameters。 | 否 |
下面是订单确认部分的**配置图样本。
  "accountId": "{{>accountId}}",
  "namespace": "{{>namespace}}",
  "OrderCreateElementName": "{{>OrderCreateElementName}}",
  "OrderCreateLanguageCode": "{{>OrderCreateLanguageCode}}",
  "OrderCreateComponents": [
    {
      "type": "body",
      "parameters": [
        {
          "type": "text",
          "text": "{{firstName}}"
        },
        {
          "type": "text",
          "text": "{{orderId}}"
        }
      ]
    },
    {
      "type": "button",
      "sub_type": "url",
      "index": "0",
      "parameters": [
        {
          "type": "text",
          "text": "{{order_status_url}}"
        }
      ]
    }
  ],
保存配置图。
购买一个产品,看看你是否能产生[预期结果]。(/docs/en/standard-procedures-shopify-whatsapp-template#what-is-your-result).
订单更新
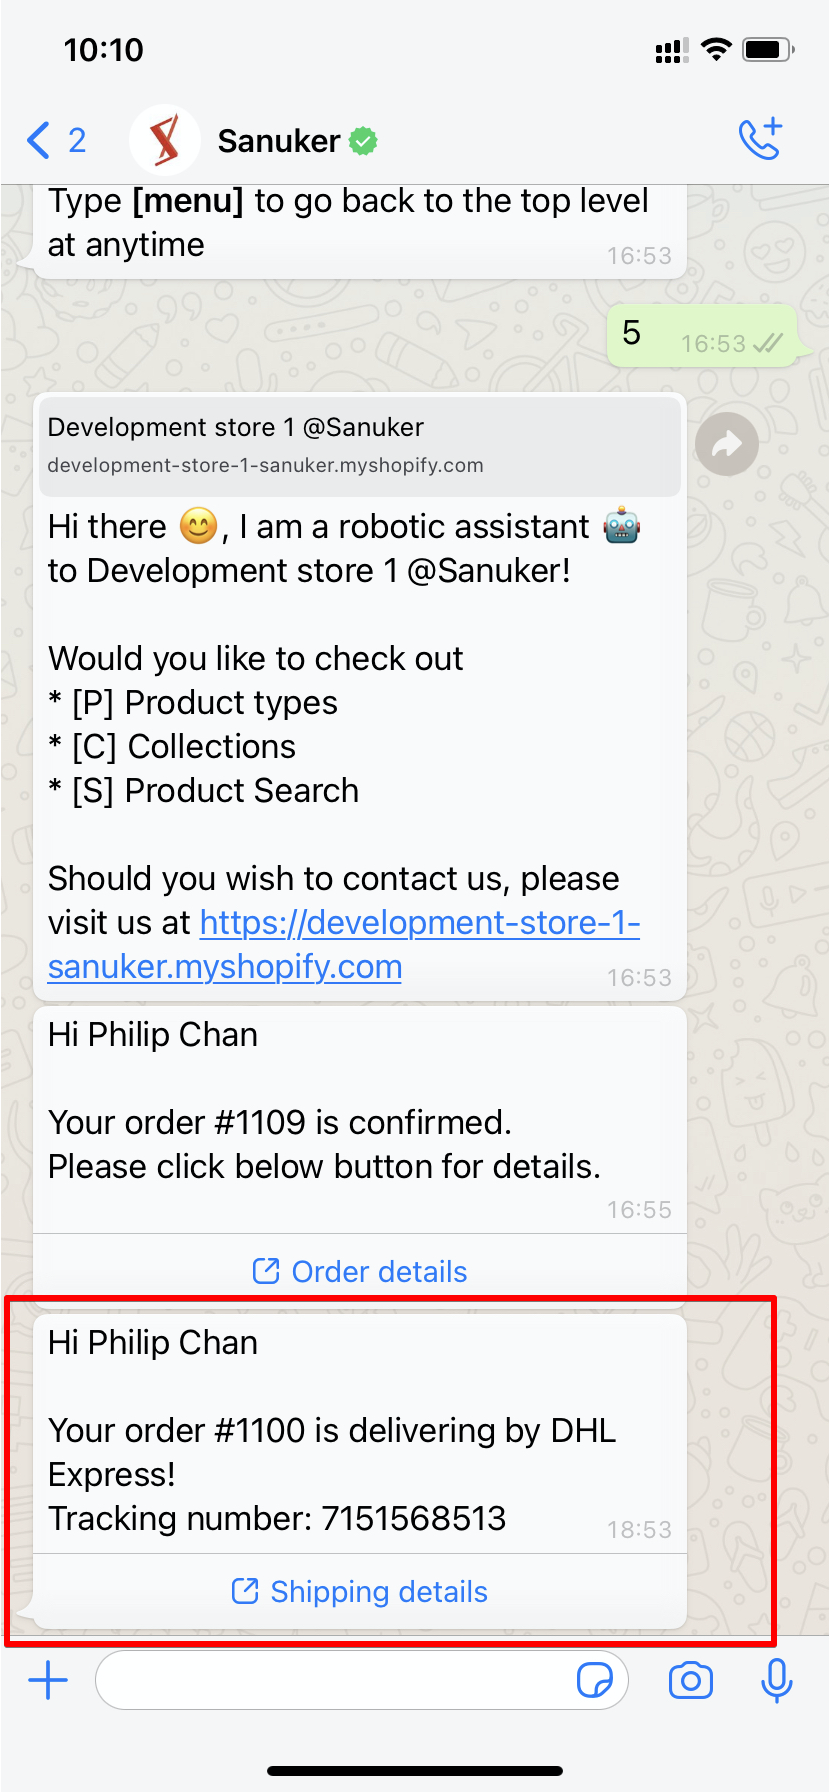
预期结果
动手试试看
提交WhatsApp模板信息 - 订单更新
- 重复订单确认中的步骤1-5并提交带有以下变量的订单更新WhatsApp Template Message。
| 变量 | 内容 | WhatsApp提交中的变量编号 |
|---|---|---|
| {{firstName}} | 来自Whatsapp资料的姓氏 | {{1}} |
| {{orderId}} | 来自shopify商店的订单ID(#xxxx)。 | {{2}} |
| {{tracking_company}} | 从shopify商店发货的公司 | {{3}} |
| {{tracking_number}} | 来自shopify商店的追踪号码 | {{4}} |
| {{tracking_url}} | 从shopify商店追踪网址 | {{1}} |
上表中的变量编号仅作参考。很明显,你可以根据你的实际信息重新安排变量编号的位置/顺序。
创建响应对象 - 订单更新
一旦模板信息被批准(绿色),你将需要复制信息的实际代码到你的配置图中。
要生成这个代码,请前往 "响应"生成器。您可以在随机树节点中访问它,或者前往顶部面板上 "资源"下的 "回复**"。
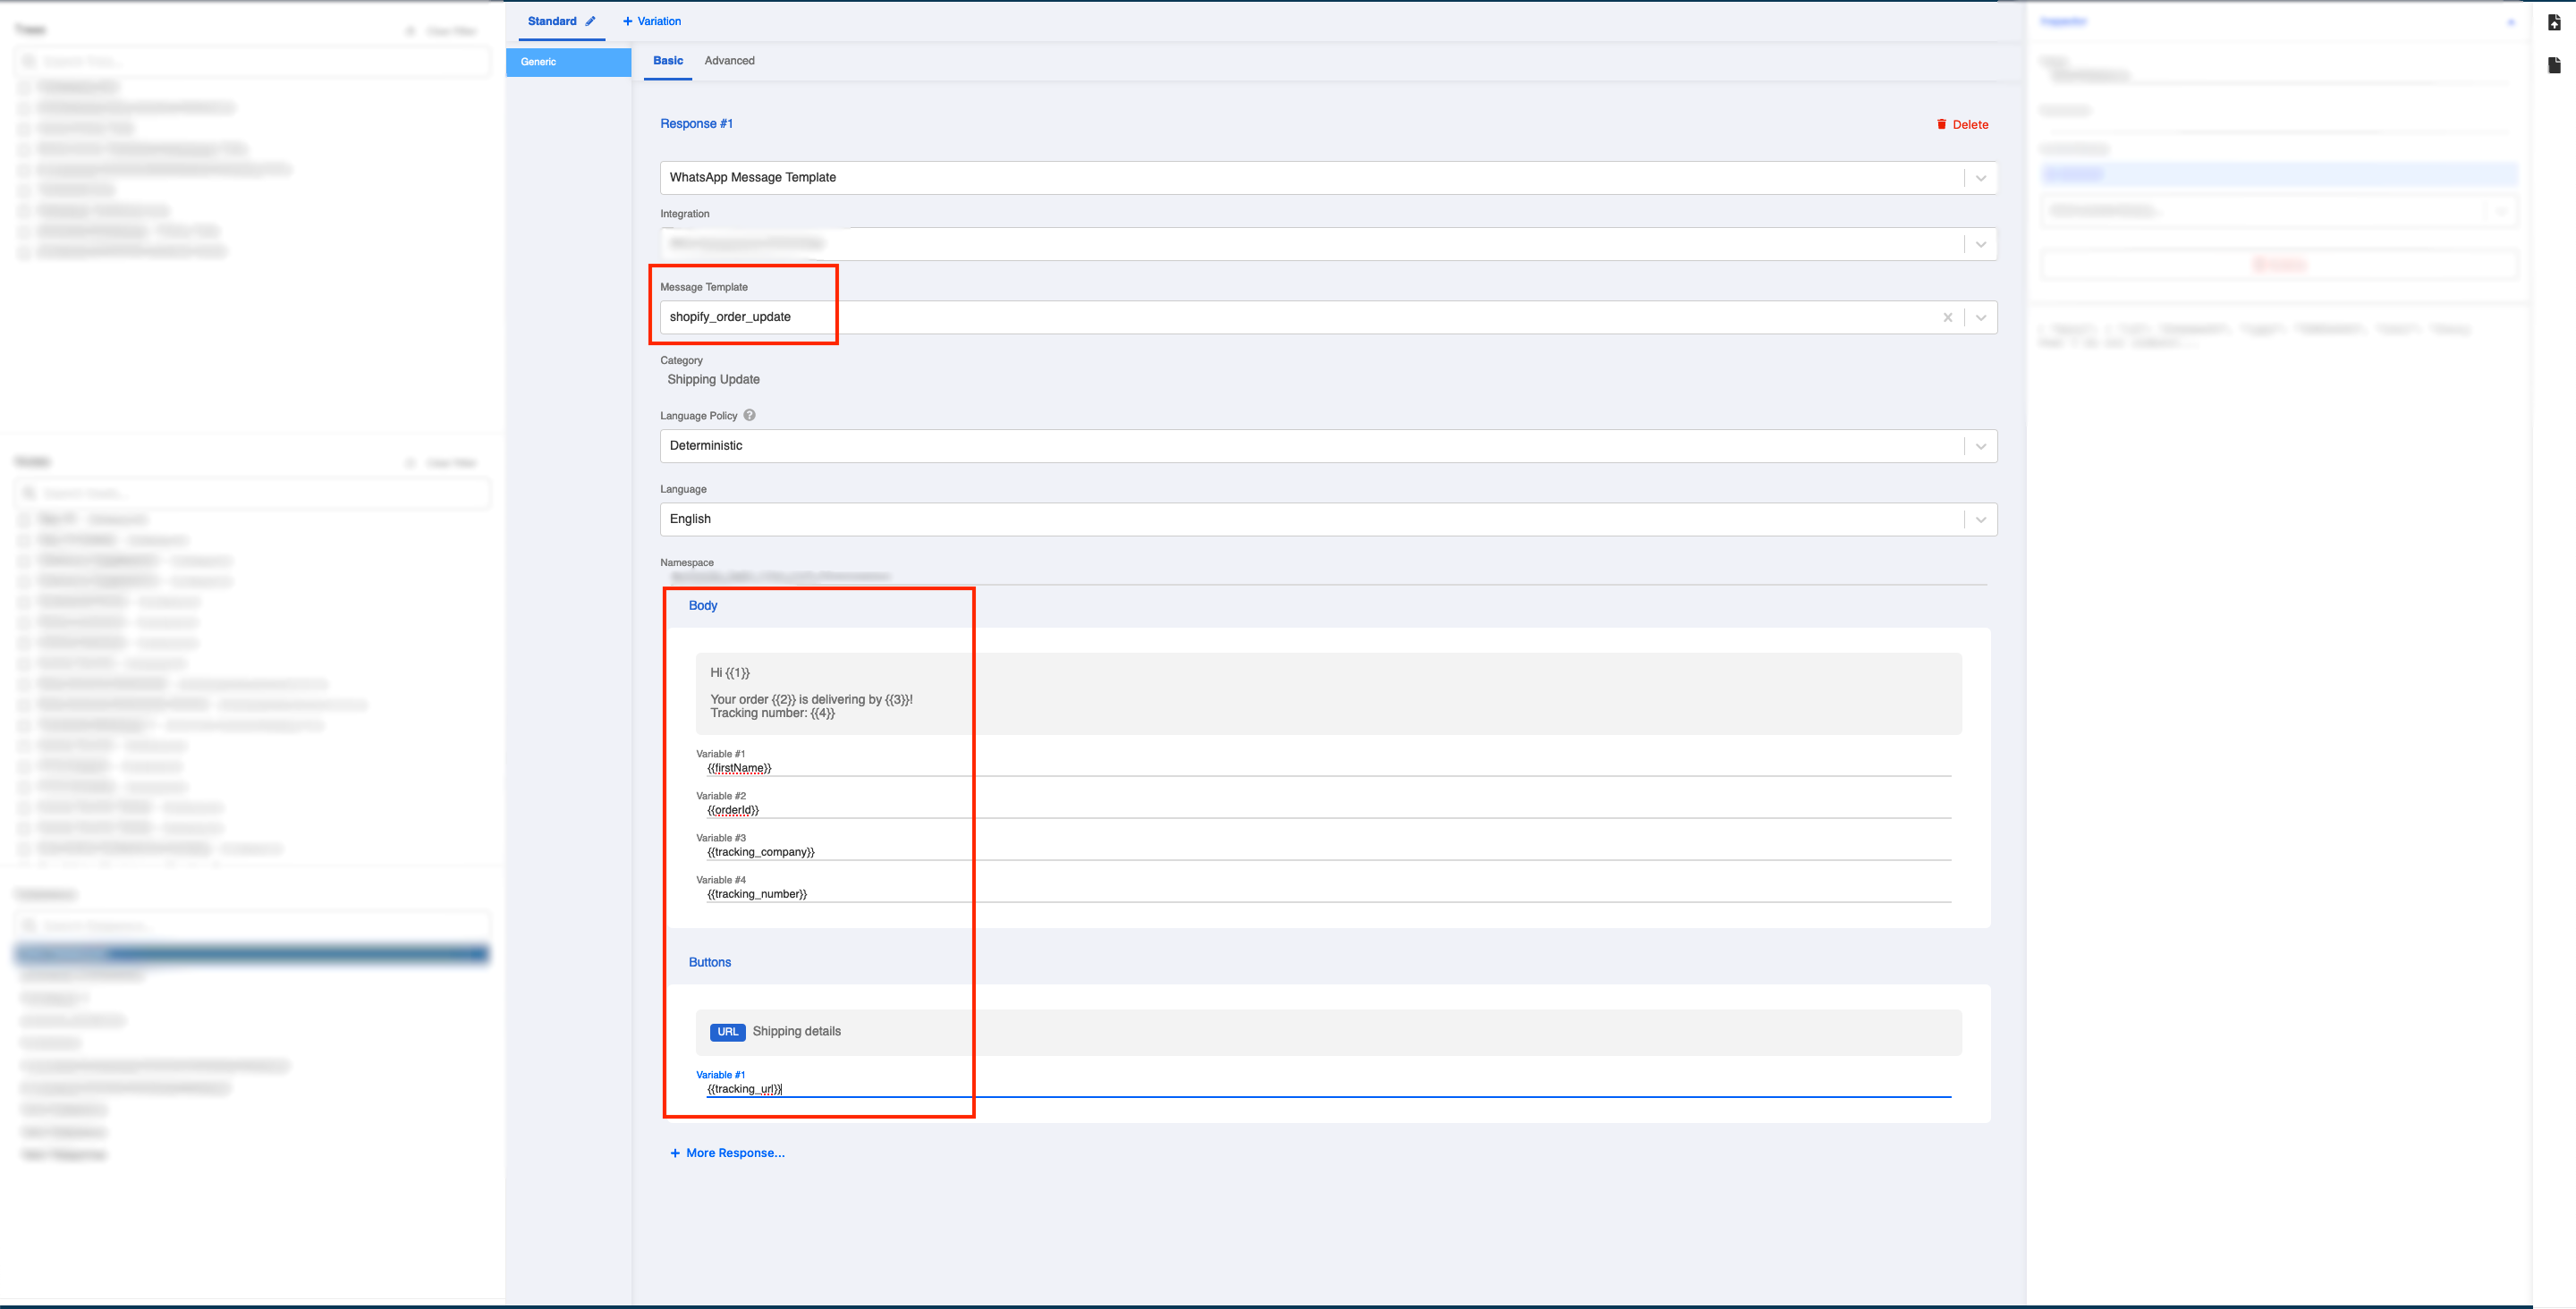
创建一个新的反应并填写以下信息。
- 选择您已经成功[提交订单更新]的 "信息模板"(https://doc.stella.sanuker.com/docs/en/standard-procedures-shopify-whatsapp#viewing-the-config-map)。 在 "正文"下,根据上面的变量编号表填写 "变量*"。
响应生成器中的变量将按照您在提交WhatsApp模板消息时标记变量编号的方式排序。请根据您的需要调整或重新安排内容。
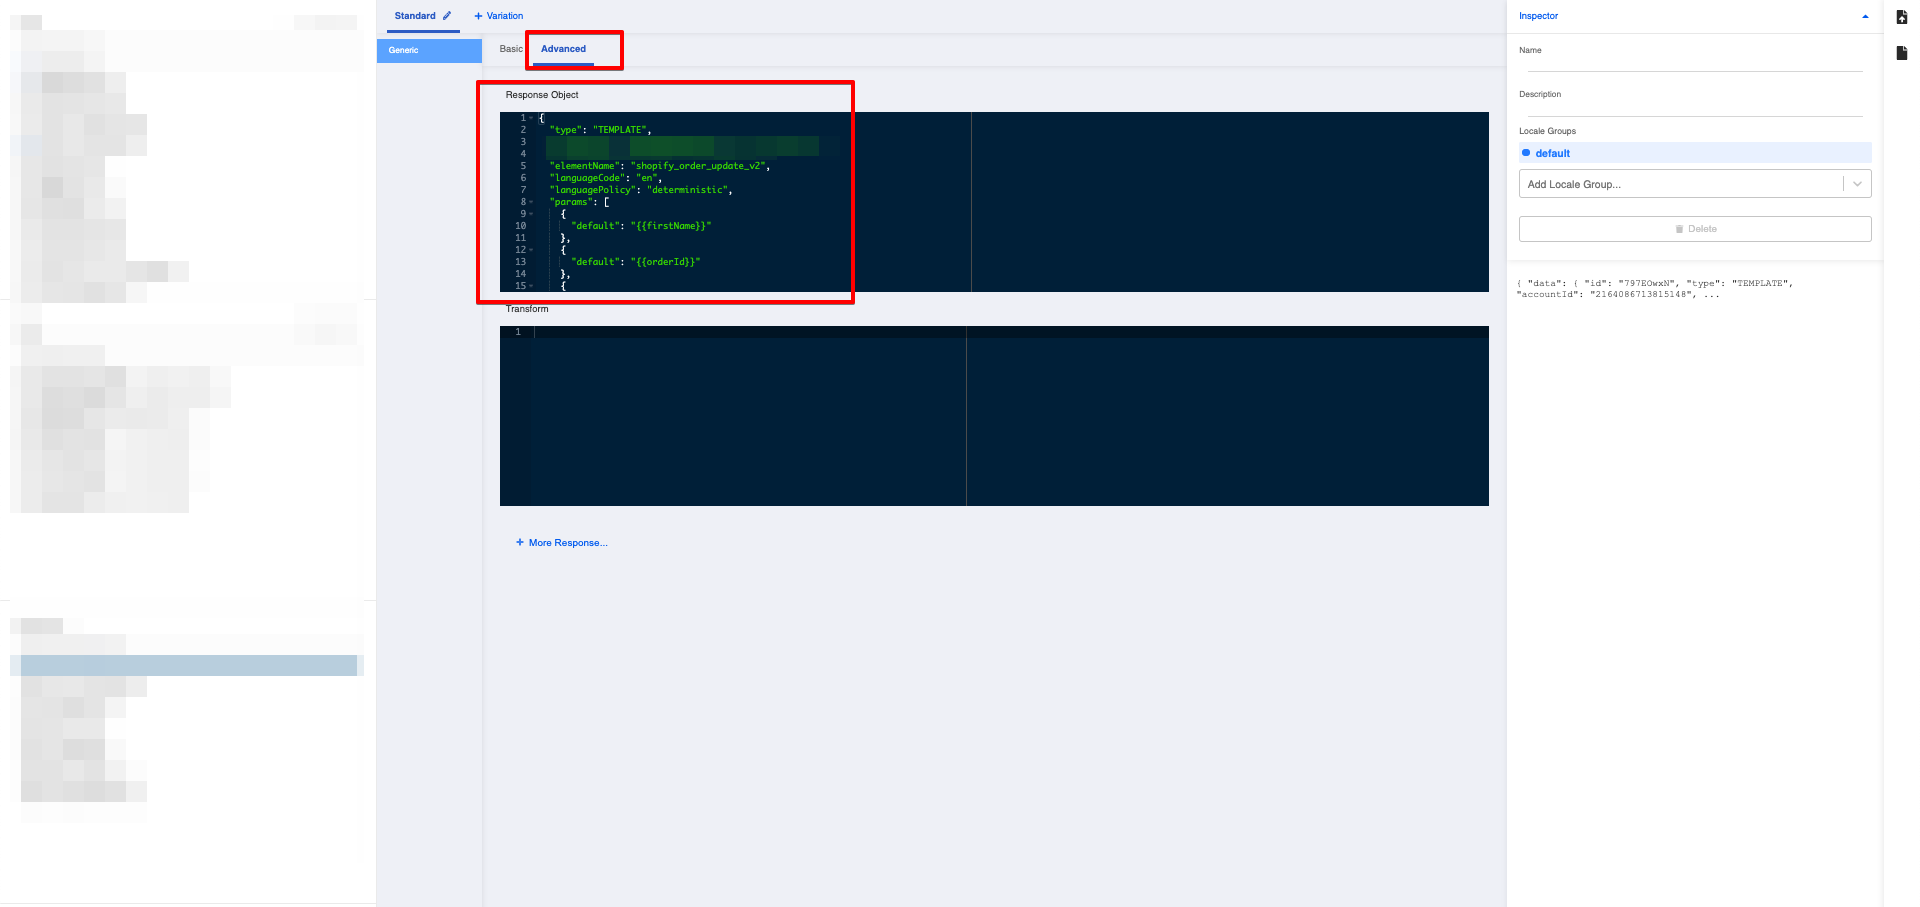
- 切换到 "高级"标签,寻找 "响应对象"下的代码块。
以下是订单确认的**响应对象的完整样本。
{
  "type": "TEMPLATE",
  "accountId": "2164086713815148",
  "namespace": "bc2ac4dd_4df4_1304_d8f6_3120038843bf",
  "elementName": "shopify_order_update_v2",
  "languageCode": "en",
  "languagePolicy": "deterministic",
  "components": [
    {
      "type": "body",
      "parameters": [
        {
          "type": "text",
          "text": "{{firstName}}"
        },
        {
          "type": "text",
          "text": "{{orderId}}"
        },
        {
          "type": "text",
          "text": "{{trackingCompany}}"
        },
        {
          "type": "text",
          "text": "{{trackingNumber}}"
        }
      ]
    },
    {
      "type": "button",
      "sub_type": "url",
      "index": "0",
      "parameters": [
        {
          "type": "text",
          "text": "{{trackingUrl}}"
        }
      ]
    }
  ]
}
- 从响应对象中复制以下**字段的内容。
accountIdnamespaceelementNamelanguageCodecomponentsarray (Applicable when the message has button). Copy starting from the[sign after"components":to the second last line of].paramsarray (Applicable when the message does not have button) Copy starting from the[sign after"params":to the second last line of].
下面是一个 "组件 "数组的示例代码。
点击查看
[
    {
      "type": "body",
      "parameters": [
        {
          "type": "text",
          "text": "{{firstName}}"
        },
        {
          "type": "text",
          "text": "{{orderId}}"
        },
        {
          "type": "text",
          "text": "{{trackingCompany}}"
        },
        {
          "type": "text",
          "text": "{{trackingNumber}}"
        }
      ]
    },
    {
      "type": "button",
      "sub_type": "url",
      "index": "0",
      "parameters": [
        {
          "type": "text",
          "text": "{{trackingUrl}}"
        }
      ]
    }
  ]
编辑配置图 - 订单更新
- 将复制的内容相应地粘贴到你在level 2.3中创建的代理树的**配置图中(记得将
组件数组放入OrderCreateComponents或将params数组放入OrderCreateParameters。)
| 字段 | 内容 | 必要? |
|---|---|---|
| accountId | WhatsApp模板 accountId | 是 |
| namespace | WhatsApp模板 namespace | 是 |
| optoutOrderUpdate | 选择的订单更新和订单创建关键词;这需要精确的关键词匹配 | 否 |
| optinOrderUpdate | Opt-in订单更新和订单创建关键词;这需要精确的关键词匹配; 默认情况下,订单创建和更新后将发送通知。 | 否 |
| OrderUpdateElementName | WhatsApp模板元素名称用于订单更新 | 是 |
| OrderUpdateLanguageCode | WhatsApp模板元素语言代码用于订单更新 | 是 |
| OrderUpdateComponents | 用于订单更新的WhatsApp模板元素组件;{{firstName}}是**用户的名字**<br/>{{trackingNumber}}是shopify商店的追踪号码{{trackingUrl}}是shopify商店的**追踪网址;<br/>需要OrderCreateComponents或OrderCreateParameters`。 | 是 |
| OrderUpdateParameters | WhatsApp模板元素参数用于订单更新;{{firstName}}是用户的**名字**<br/>{{trackingNumber}}是shopify商店的追踪号码`{{trackingUrl}}是shopify商店的**追踪URL | 是 |
下面是订单确认部分的**配置图样本。
  "accountId": "{{>accountId}}",
  "namespace": "{{>namespace}}",
  "optoutOrderUpdate": "unsubscribe",
  "optinOrderUpdate": "subscribe",
  "OrderUpdateElementName": "{{>OrderUpdateElementName}}",
  "OrderUpdateLanguageCode": "{{>OrderUpdateLanguageCode}}",
  "OrderUpdateComponents":
  [
    {
      "type": "body",
      "parameters": [
        {
          "type": "text",
          "text": "{{firstName}}"
        },
        {
          "type": "text",
          "text": "{{orderId}}"
        },
        {
          "type": "text",
          "text": "{{trackingCompany}}"
        },
        {
          "type": "text",
          "text": "{{trackingNumber}}"
        }
      ]
    },
    {
      "type": "button",
      "sub_type": "url",
      "index": "0",
      "parameters": [
        {
          "type": "text",
          "text": "{{trackingUrl}}"
        }
      ]
    }
  ],
保存配置图。
购买一个产品,看看你是否能产生[预期结果]。(/docs/en/standard-procedures-shopify-whatsapp-template#what-is-your-result-1).


