WhatsApp Customer Care Notification for Shopify
By this time, you should have completed level 2.3 and customized part of the WhatsApp chatbot flow for Shopify. It's time to set up the customer care notification messages (WhatsApp Template Message). WhatsApp is particularly useful if you want to notify any customers because the user's open rate to WhatsApp messages can be up to 90%.
In this section, you will learn how to set up order confirmation & order update messages.
Default WhatsApp Template Submission
After you have completed the WhatsApp Shopify integration in level 2.3. "Order Confirmation" and "Order Update" WhatsApp templates will be created automatically.

Custom WhatsApp Template Creation
Order Confirmation
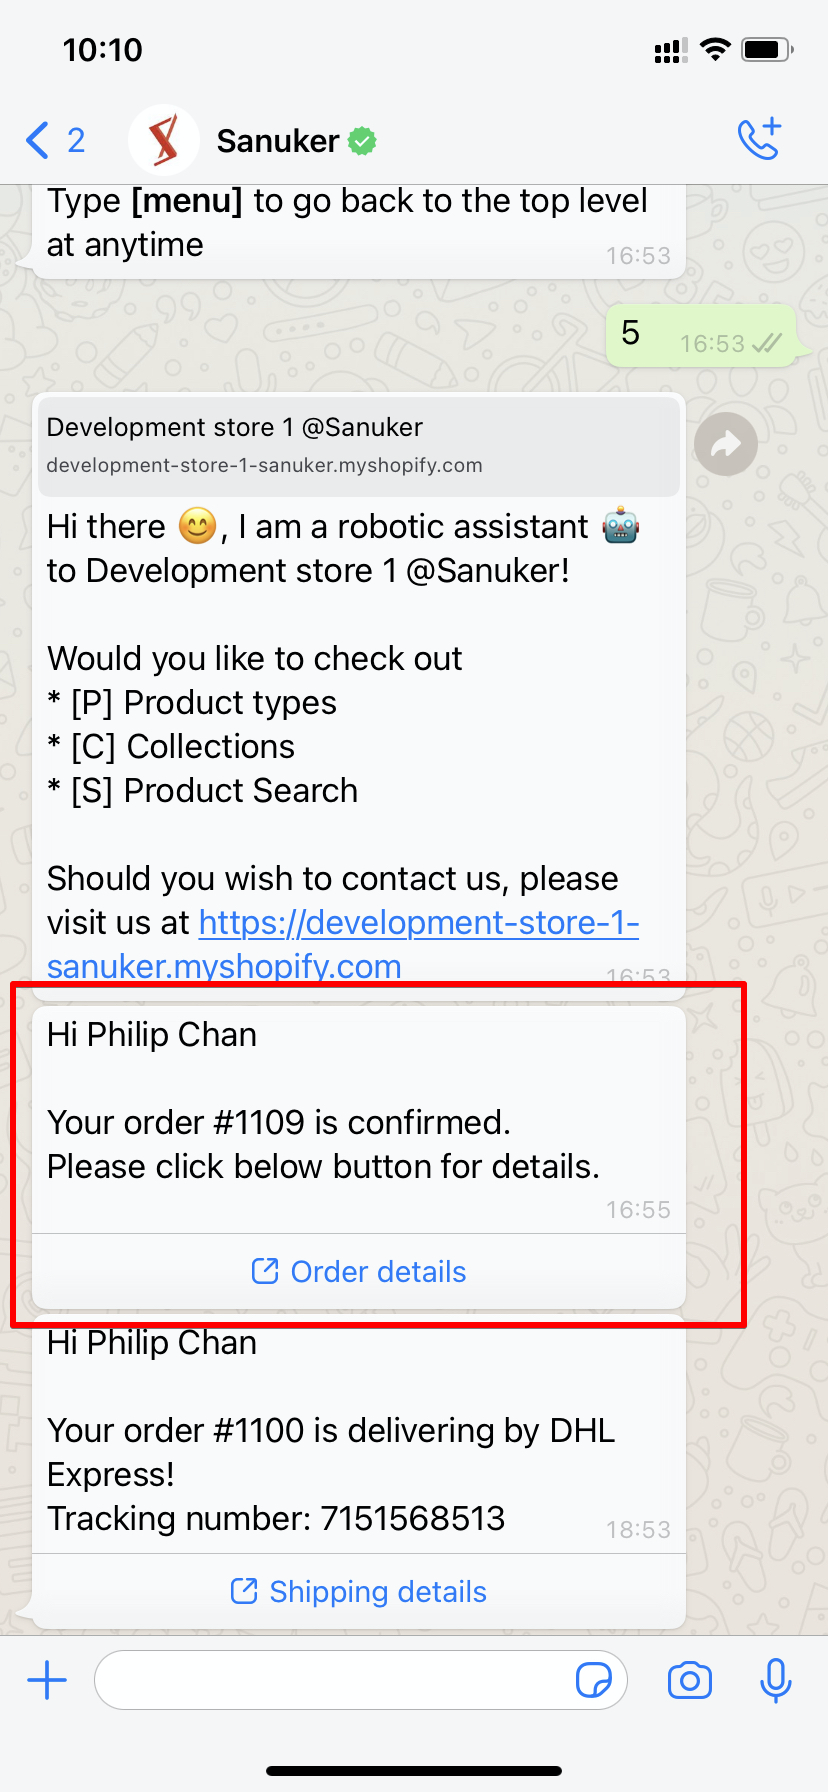
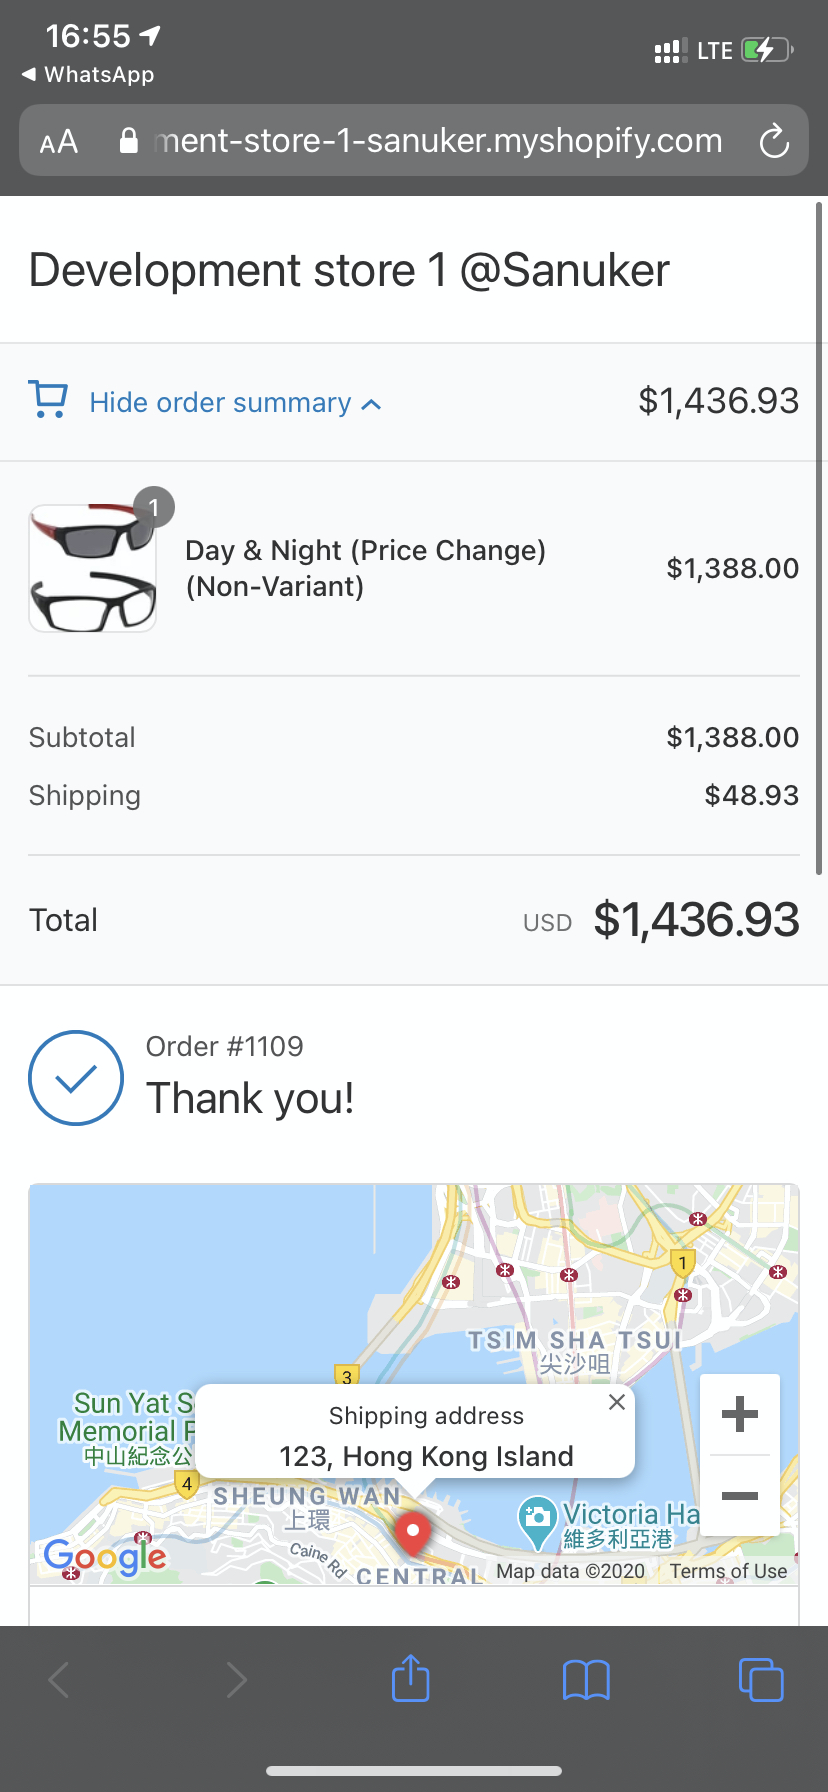
What is Your Result?
Getting Hands-on
Submitting a WhatsApp Template Message - Order Confirmation
You will first need to get the content of your WhatsApp Template Message approved by WhatsApp. For supported types of message contents, please refer to the policy here.
- Click "Message Template" in your WhatsApp channel.

You will see the overview of message templates under your WABA. Select the correct WABA integration.
Click "Create" to create a new message template. A new window will pop up.
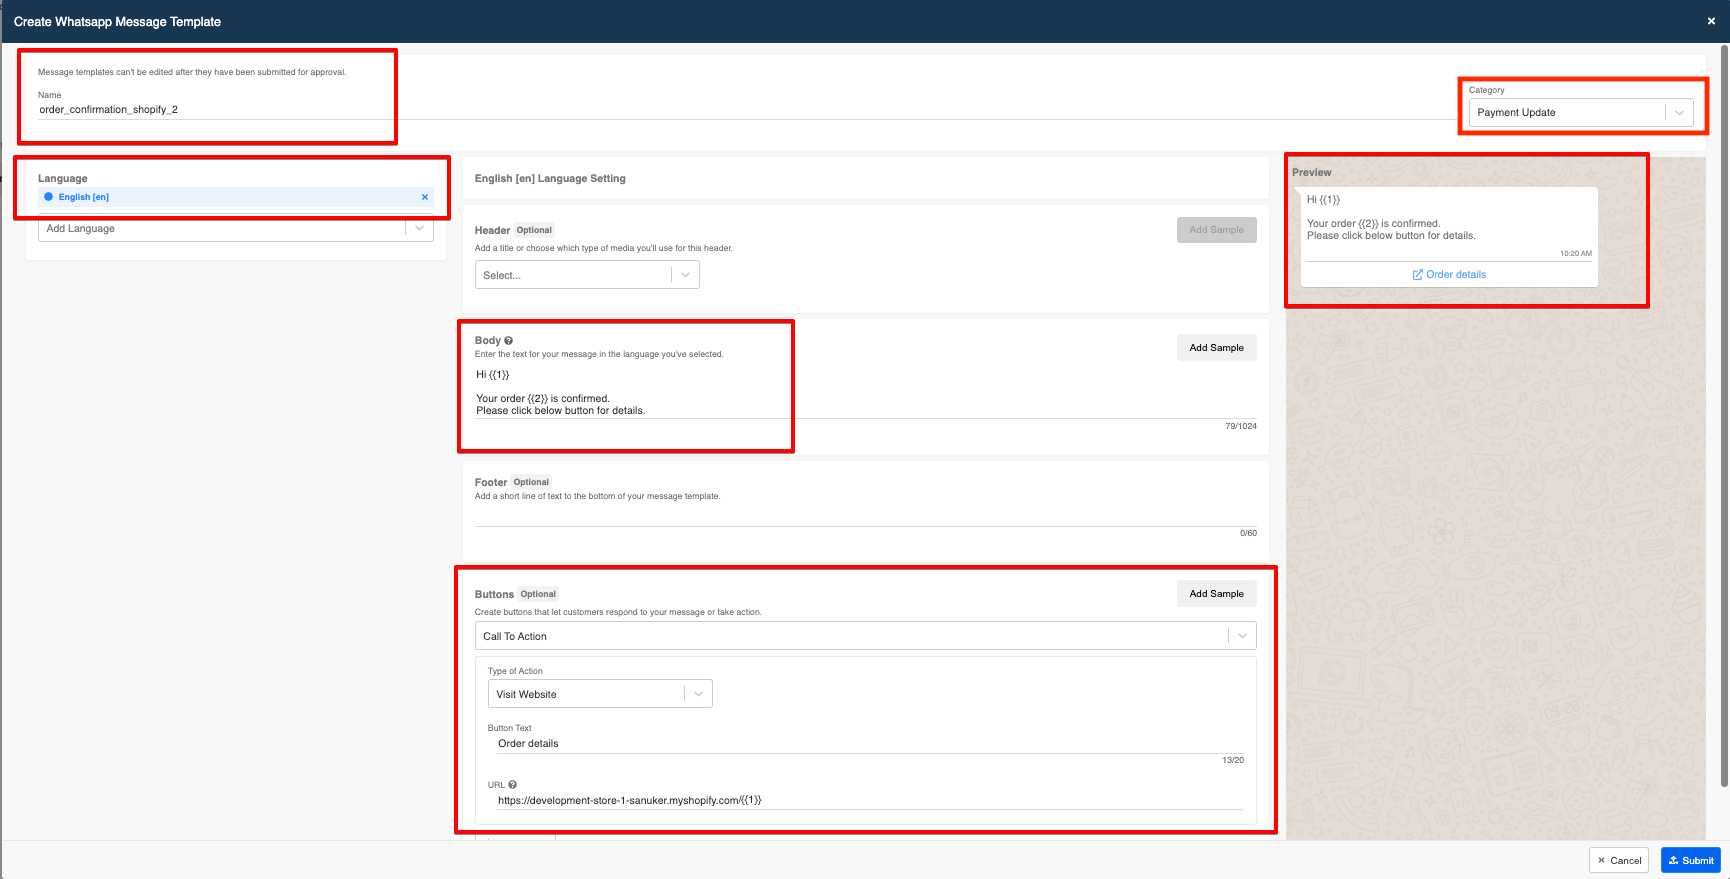
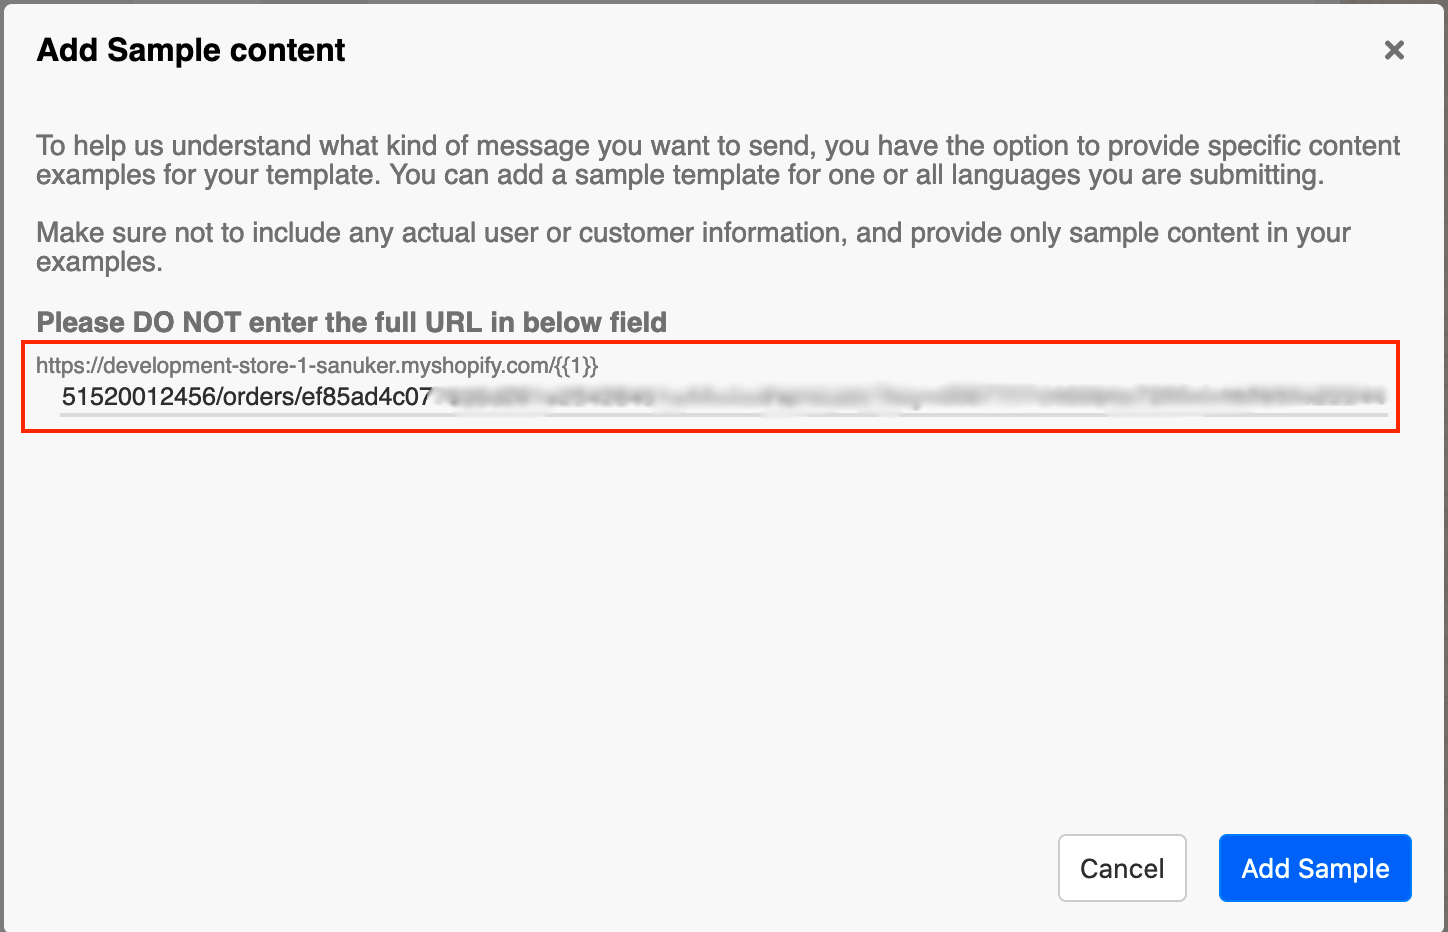
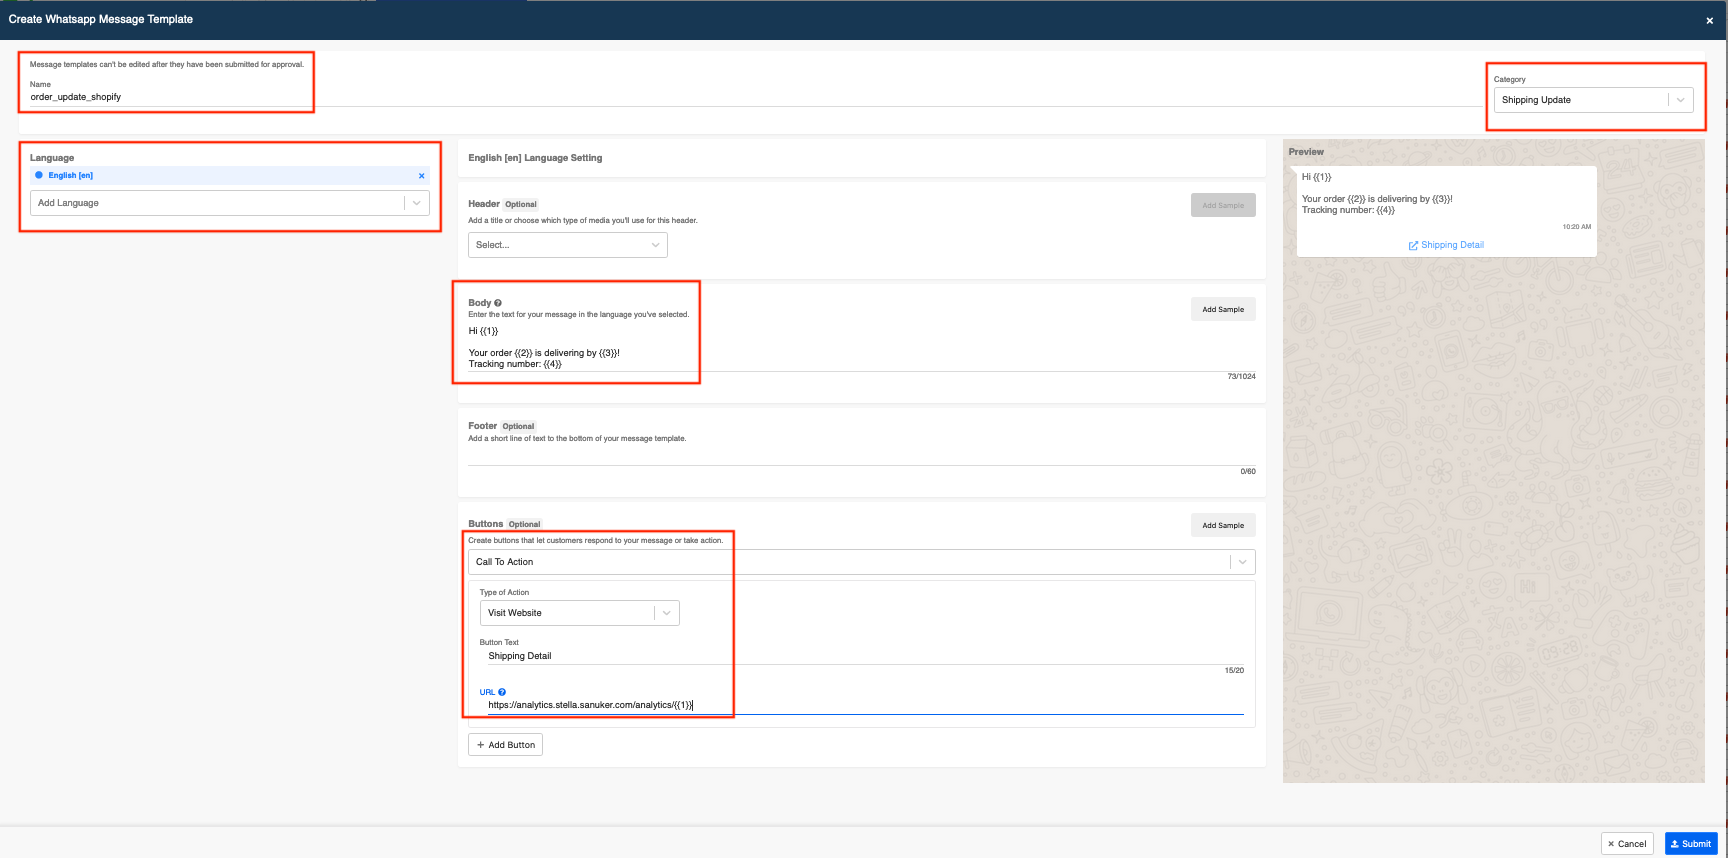
- Fill in the necessary details of this message template. You may check out the example template or the WhatsApp documentation. For any media or text with parameters like
{{1}}, you are required to add sample as part of the review process.
Here are the variables for order confirmation WhatsApp Template Message Submission:
| Variable | Content | Variable Number in WhatsApp Submission |
|---|---|---|
| {{firstName}} | firstName from WhatsApp Profile | {{1}} |
| {{orderId}} | Order ID (#xxxx) from Shopify store | {{2}} |
| {{order_status_url}} | Order status url from Shopify store (Store url removed for embedding into button) | {{1}} |
The variable number in the above table is for reference only. Obviously, you can re-arrange the position/order of the variable number according to your actual messages.

- Click "Submit" to submit your message template. Once submitted, a new row will be created.

Creating the Response Object - Order Confirmation
Once the template message is approved (Green), you will need to copy the actual code of the message to your config map.
To generate this code, please head to the "Response" Builder. You can either access it in a random tree node or head to "Responses" under "Resources" on the top panel.
Create a new response and fill in the following information:
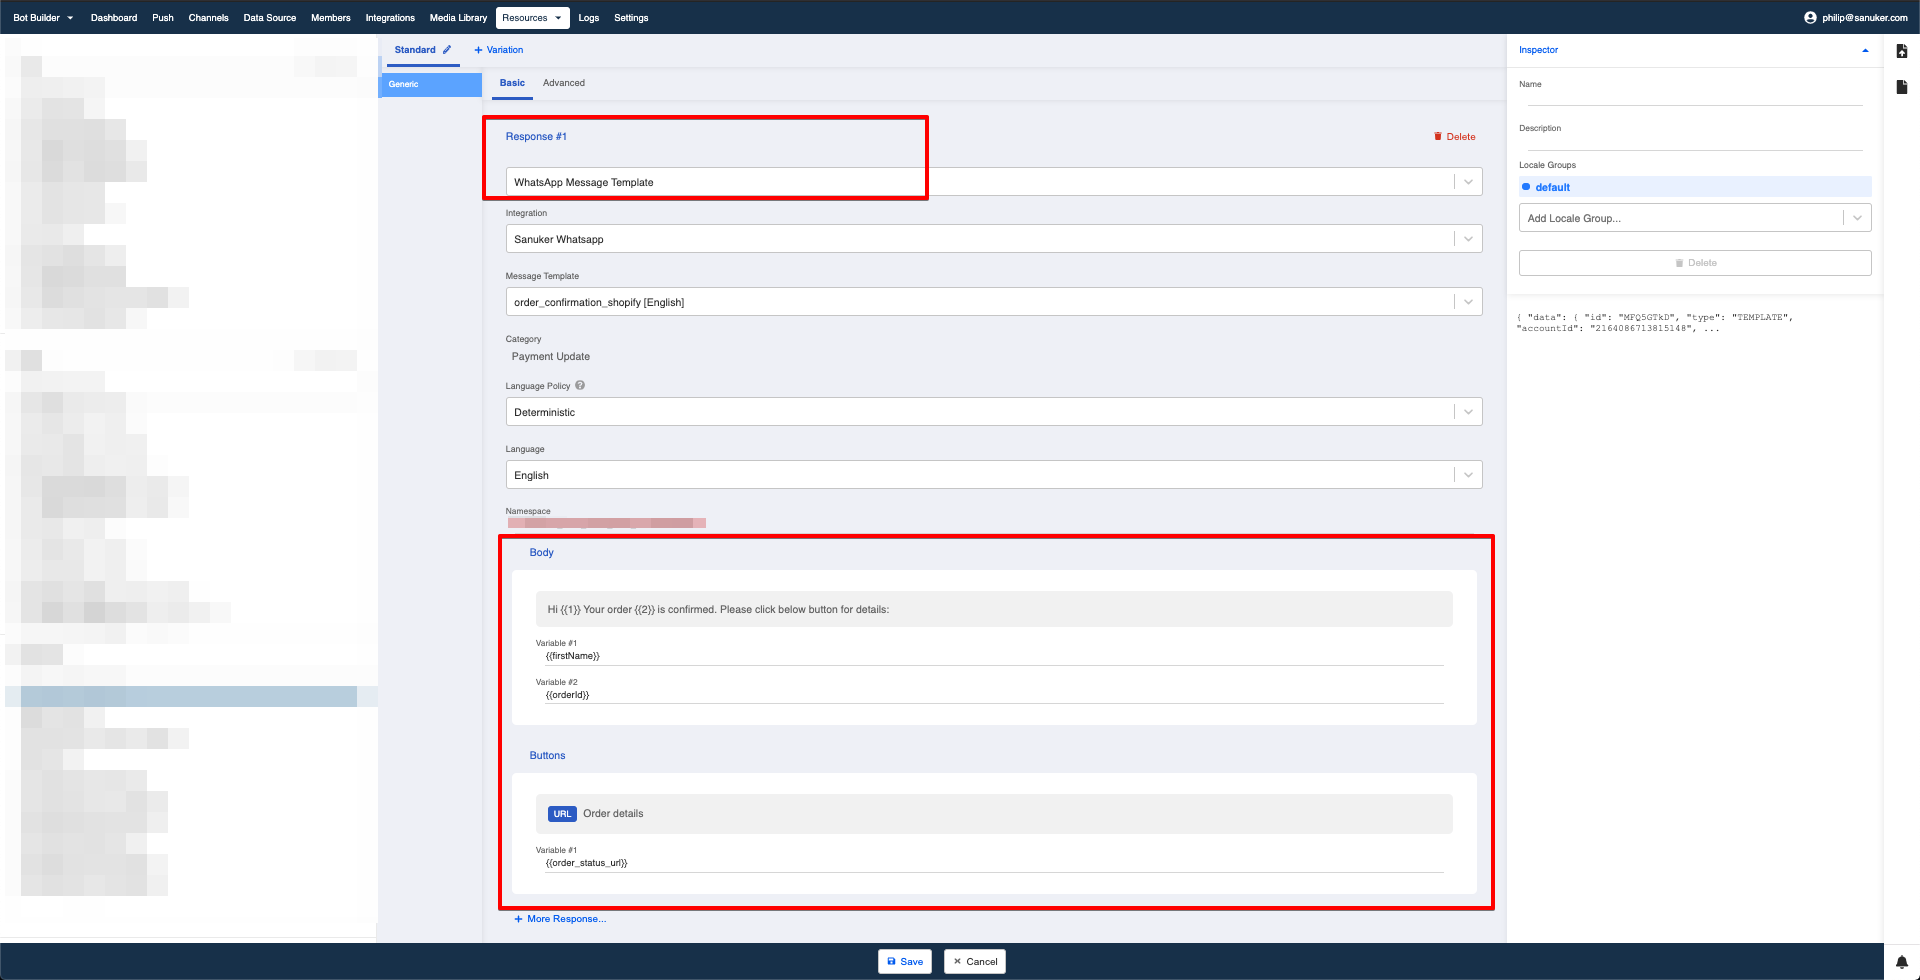
- Select the "Message Template" which you have successfully submitted.
- Under "Body", fill in "Variable #1" as
{{firstName}}and "Variable #2" as{{orderId}}. - Under "Button, fill in "Variable #1" as
{{order_status_url}}.
The variables in the response builder will order themselves in the same way you mark the variable numbers during the WhatsApp Template Message submission. Please adjust or re-arrange the content as you see fit.
- Switch to "Advanced" tab and look for the code block under "Response Object".
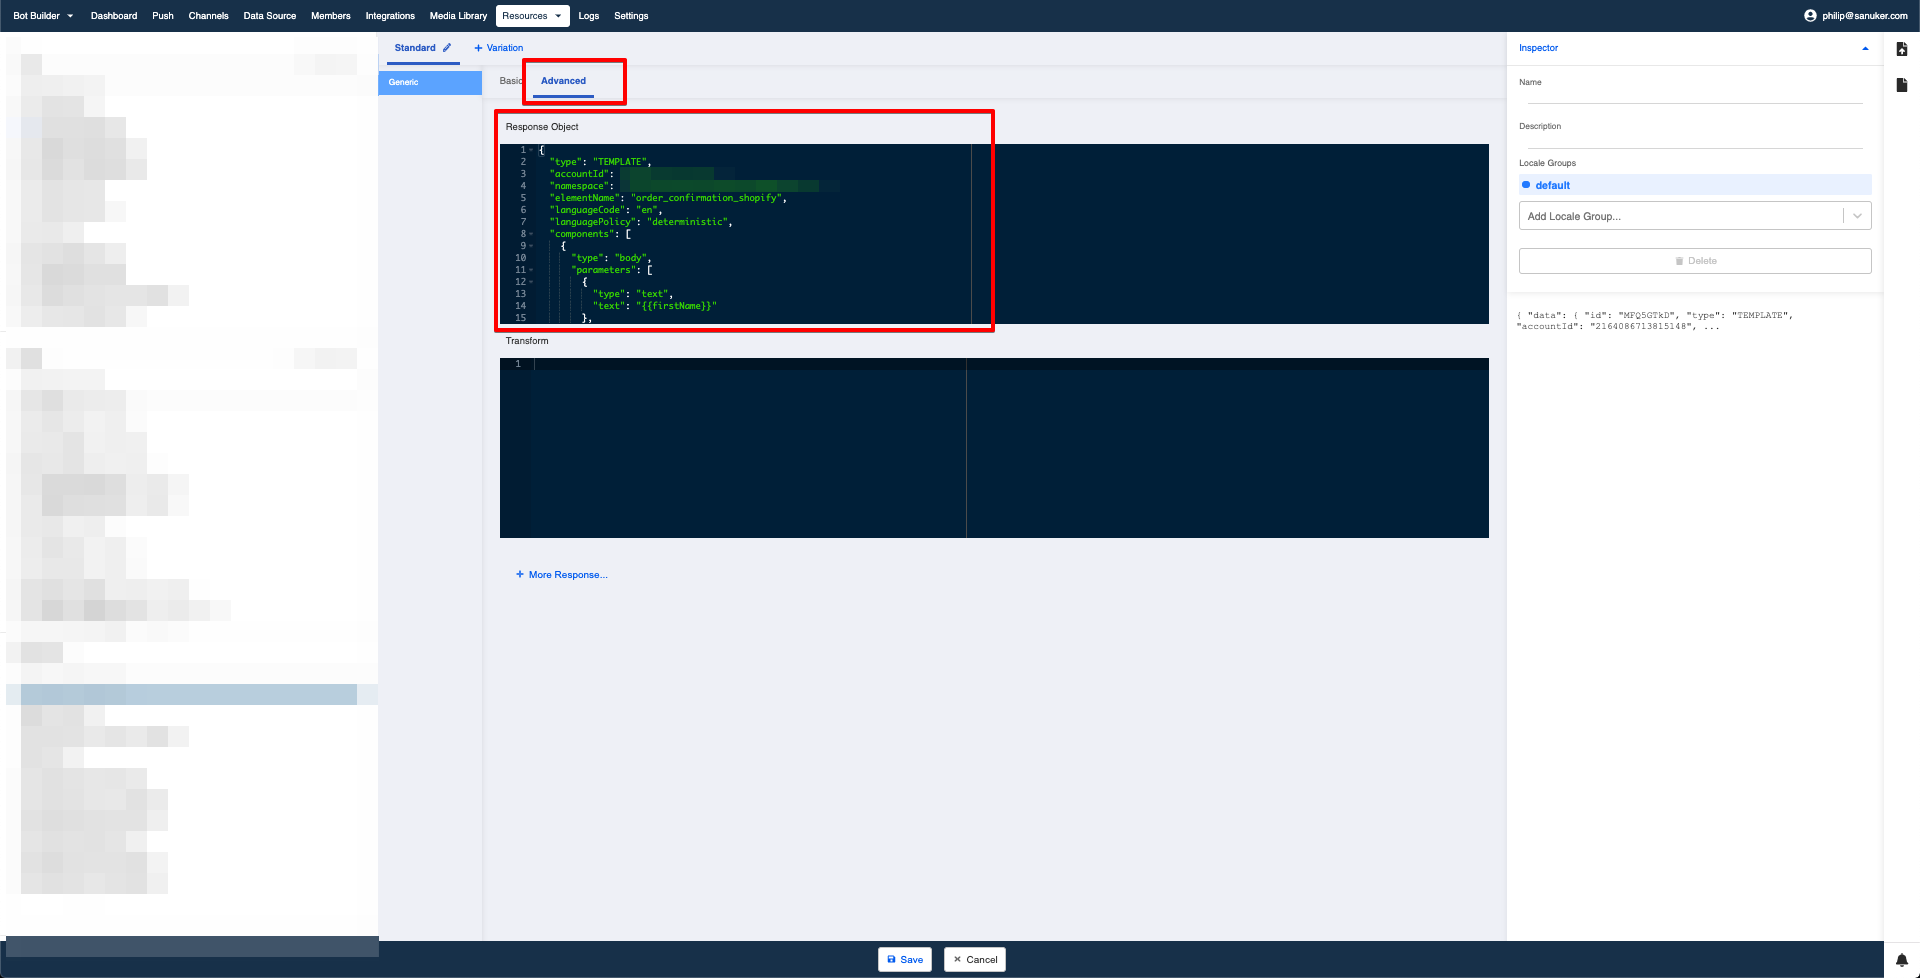
Below is the full sample response object for order confirmation:
{
  "type": "TEMPLATE",
  "accountId": "1234566778899",
  "namespace": "bc2ac4dd_123123123_123123_123",
  "elementName": "order_confirmation_shopify",
  "languageCode": "en",
  "languagePolicy": "deterministic",
  "components": [
    {
      "type": "body",
      "parameters": [
        {
          "type": "text",
          "text": "{{firstName}}"
        },
        {
          "type": "text",
          "text": "{{orderId}}"
        }
      ]
    },
    {
      "type": "button",
      "sub_type": "url",
      "index": "0",
      "parameters": [
        {
          "type": "text",
          "text": "{{order_status_url}}"
        }
      ]
    }
  ]
}
- Copy the content in the following fields from the response object:
accountIdnamespaceelementNamelanguageCodecomponentsarray (Applicable when the message has button). Copy starting from the[sign after"components":to the second last line of].paramsarray (Applicable when the message does not have button) Copy starting from the[sign after"params":to the second last line of].
Below is a sample code of components array :
Click to view
[
    {
      "type": "body",
      "parameters": [
        {
          "type": "text",
          "text": "{{firstName}}"
        },
        {
          "type": "text",
          "text": "{{orderId}}"
        }
      ]
    },
    {
      "type": "button",
      "sub_type": "url",
      "index": "0",
      "parameters": [
        {
          "type": "text",
          "text": "{{order_status_url}}"
        }
      ]
    }
  ]
Editing the Config Map - Order Confirmation
- Paste the copied content into the Config Map of the Proxy Tree you have created in level 2.3 accordingly (Remember to put
componentsarray intoOrderCreateComponentsor putparamsarray intoOrderCreateParameters.).
| Field | Content | Required if in use? |
|---|---|---|
| accountId | WhatsApp template accountId | Y |
| namespace | WhatsApp template namespace | Y |
| OrderCreateElementName | WhatsApp template element name for order creation; Put elementName into OrderCreateElementName | Y |
| OrderCreateLanguageCode | WhatsApp template element language code for order creation; Put languageCode into OrderCreateLanguageCode | Y |
| OrderCreateComponents | WhatsApp template element components for order creation;{{firstName}}is user firstname {{orderId}} is order id from shopify store{{order_status_url}}is order status url from shopify store | Y |
| OrderCreateParameters | WhatsApp template element params for order creation;{{firstName}} is user firstname{{orderId}} is order id from shopify store{{order_status_url}} is order status url from shopify storeEither OrderCreateComponents or OrderCreateParameters is required | N |
Below is the sample config map for the order confirmation section:
  "accountId": "{{>accountId}}",
  "namespace": "{{>namespace}}",
  "OrderCreateElementName": "{{>OrderCreateElementName}}",
  "OrderCreateLanguageCode": "{{>OrderCreateLanguageCode}}",
  "OrderCreateComponents": [
    {
      "type": "body",
      "parameters": [
        {
          "type": "text",
          "text": "{{firstName}}"
        },
        {
          "type": "text",
          "text": "{{orderId}}"
        }
      ]
    },
    {
      "type": "button",
      "sub_type": "url",
      "index": "0",
      "parameters": [
        {
          "type": "text",
          "text": "{{order_status_url}}"
        }
      ]
    }
  ],
Save the config map.
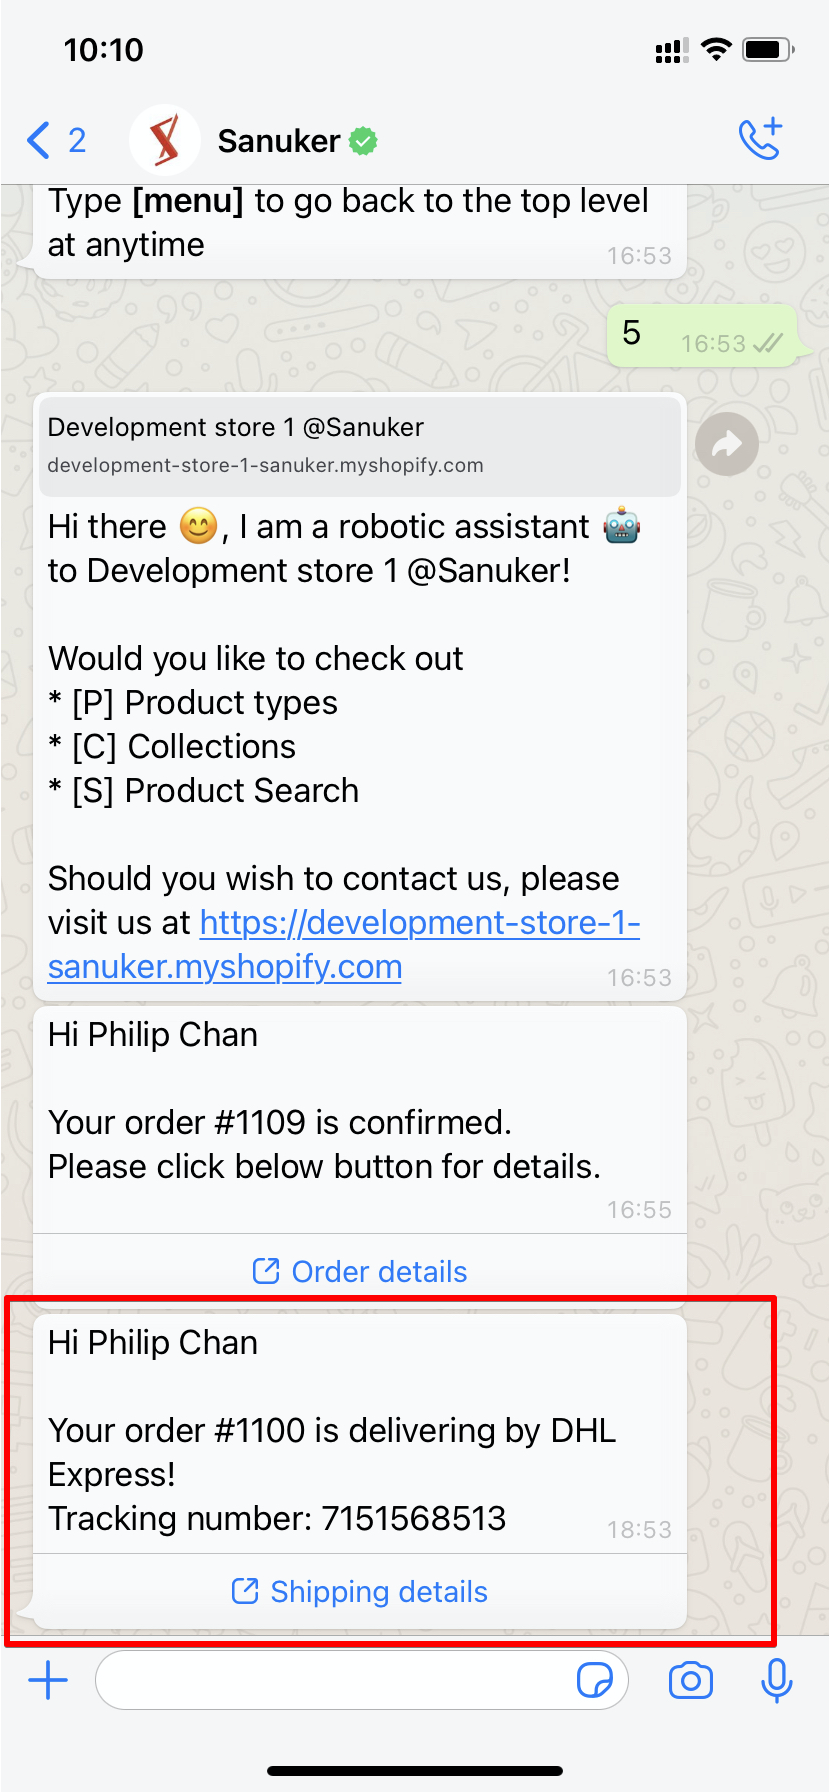
Purchase a product and see if you can produce the expected outcome.
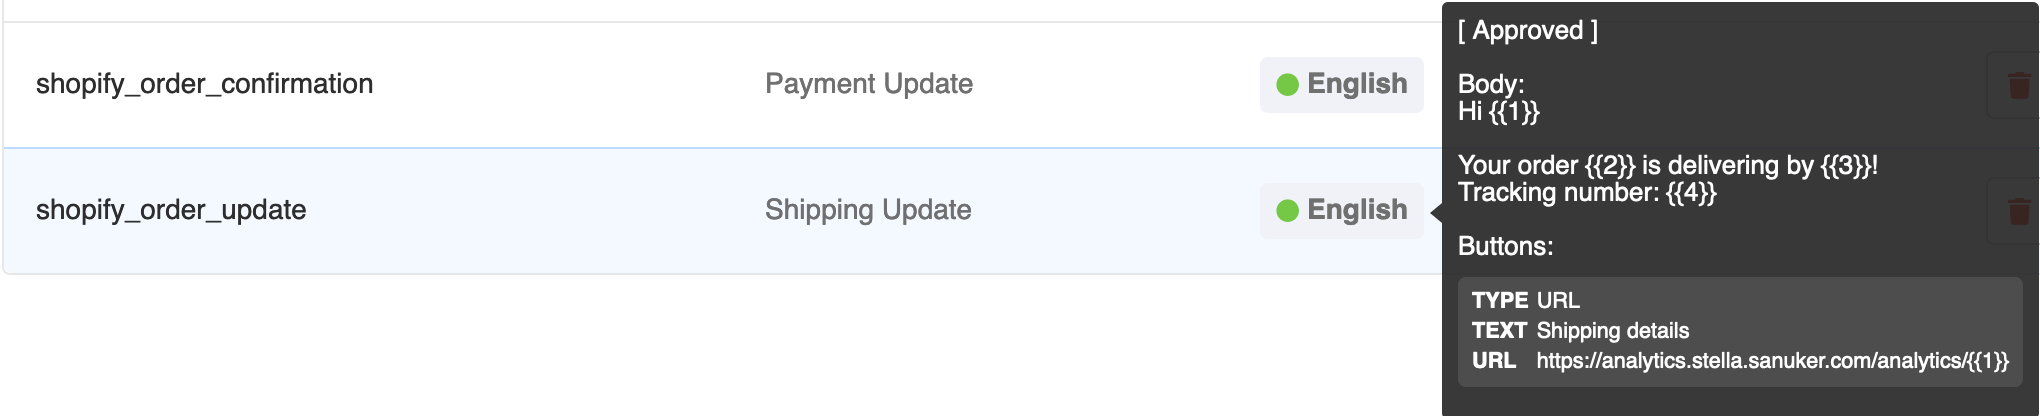
Order Update
What is Your Result?
Getting Hands-on
Submitting a WhatsApp Template Message - Order Update
- Repeat step 1 - 5 in order confirmation and submit the order update WhatsApp Template Message with the following variables:


| Variable | Content | Variable Number in WhatsApp Submission |
|---|---|---|
| {{firstName}} | firstName from Whatsapp Profile | {{1}} |
| {{orderId}} | Order ID (#xxxx) from shopify store | {{2}} |
| {{tracking_company}} | Shipping company from shopify store | {{3}} |
| {{tracking_number}} | Tracking Number from shopify store | {{4}} |
| {{tracking_url}} | Tracking url from shopify store | {{1}} |
The variable number in the above table is for reference only. Obviously, you can re-arrange the position/order of the variable number according to your actual messages.
Creating the Response Object - Order Update
Once the template message is approved (Green), you will need to copy the actual code of the message to your config map.
To generate this code, please head to the "Response" Builder. You can either access it in a random tree node or head to "Responses" under "Resources" on the top panel.
Create a new response and fill in the following information:

- Select the "Message Template" which you have successfully submitted for order update.
- Under "Body", fill in "Variables" according to the variable number table above.
The variables in the response builder will order themselves in the same way you mark the variable numbers during the WhatsApp Template Message submission. Please adjust or re-arrange the content as you see fit.
- Switch to "Advanced" tab and look for the code block under "Response Object".
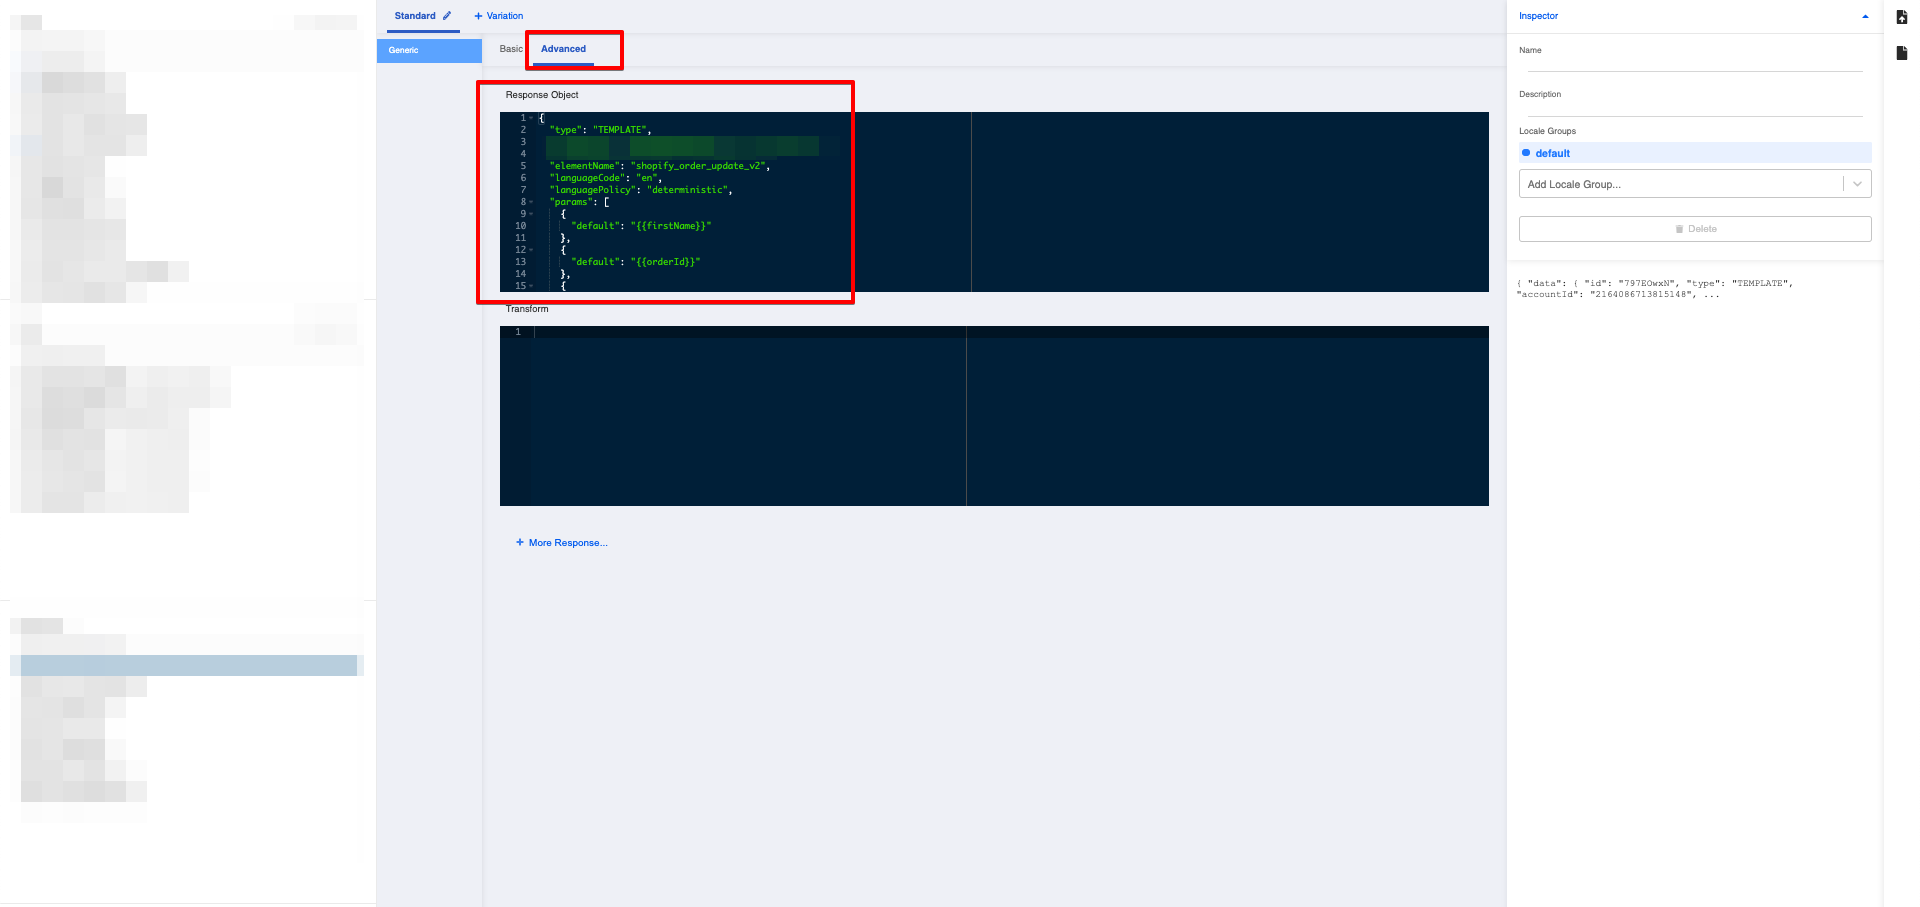
Below is the full sample response object for order confirmation:
{
  "type": "TEMPLATE",
  "accountId": "2164086713815148",
  "namespace": "bc2ac4dd_4df4_1304_d8f6_3120038843bf",
  "elementName": "shopify_order_update_v2",
  "languageCode": "en",
  "languagePolicy": "deterministic",
  "components": [
    {
      "type": "body",
      "parameters": [
        {
          "type": "text",
          "text": "{{firstName}}"
        },
        {
          "type": "text",
          "text": "{{orderId}}"
        },
        {
          "type": "text",
          "text": "{{trackingCompany}}"
        },
        {
          "type": "text",
          "text": "{{trackingNumber}}"
        }
      ]
    },
    {
      "type": "button",
      "sub_type": "url",
      "index": "0",
      "parameters": [
        {
          "type": "text",
          "text": "{{trackingUrl}}"
        }
      ]
    }
  ]
}
- Copy the content in the following fields from the response object:
accountIdnamespaceelementNamelanguageCodecomponentsarray (Applicable when the message has button). Copy starting from the[sign after"components":to the second last line of].paramsarray (Applicable when the message does not have button) Copy starting from the[sign after"params":to the second last line of].
Below is a sample code of components array :
Click to view
[
    {
      "type": "body",
      "parameters": [
        {
          "type": "text",
          "text": "{{firstName}}"
        },
        {
          "type": "text",
          "text": "{{orderId}}"
        },
        {
          "type": "text",
          "text": "{{trackingCompany}}"
        },
        {
          "type": "text",
          "text": "{{trackingNumber}}"
        }
      ]
    },
    {
      "type": "button",
      "sub_type": "url",
      "index": "0",
      "parameters": [
        {
          "type": "text",
          "text": "{{trackingUrl}}"
        }
      ]
    }
  ]
Editing the Config Map - Order Update
- Paste the copied content into the Config Map of the Proxy Tree you have created in level 2.3 accordingly (Remember to put
componentsarray intoOrderCreateComponentsor putparamsarray intoOrderCreateParameters.).
| Field | Content | Required if in use? |
|---|---|---|
| accountId | WhatsApp template accountId | Y |
| namespace | WhatsApp template namespace | Y |
| optoutOrderUpdate | Opt-out order update & order creation keyword; This requires exact keyword match | N |
| optinOrderUpdate | Opt-in order update & order creation keyword; This require exact keyword match; Notification will be sent after order creation & update by default | N |
| OrderUpdateElementName | WhatsApp template element name for order update | Y |
| OrderUpdateLanguageCode | WhatsApp template element language code for order update | Y |
| OrderUpdateComponents | WhatsApp template element components for order update;{{firstName}} is user firstname{{trackingNumber}} is tracking number from shopify store{{trackingUrl}} is tracking url from shopify store; Either OrderCreateComponents or OrderCreateParameters is required | Y |
| OrderUpdateParameters | WhatsApp template element parameters for order update;{{firstName}} is user firstname{{trackingNumber}} is tracking number from shopify store{{trackingUrl}} is tracking url from shopify store | Y |
Below is the sample config map for the order confirmation section:
  "accountId": "{{>accountId}}",
  "namespace": "{{>namespace}}",
  "optoutOrderUpdate": "unsubscribe",
  "optinOrderUpdate": "subscribe",
  "OrderUpdateElementName": "{{>OrderUpdateElementName}}",
  "OrderUpdateLanguageCode": "{{>OrderUpdateLanguageCode}}",
  "OrderUpdateComponents":
  [
    {
      "type": "body",
      "parameters": [
        {
          "type": "text",
          "text": "{{firstName}}"
        },
        {
          "type": "text",
          "text": "{{orderId}}"
        },
        {
          "type": "text",
          "text": "{{trackingCompany}}"
        },
        {
          "type": "text",
          "text": "{{trackingNumber}}"
        }
      ]
    },
    {
      "type": "button",
      "sub_type": "url",
      "index": "0",
      "parameters": [
        {
          "type": "text",
          "text": "{{trackingUrl}}"
        }
      ]
    }
  ],
Save the config map.
Purchase a product and see if you can produce the expected outcome.