Apply Payload Value to Chatbot
Payload value lets you assign a unique value to each button. This is particularly useful if you want to know or record which button the user has selected in a chatbot flow.
By saving the payload value, you can also apply it to the rest of the chatbot flow. The following objects will be used in the application of payload value:
- this.member.botMeta.tempData
- this.messageEvent.data.payload.payload
- this.messageEvent.data.payload.value
For more object references, please refer to the Reference documentation.
Expected Outcome
The following chatbot conversation is just an example for illustrating the application of payload value. Please feel free to utilize the objects/code as you see fit.
- User answers a survey question (Score is 5).
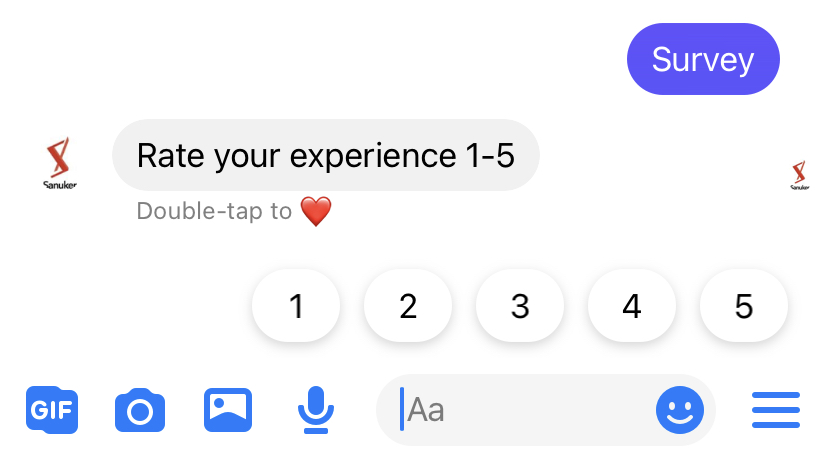

Payload Value Sample Flow
- The user answer is reused in the response following after member tag & analytics.

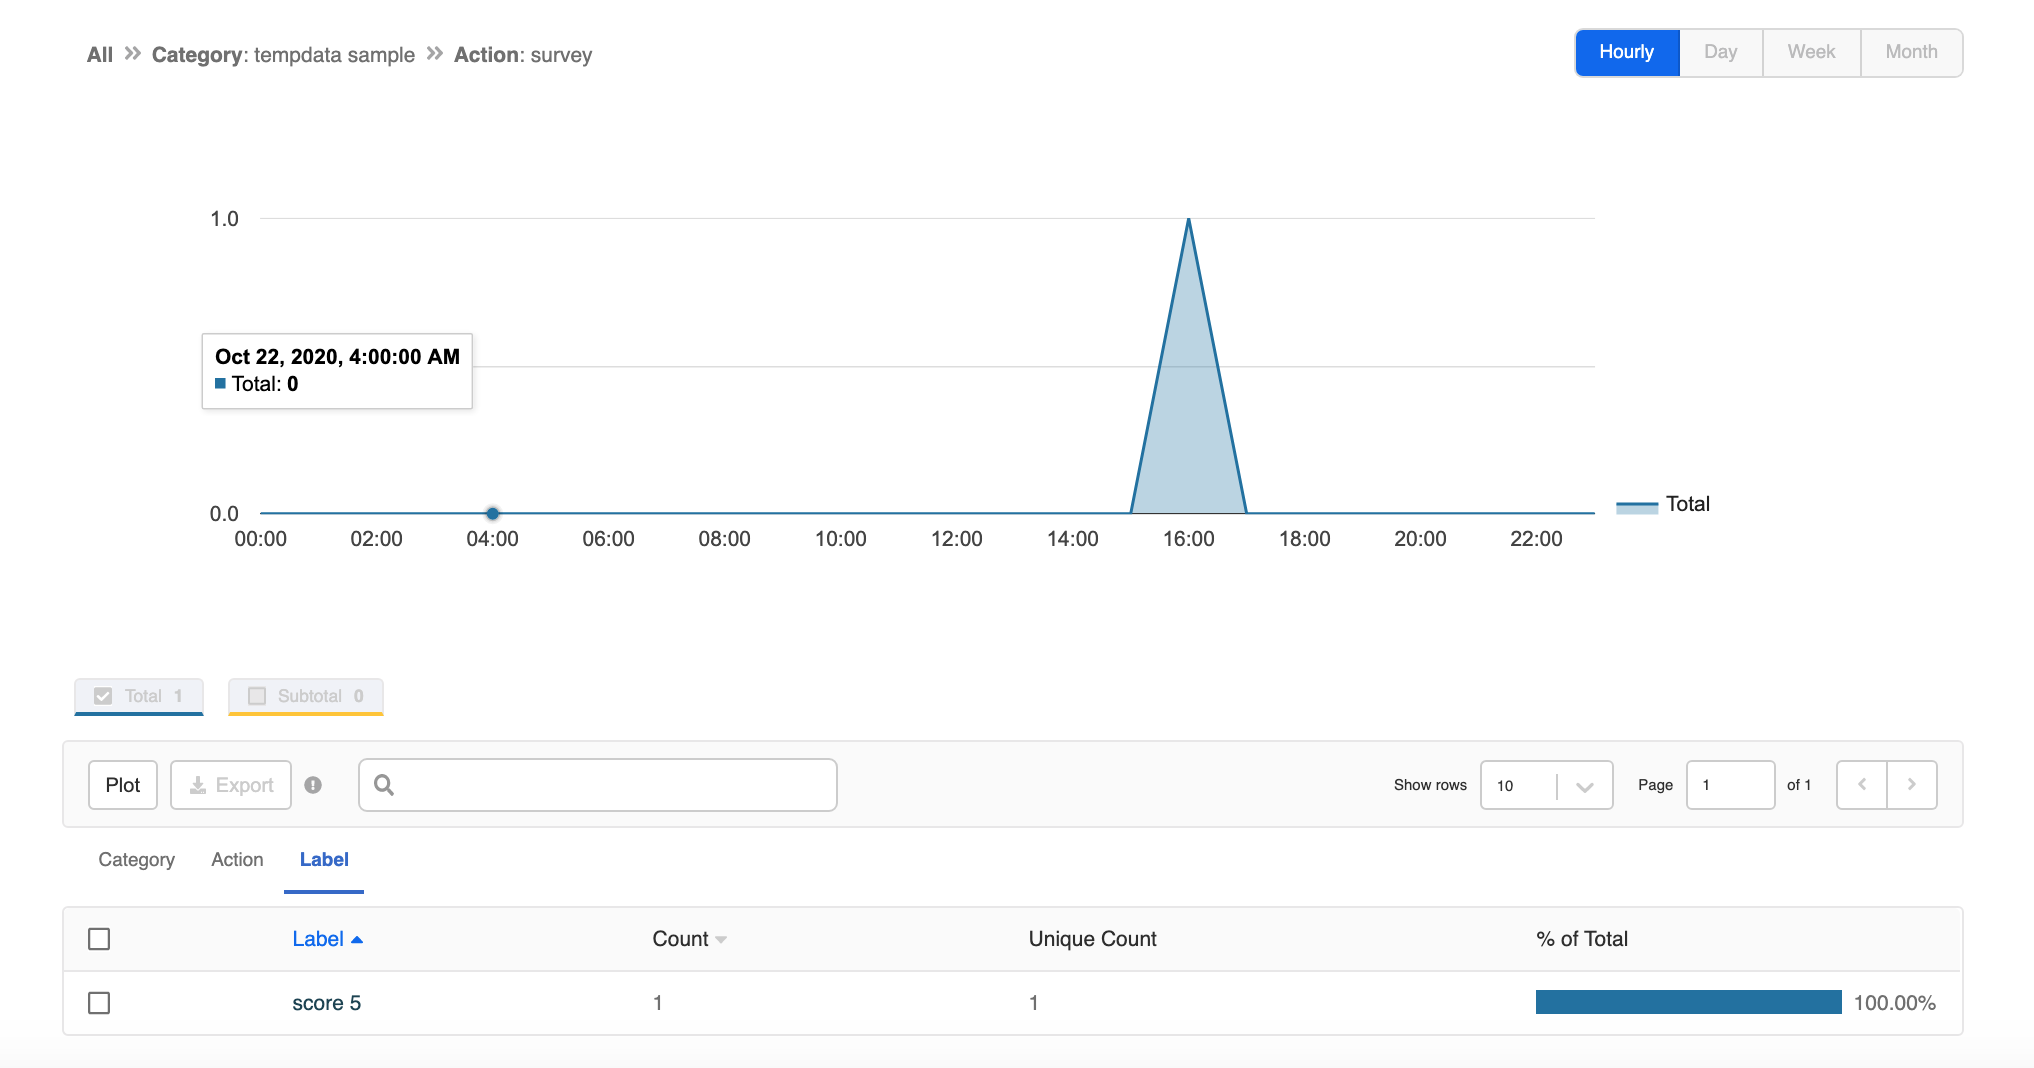
Member Tagging & Analytics with Payload Value
Sample Tree Structure

Payload Value Sample Tree Structure
Getting Hands-on
Click here to create your tree node.
Creating the 1st Tree Node - Survey Question
- Create a the 1st tree node and rename it as "Survey Question".

Response Object with Payload Value
- Create a quick reply response (you may choose other response type with payload button if you want) for the survey question. Then head to "Response Object" under "Advanced" and apply the following sample code format:
{
  "type": "QUICK_REPLIES",
  "quickReplies": [
    {
      "id": "HzpoWVKa",
      "content_type": "text",
      "title": "1",
      "payload": {
        "payload": "TEMP_RESULT",
        "value": "1"
      }
    },
    {
      "id": "DKo8lI9d",
      "content_type": "text",
      "title": "2",
      "payload": {
        "payload": "TEMP_RESULT",
        "value": "2"
      }
    },
    {
      "id": "EMtZb2P8",
      "content_type": "text",
      "title": "3",
      "payload": {
        "payload": "TEMP_RESULT",
        "value": "3"
      }
    },
    {
      "id": "ALFY2WtR",
      "content_type": "text",
      "title": "4",
      "payload": {
        "payload": "TEMP_RESULT",
        "value": "4"
      }
    },
    {
      "id": "jWqgikj1",
      "content_type": "text",
      "title": "5",
      "payload": {
        "payload": "TEMP_RESULT",
        "value": "5"
      }
    }
  ],
  "text": "Rate your experience 1-5"
}
The above format allows you to add a value to the payload.
- Save this tree node.
Creating the 2nd Tree Node - Save Survey Answer
- Add the 2nd tree node and rename it as "Save Survey Answer".

payload.payload Trigger
- Create the following trigger for matching payload.payload:
- Condition 1: Type Payload
this.messageEvent.type === "PAYLOAD"
- Condition 2: TEMP_RESULT
this.messageEvent.data.payload.payload === "TEMP_RESULT"
The above payload.payload format allows the node to be triggered by any specific payload with value.
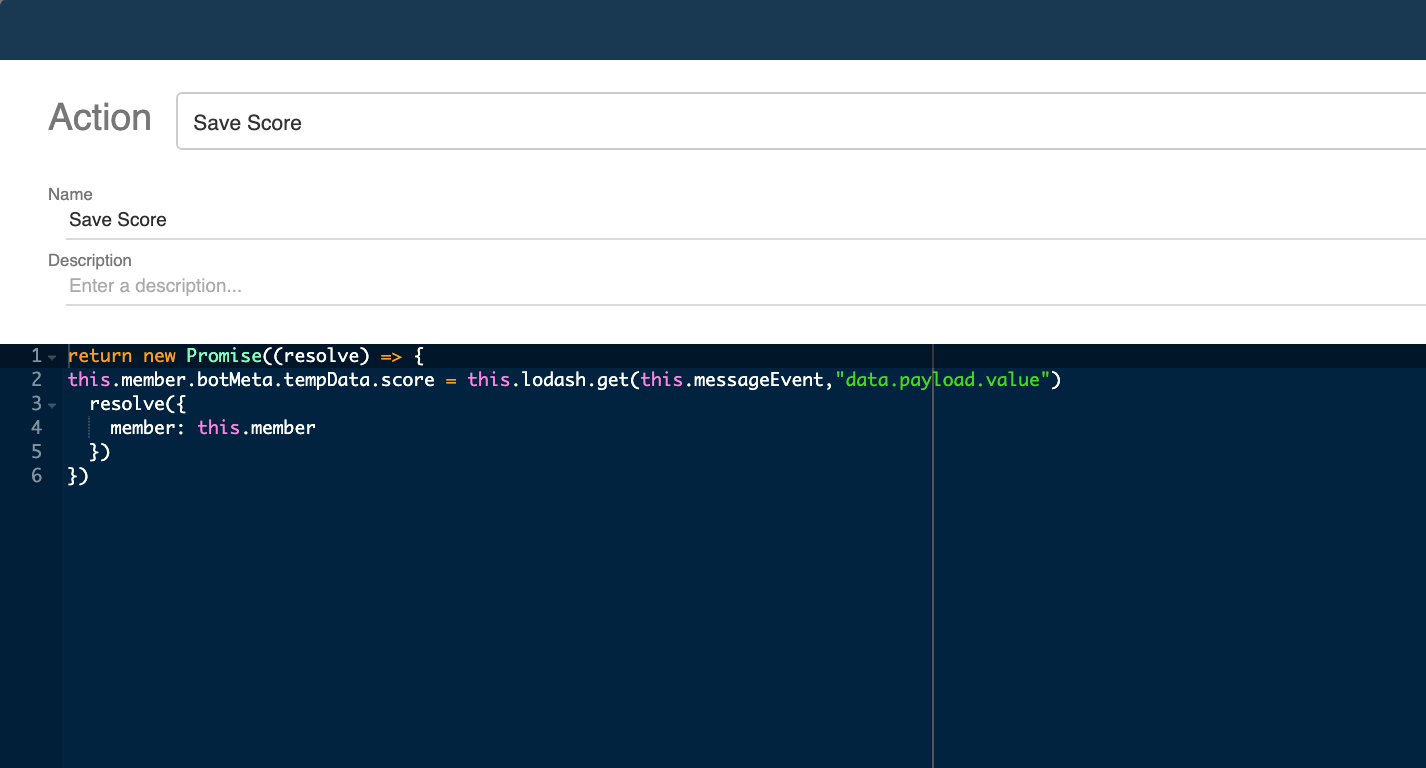
Save Payload Value to tempData
- Create an action to save the payload with the following code sample:
return new Promise((resolve) => {
  this.member.botMeta.tempData.score = this.lodash.get(this.messageEvent,"data.payload.value")
  resolve({
    member: this.member
  })
})
The above sample code save the payload.value from the messageEvent as tempData in the member object, so that saved data can be reused in other nodes.
- If you want to display the saved payload.value in your chatbot response, you can apply the following code sample on the "Response Object":
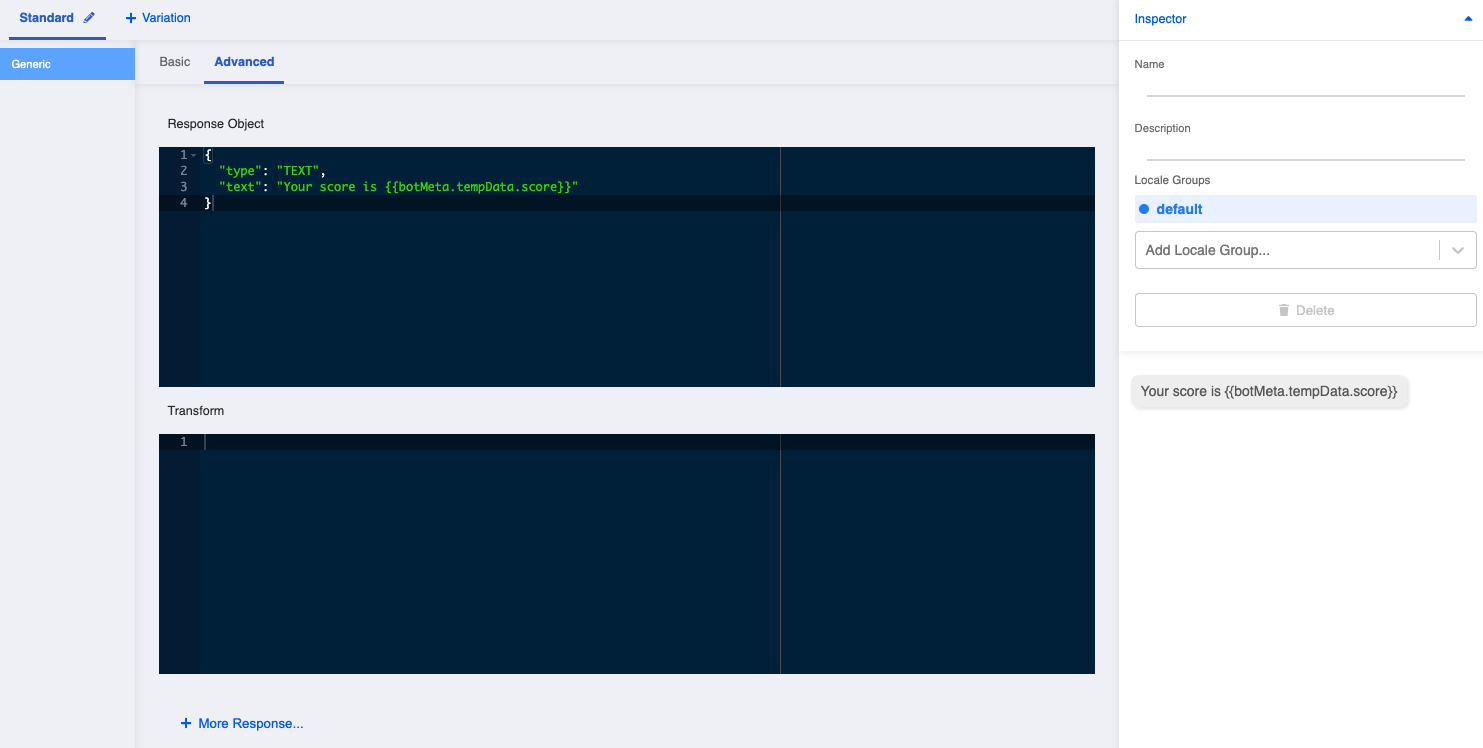
Response Object with payload value
{
  "type": "TEXT",
  "text": "Your score is {{botMeta.tempData.score}}"
}
As the payload.value is saved in the tempData of the member object, the above format allows Stella to retrieve the data from member and display in the response. You can use {{}} instead of this.member in the response.
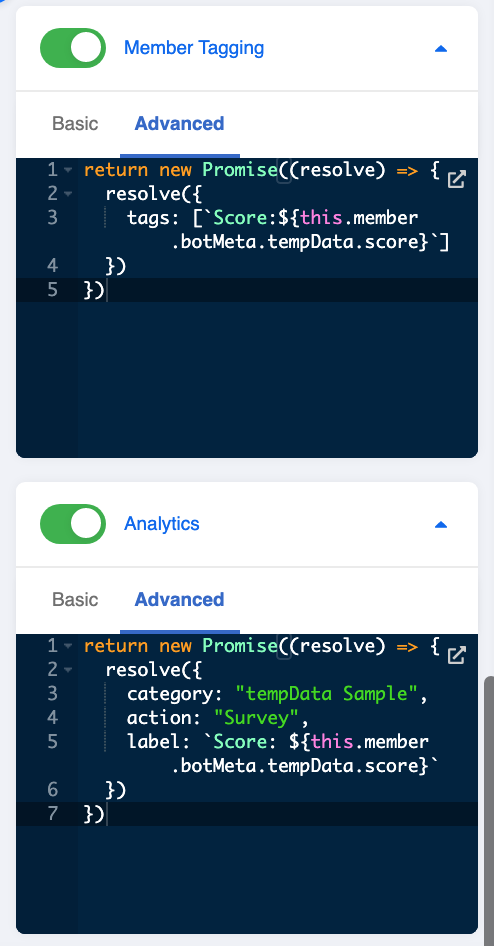
Advanced Member Tagging & Analytics with Payload Value
- You can also apply the this.member.botMeta.tempData.score to member tag and analytics. Please refer to the following sample code:
return new Promise((resolve) => {
  resolve({
    tags: [`Score:${this.member.botMeta.tempData.score}`]
  })
})
return new Promise((resolve) => {
  resolve({
    category: "tempData Sample",
    action: "Survey",
    label: `Score: ${this.member.botMeta.tempData.score}`
  })
})
For member tagging, if you set add a ":" between the field (i.e. Score) and the variable (i.e. this.member.botMeta.tempData.score), the variable will become dynamic. That means when the user answers with a different score (i.e. 4), the member tag will be updated (i.e. Score:4).
- Check and see if you can produce a result similar to the expected outcome.