Apply Opt-in Flow to Chatbot
Opt-in is a very important safeguard for enterprise, especially when the brand is running a marketing campaign with prizes. In most cases, users will need to opt-in or agree to a set of terms & conditions. A well-written terms will clear any disputes originated from the chatbot game because it set the expectation, rules & regulations for players or users.
Another important use case is to send WhatsApp Template Message from WABA to users. The rules state that a business must get the consent from their users before sending any push messages. For details, you may refer to the opt-in requirement in WhatsApp Overview.
These use cases require an opt-in conversation flow, a record of the opt-in user data, as well as a way to filter out who is opted-in in our member page & push panel.
The following object(s) and method(s) will be used in the application of data source:
Expected Outcome
There are 4 types of expected outcome:
- User agrees on the terms of service and redirected to the starting message of the chatbot service. At the same time, the user is tagged with "Agree TNC" and also has a record on the Opt-in Record data source.
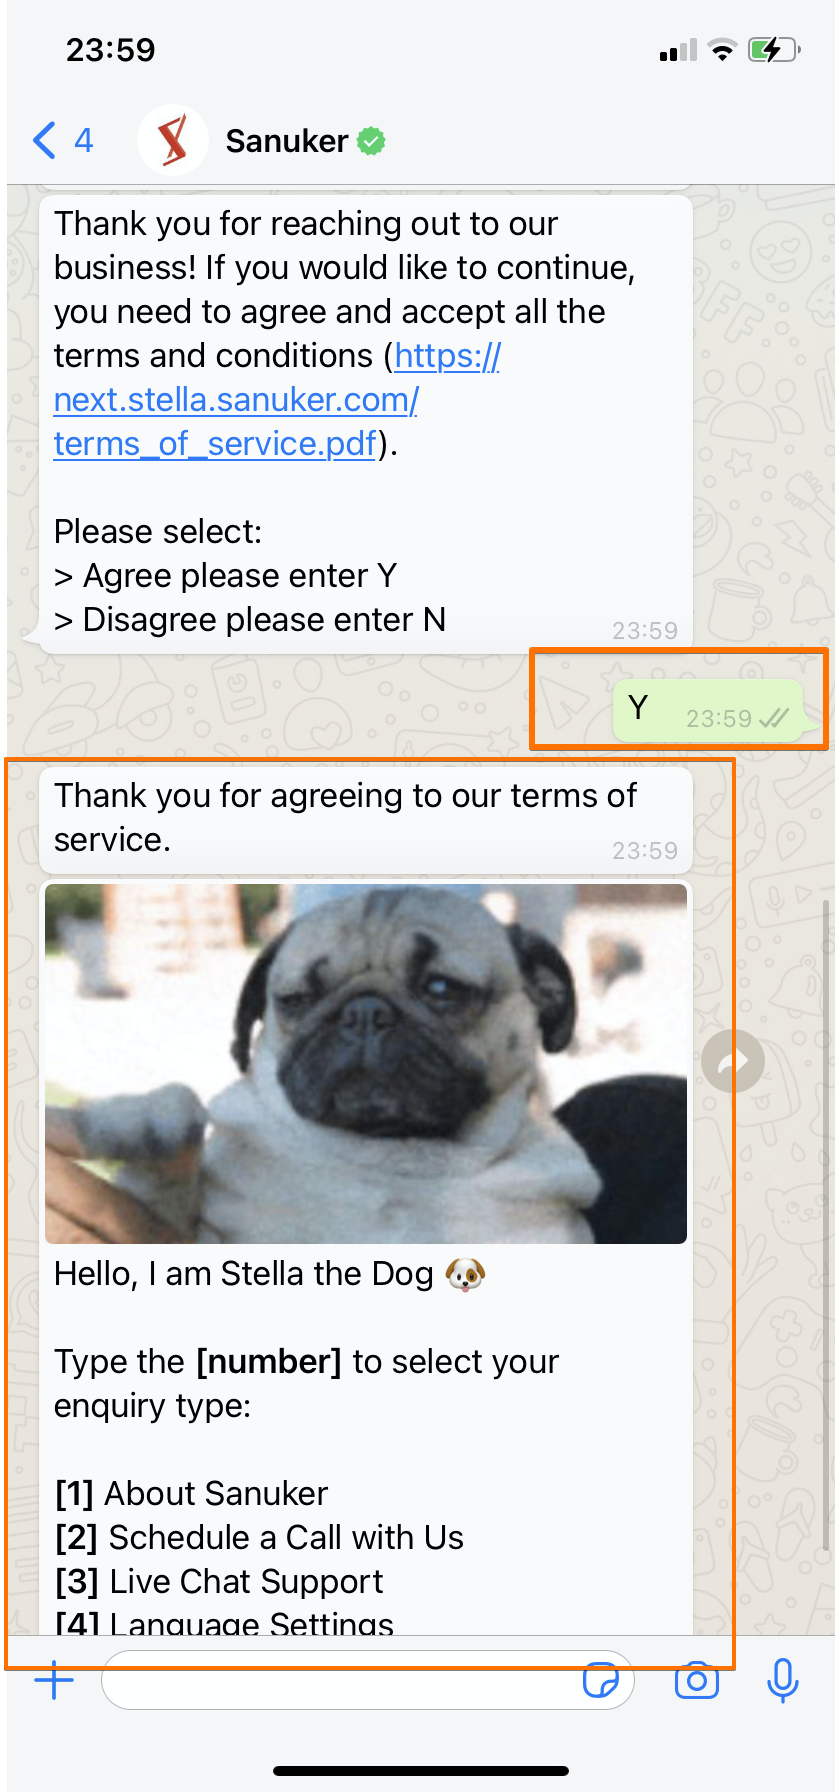
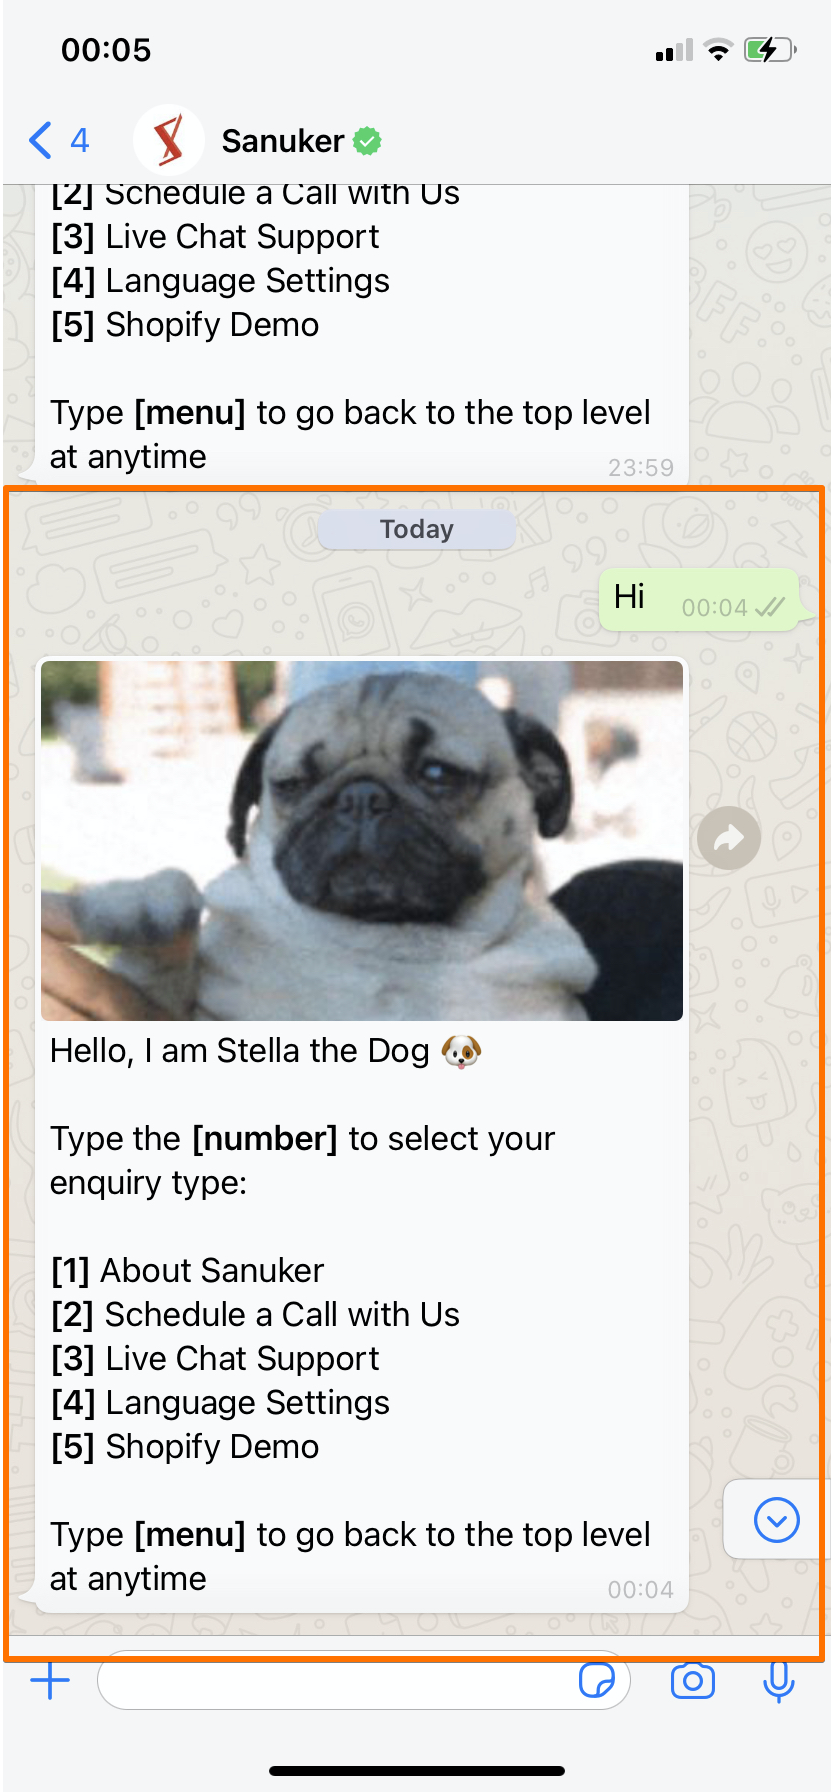
- Any users who accepted the T&C previously would not be asked to agree to the terms of service the next time they greet the chatbot.
- User disagress on the terms of service and redirected back to the T&C message.
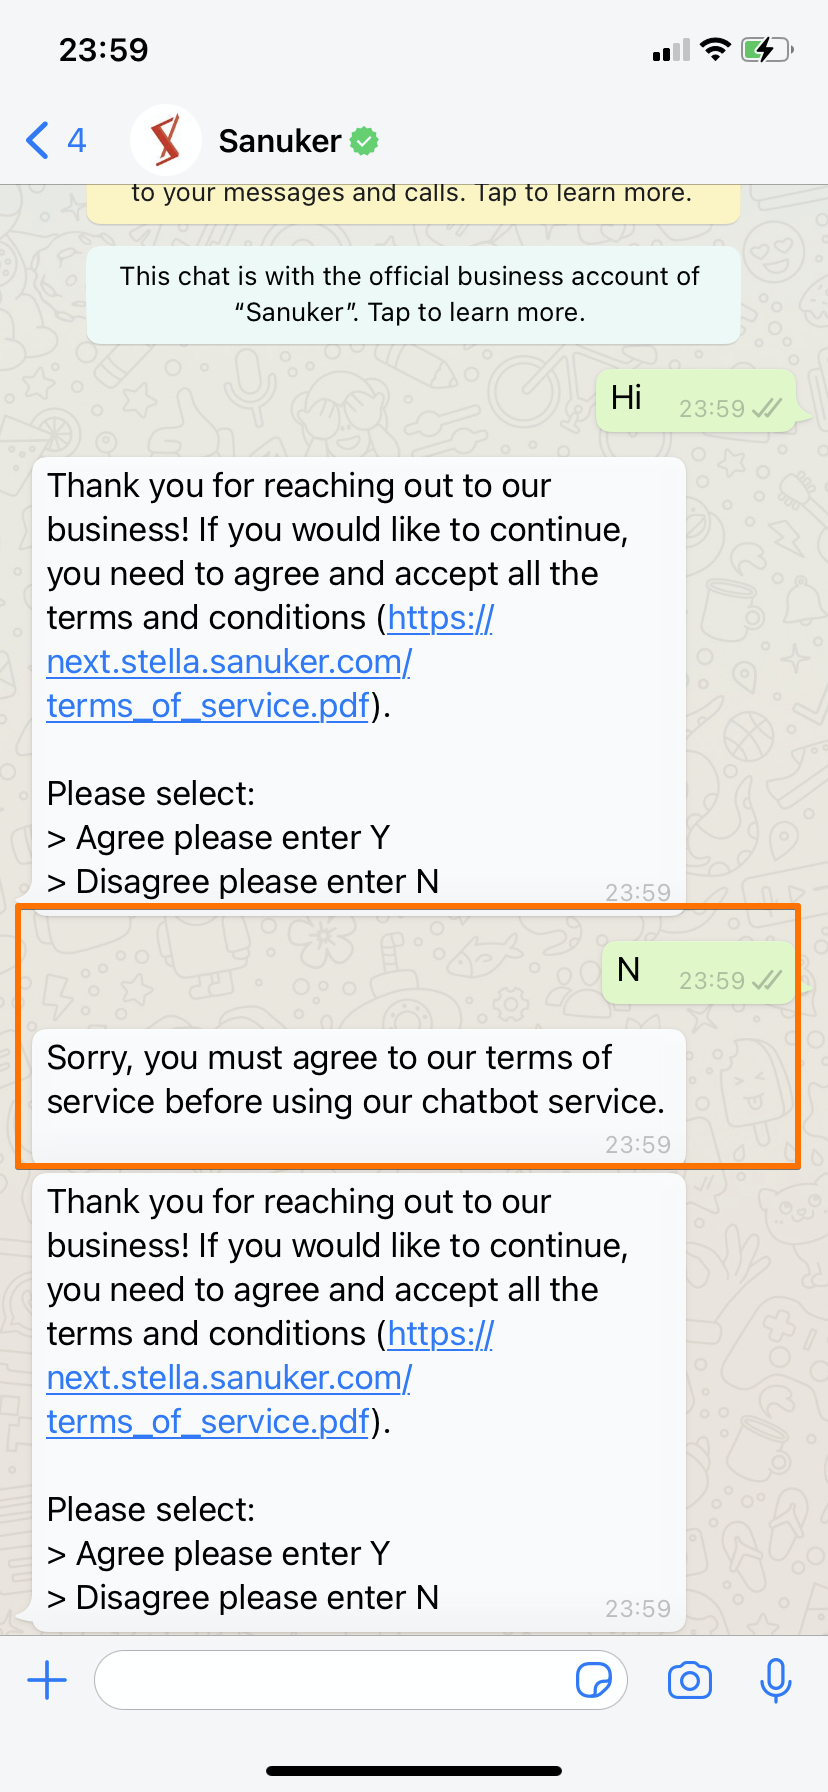
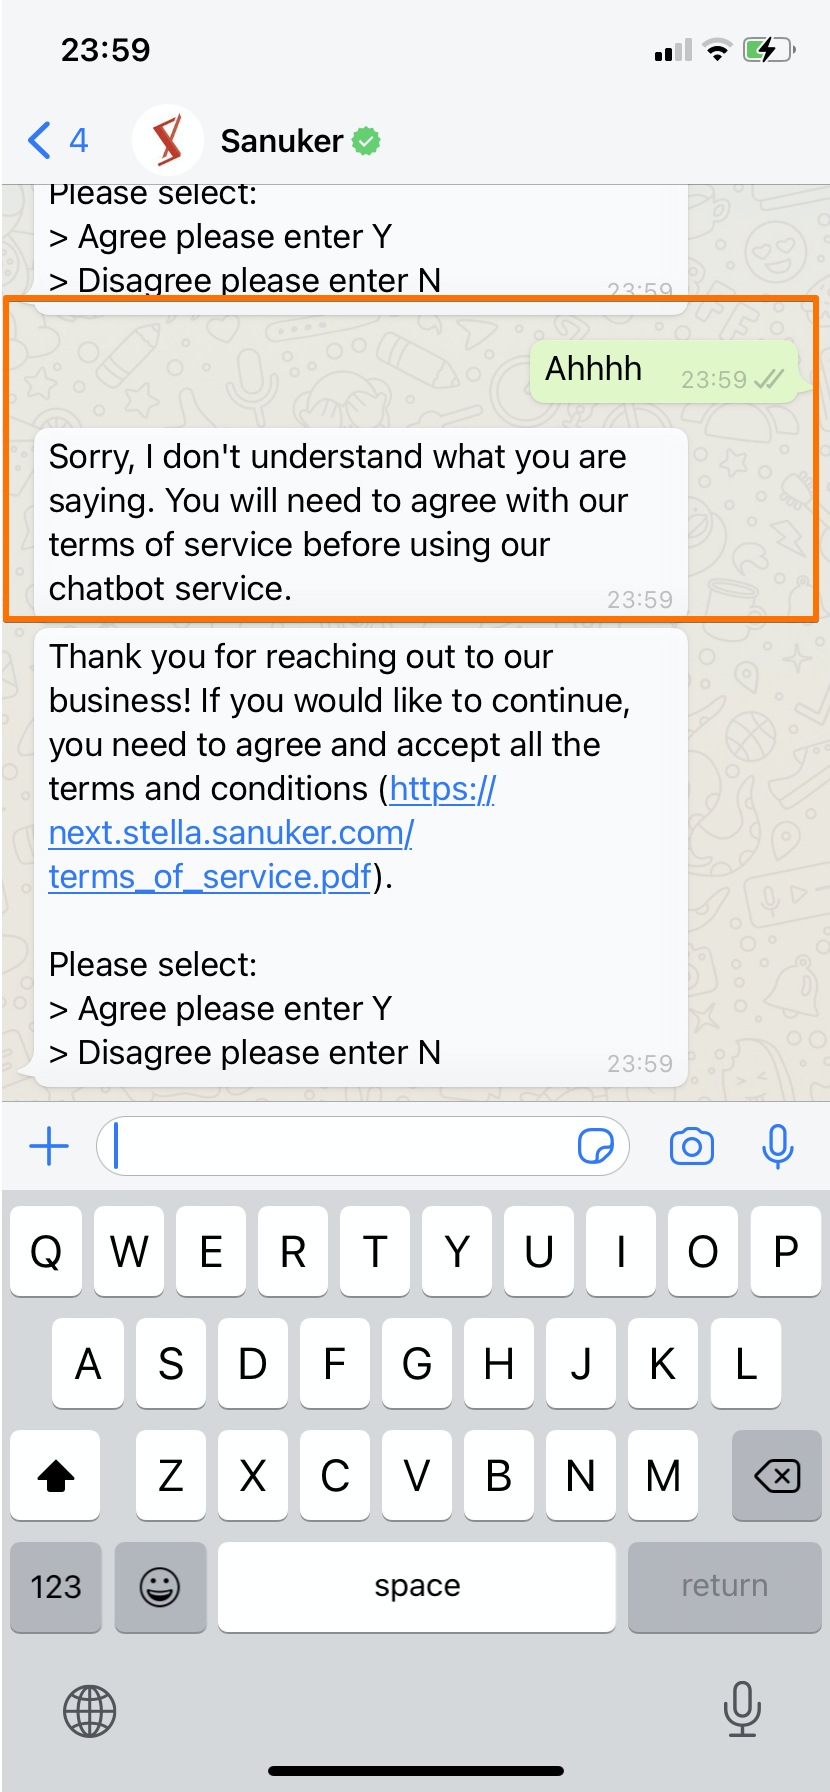
- User types something randomly to trigger the fail safe and redirected back to the T&C message.
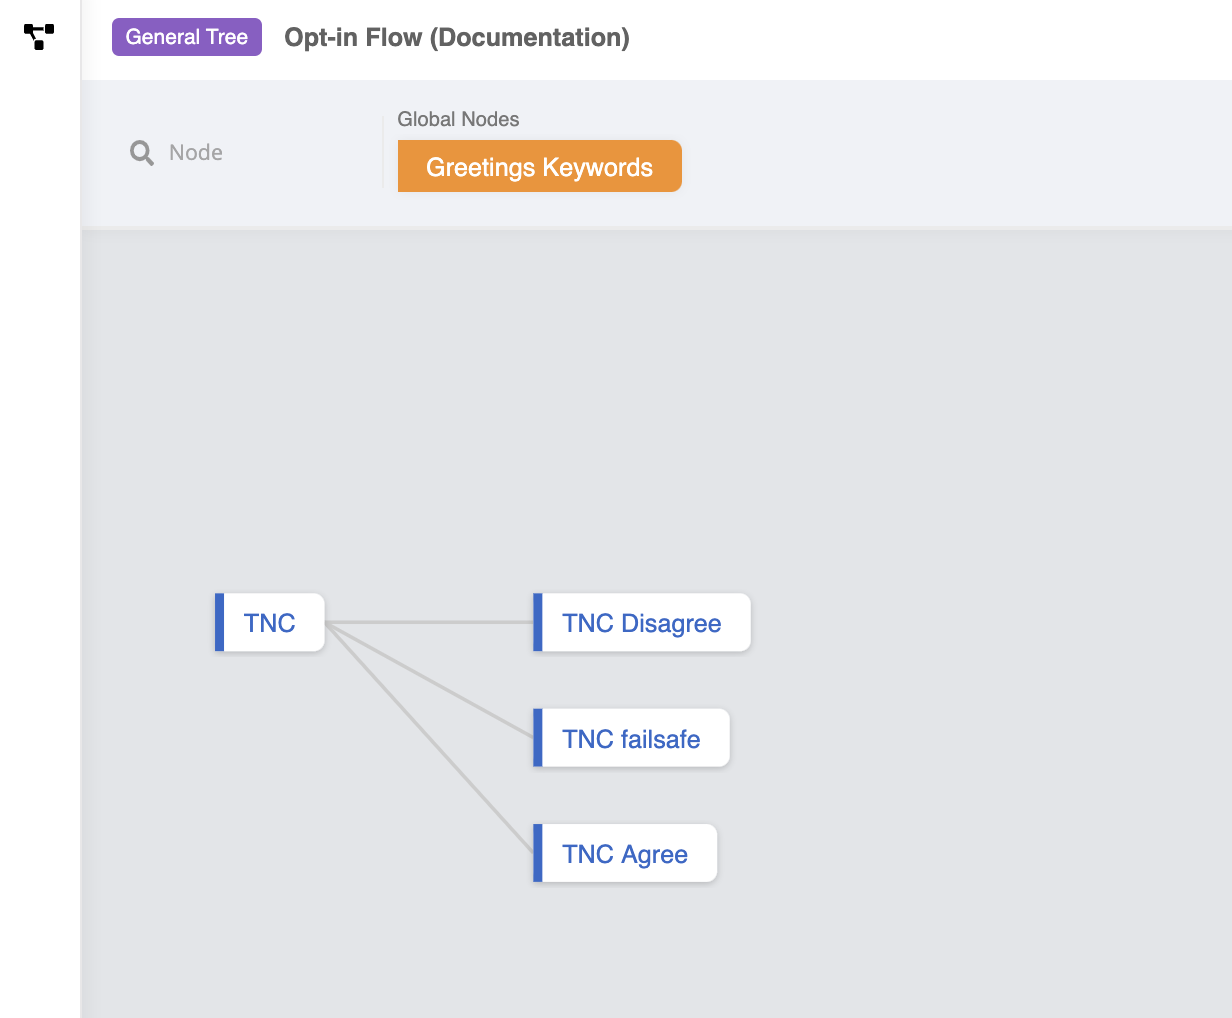
Sample Tree Structure
Getting Hands-on
Enter the Bot Builder here to create your tree node.
Create a Tree Node - TNC
Create a Tree Node and rename it as "TNC".
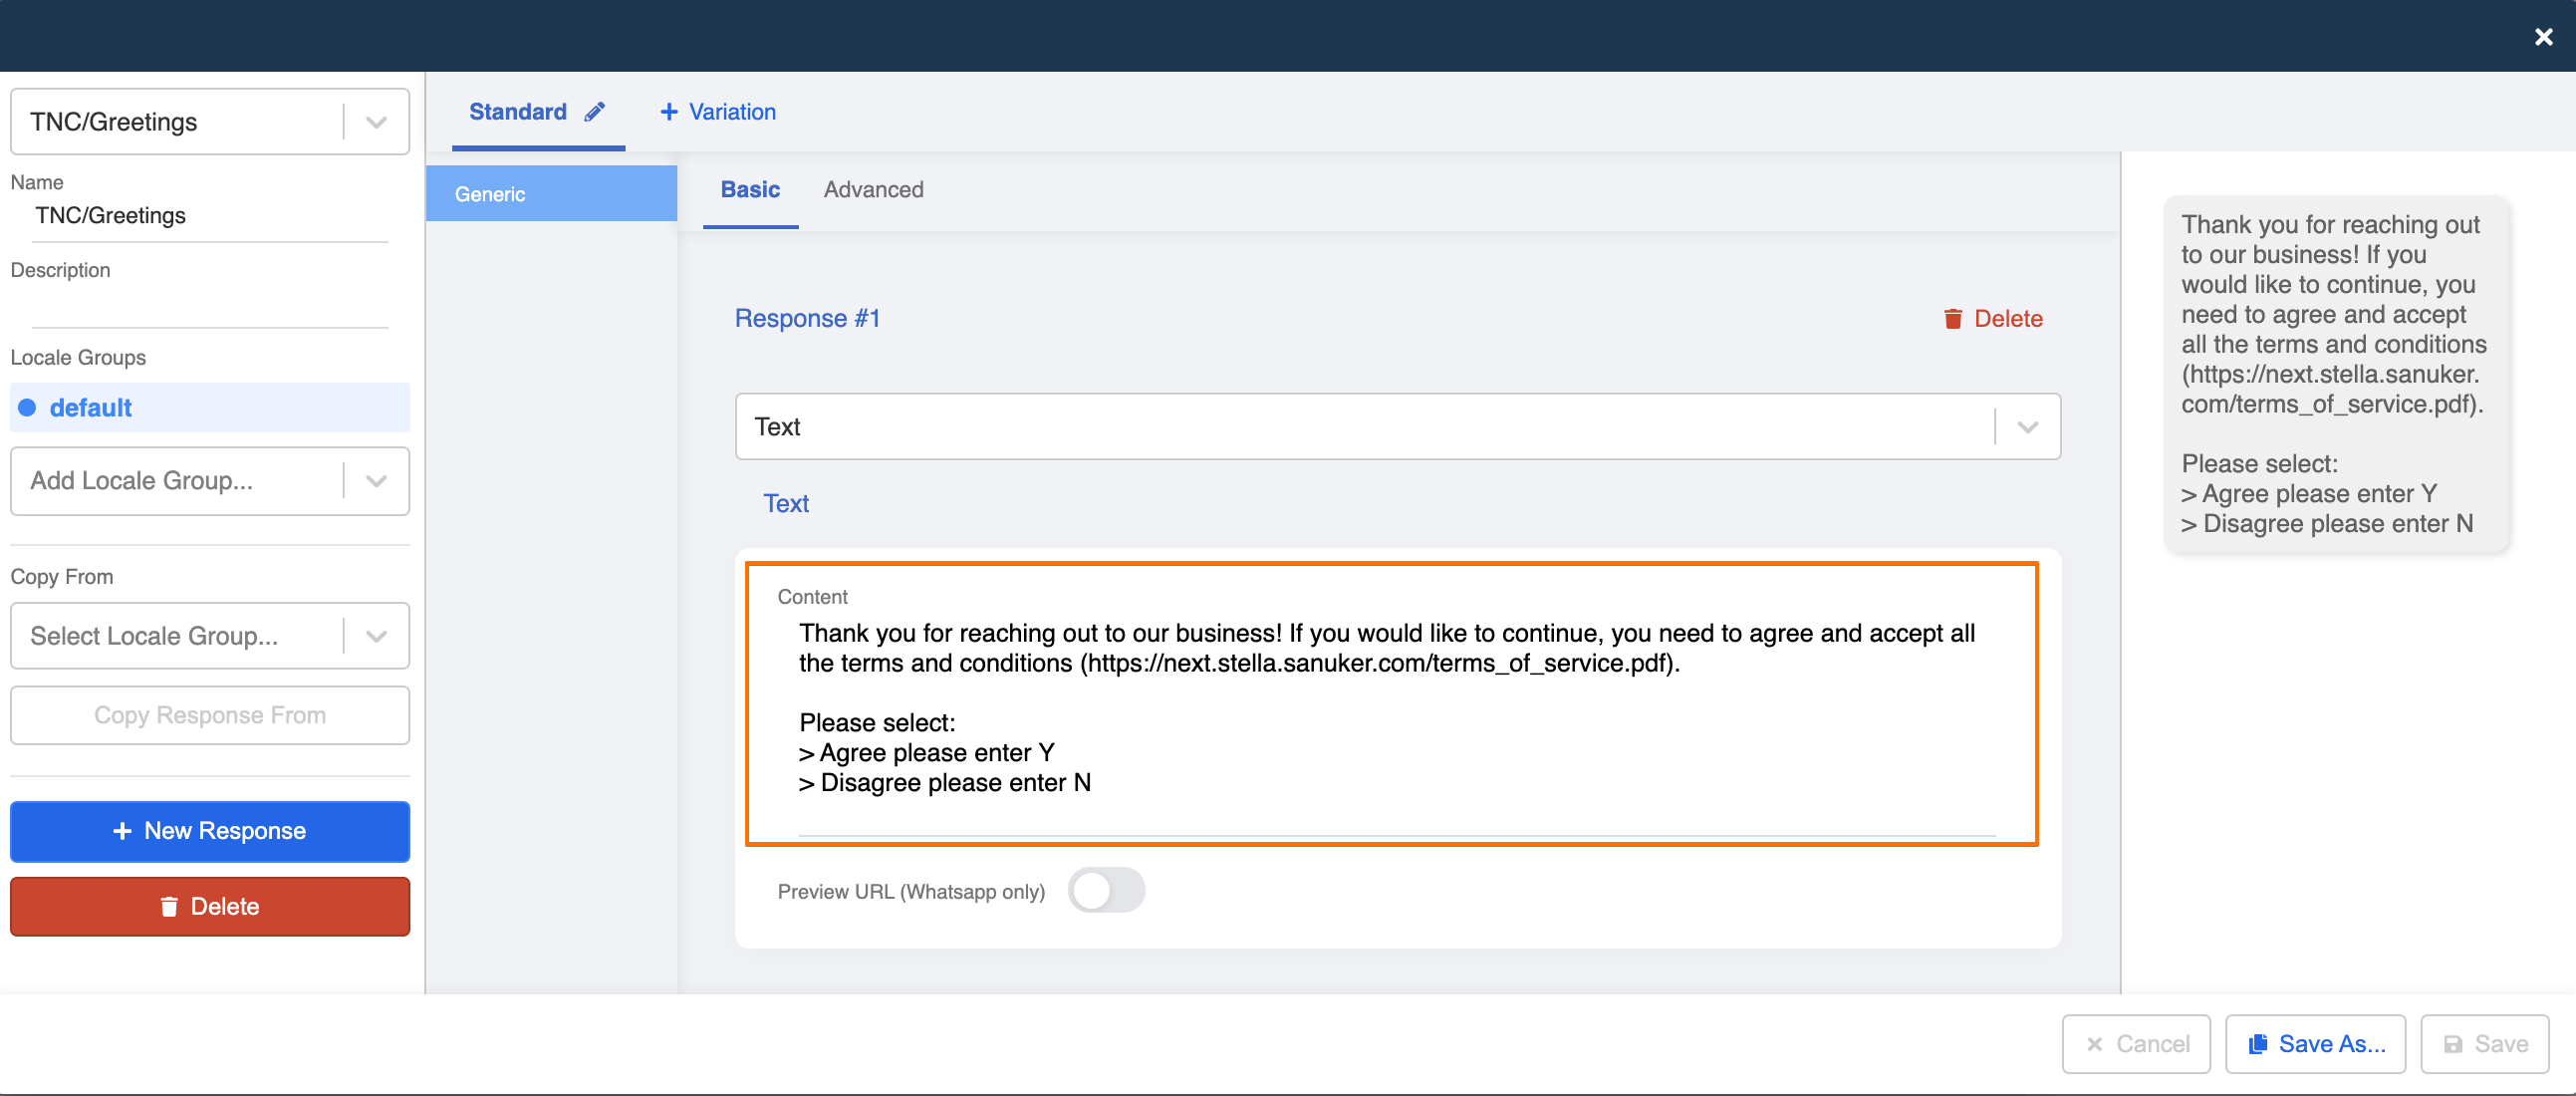
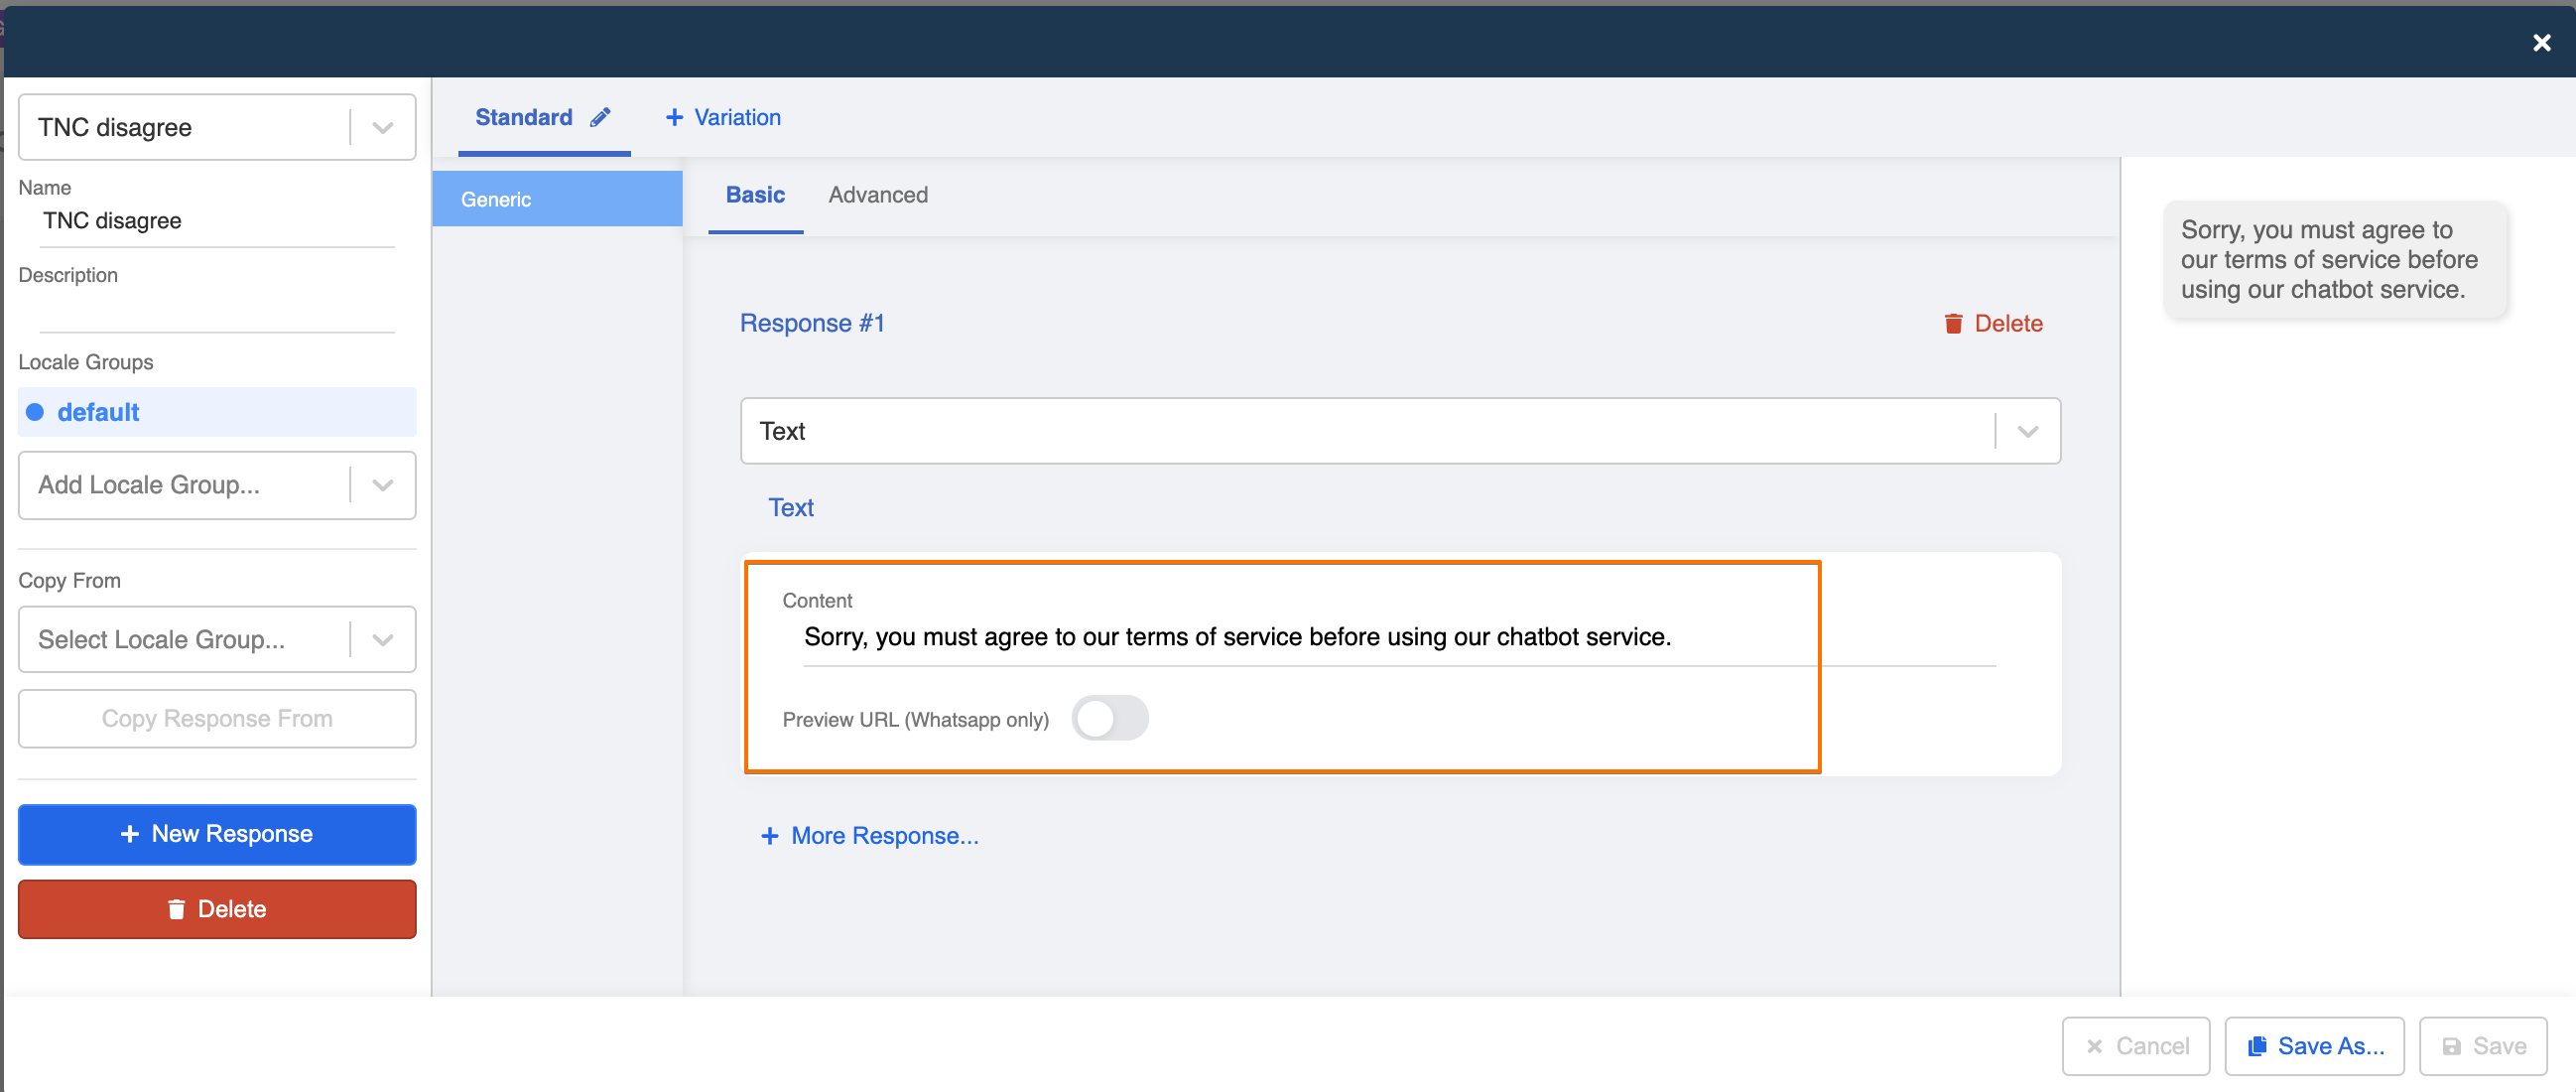
Create a Response for stating the terms of service and define what constitutes as agreement to the T&C.
- Save the Tree Node.
Create a Data Source - Opt-in Record
- Create a new Data Source.

- Import this sample Opt-in Record to the Data Source.

- Copy the Data Source ID.
Create a Tree Node - TNC Agree
- Create a Tree Node and rename it as "TNC Agree".
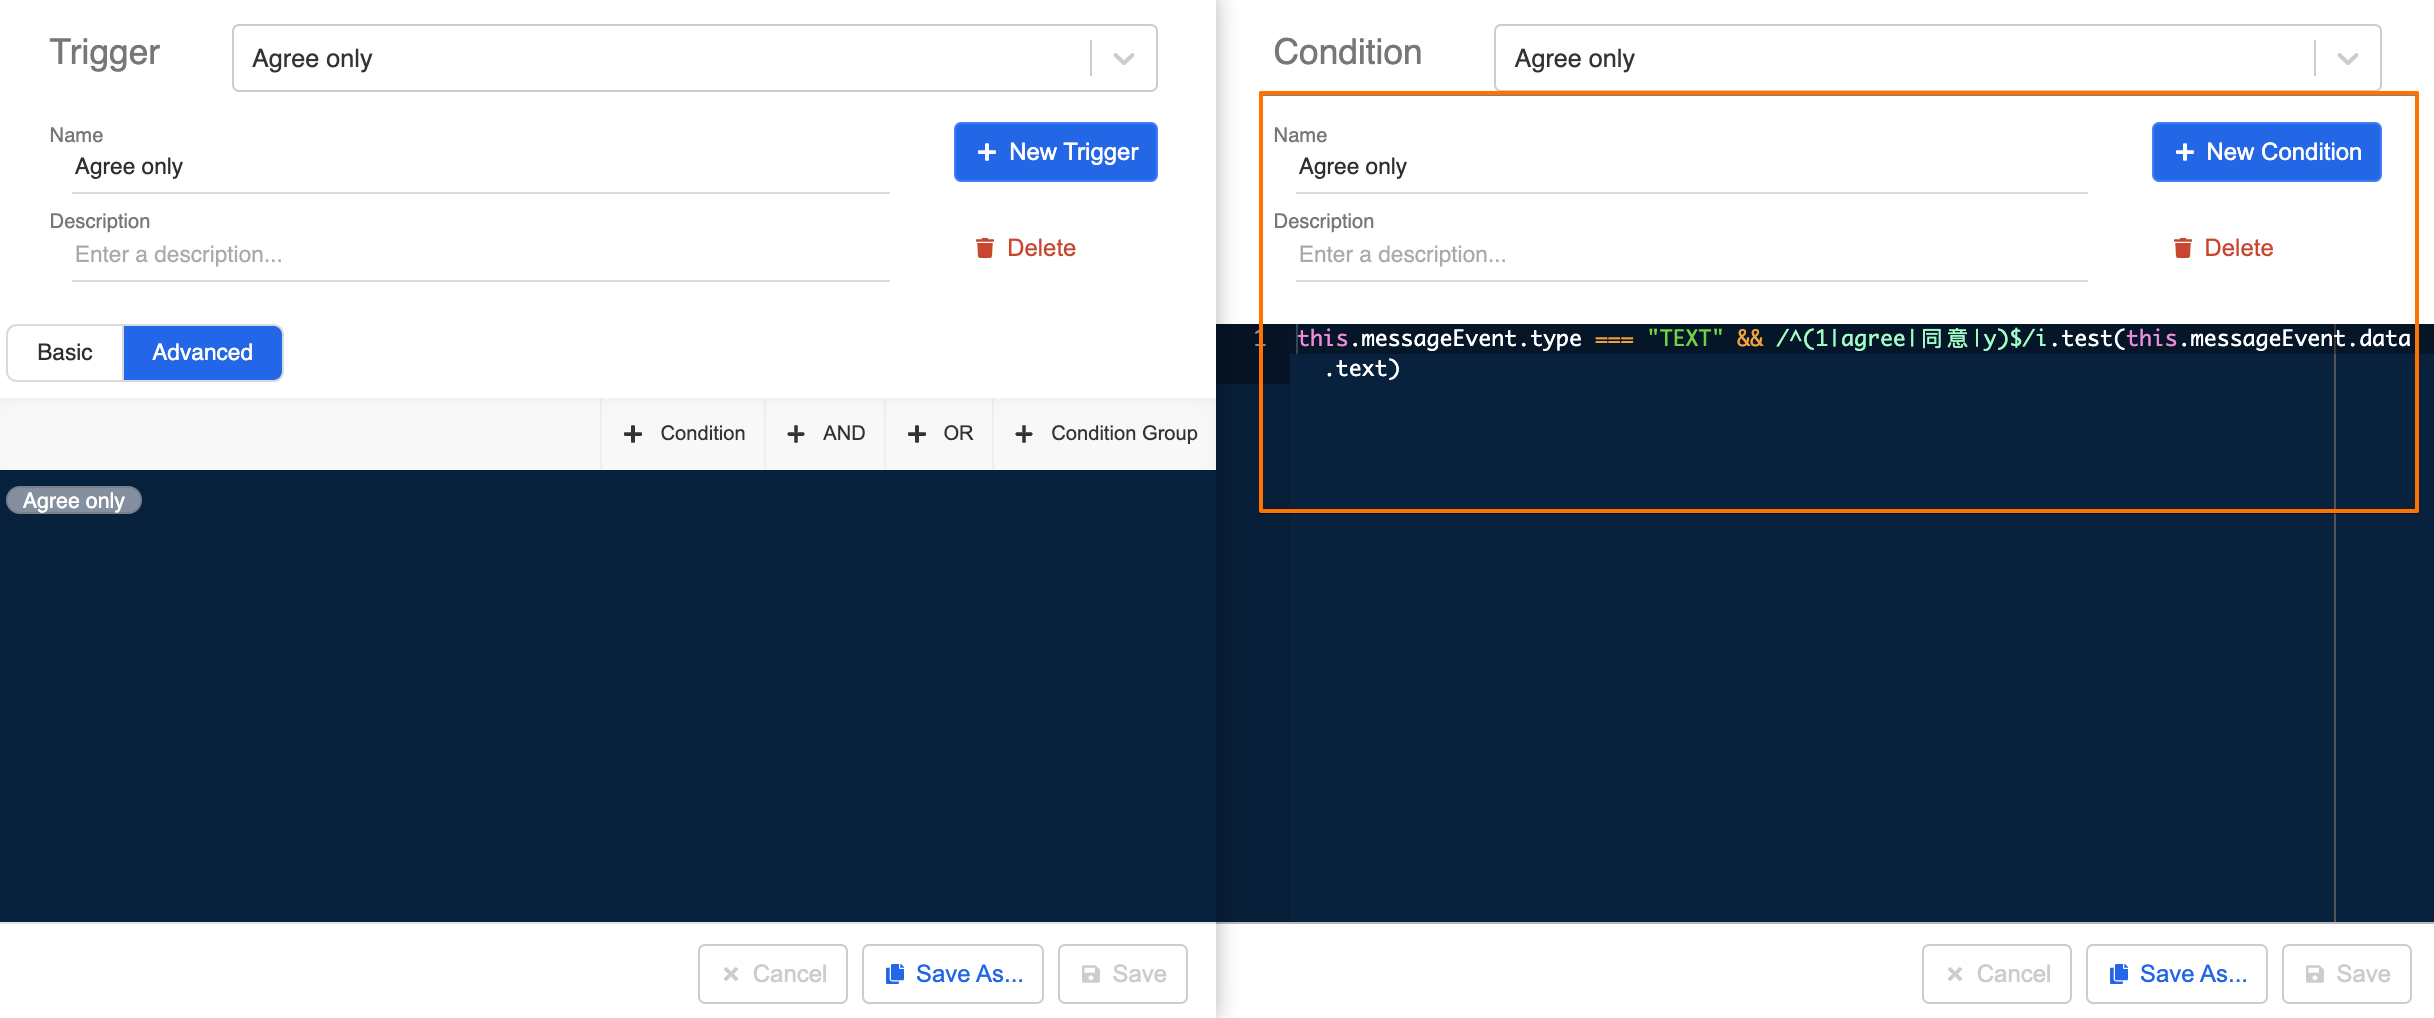
- Create a Trigger for detecting keywords that contitutes as agreement. Rename the Trigger as "Agree Only". You may take reference to the following condition:
this.messageEvent.type === "TEXT" && /^(1|agree|同意|y)$/i.test(this.messageEvent.data.text)
- Create the 1st Pre-action for setting the status of user agreeing to T&C in the member data. Rename it as "Set User Agree TNC Status". You may refer to the following code:
return new Promise((resolve) => {
  this.lodash.set(this.member, "tags", this.lodash.get(this.member, "tags", []).filter(tag => tag !== "Disagree TNC"))
  this.lodash.set(this.member, "botMeta.tempData.userAgreeTNC", true)

  resolve({
    member: this.member
  })
})
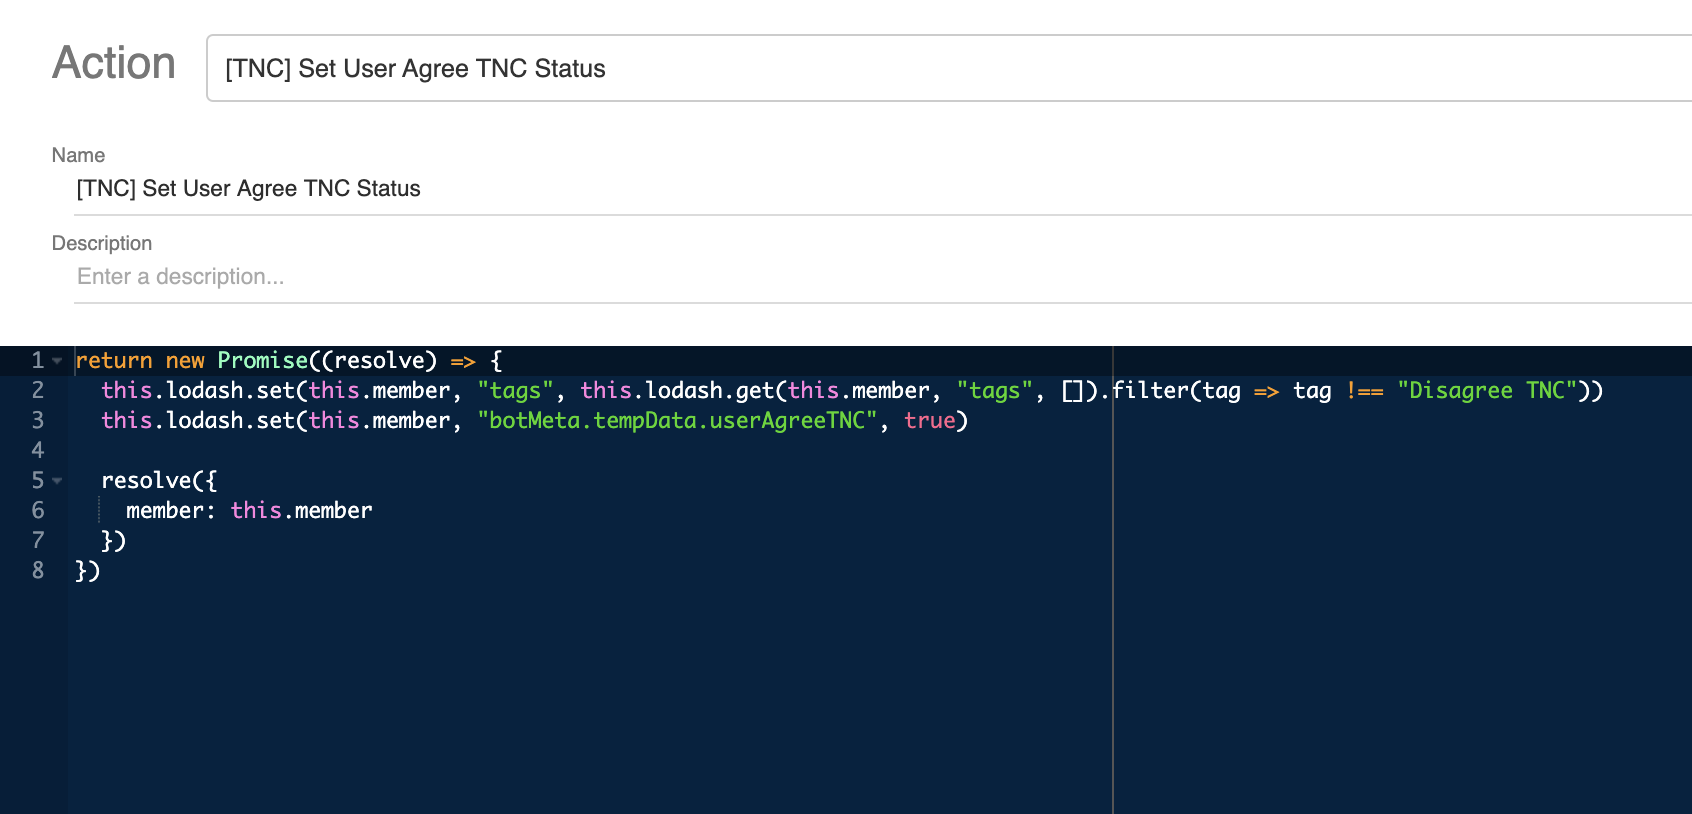
Please make sure the tag in the array (i.e. Disagree TNC) is the same as the one set in Create a Tree Node - TNC Disagree.
- Create the 2nd Pre-action for upserting the user opt-in record to the Data Source. You may refer to the following code:
return new Promise(async (resolve, reject) => {
try {
await this.upsertDataToDataSource({
dataSourceId: "Insert Data Source ID Here",
data: {
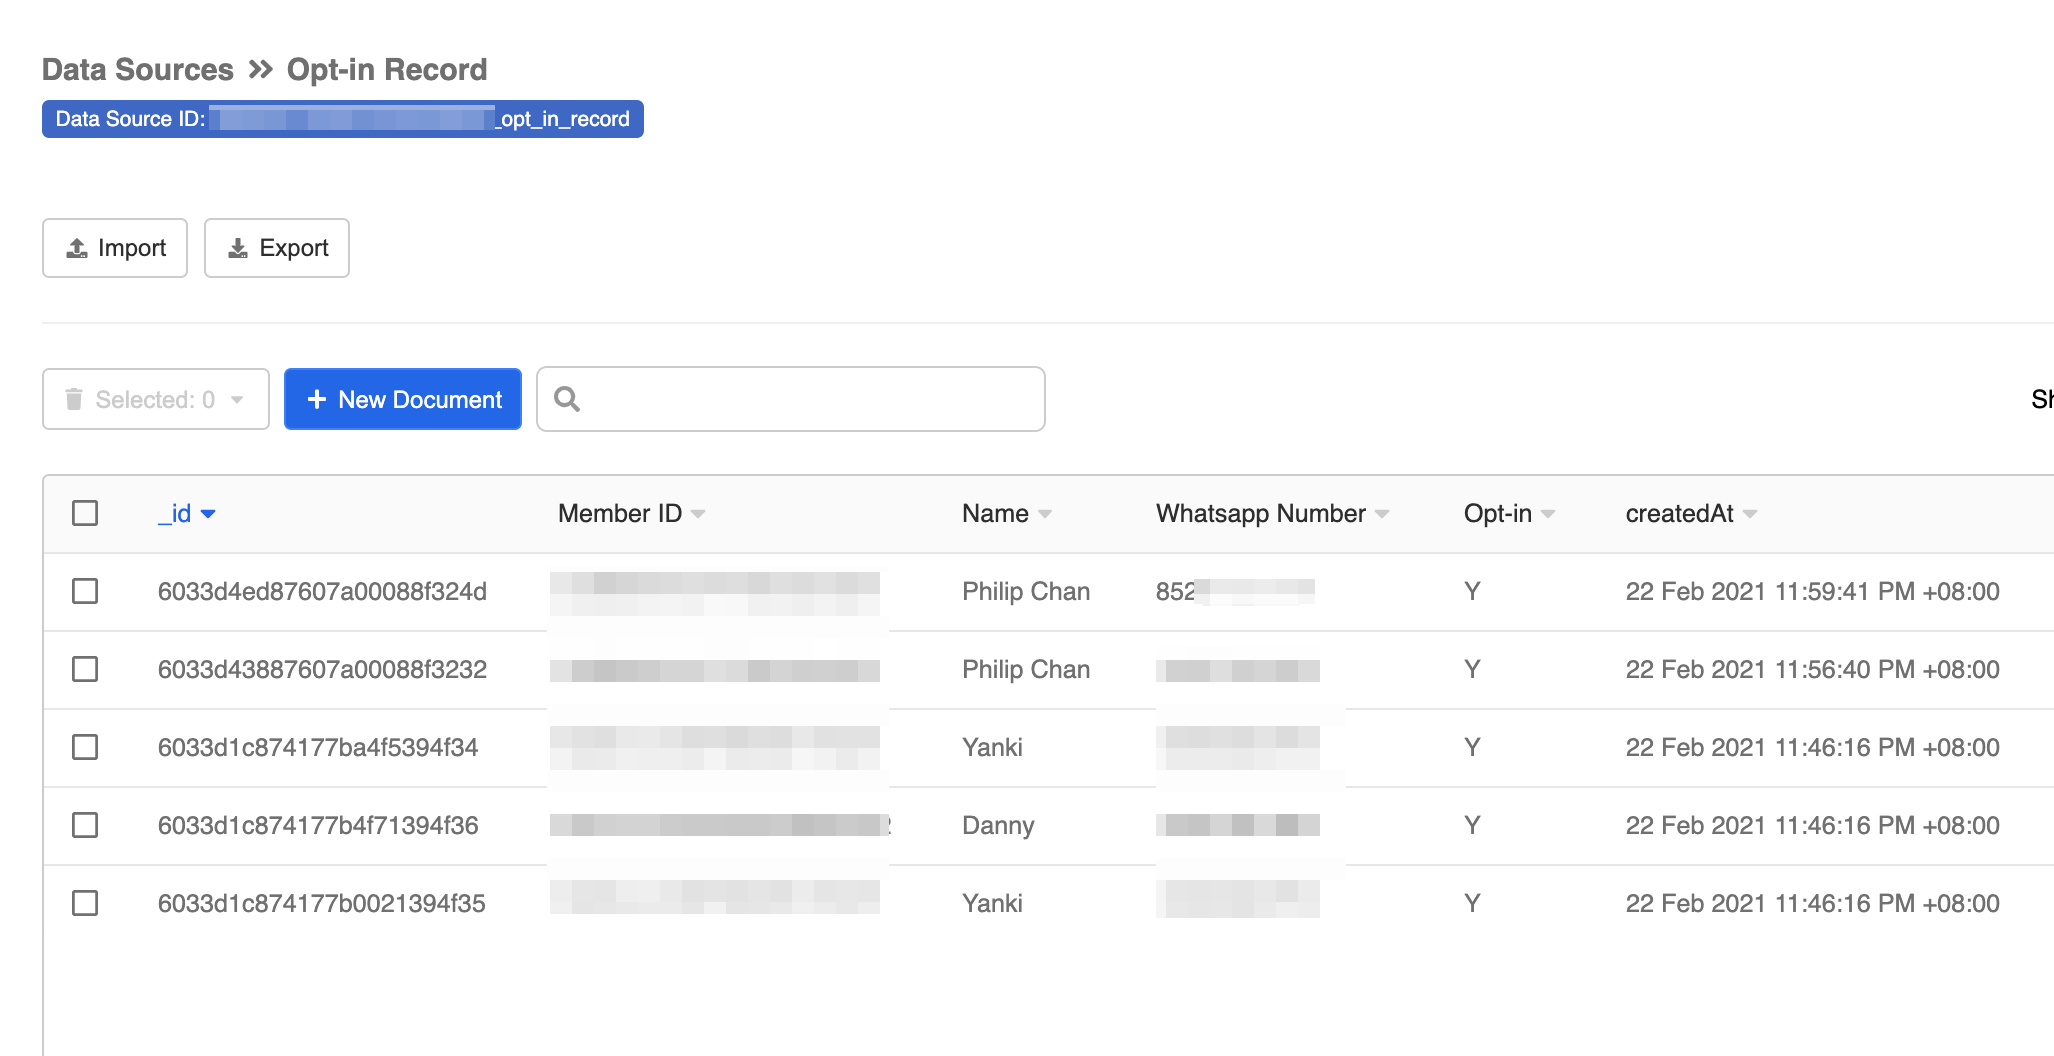
"Member ID": this.member._id,
"Name": this.member.firstName,
"Whatsapp Number": this.member.externalId,
"Opt-in": "Y"
}
})
resolve({
member: this.member
})
} catch (e) {
reject(e)
}
})
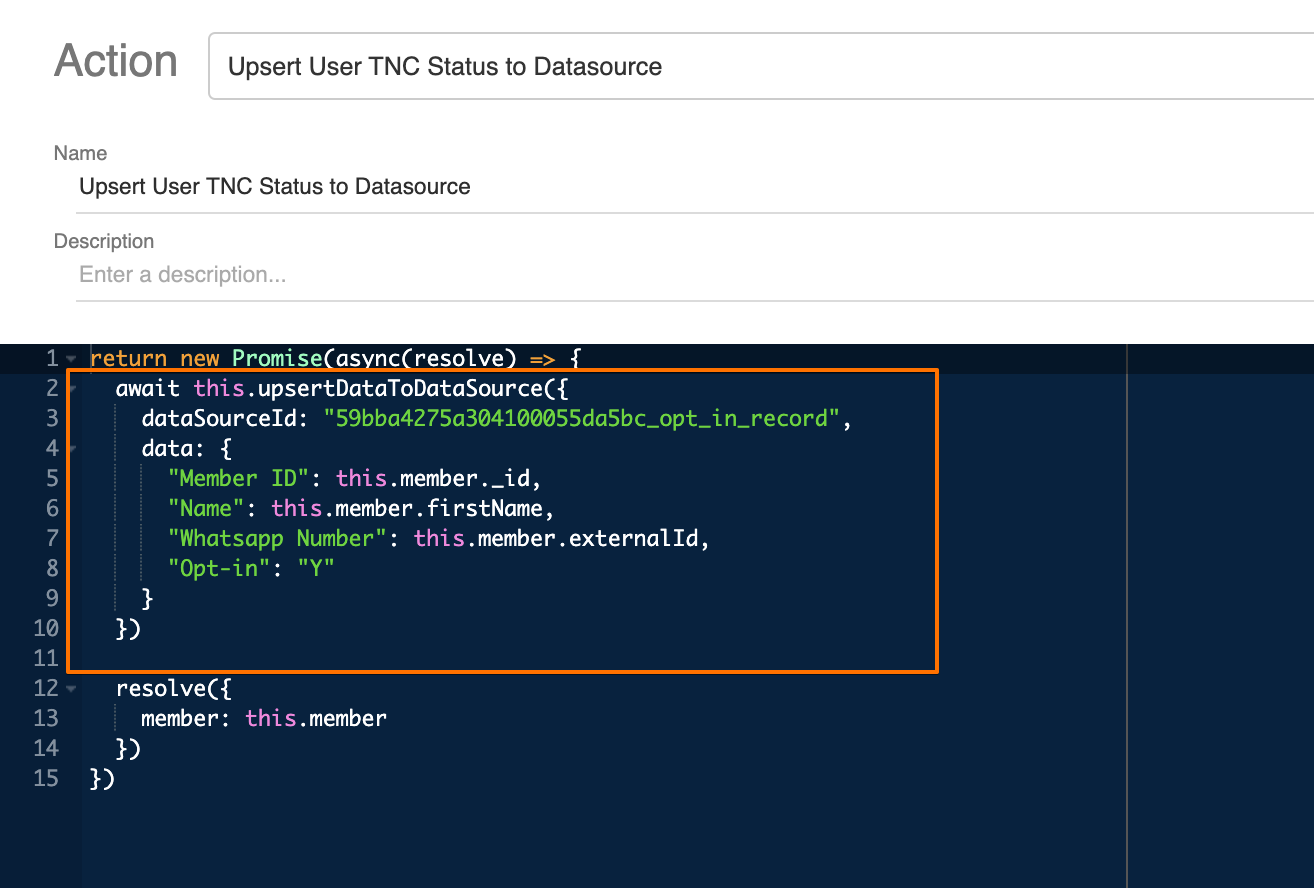
Please remember to set the dataSourceId with the Data Source ID you created for Opt-in Record. You can change the data's naming (i.e. the array of
data, e.g. "Member ID") to fit your Data Source column headers too.
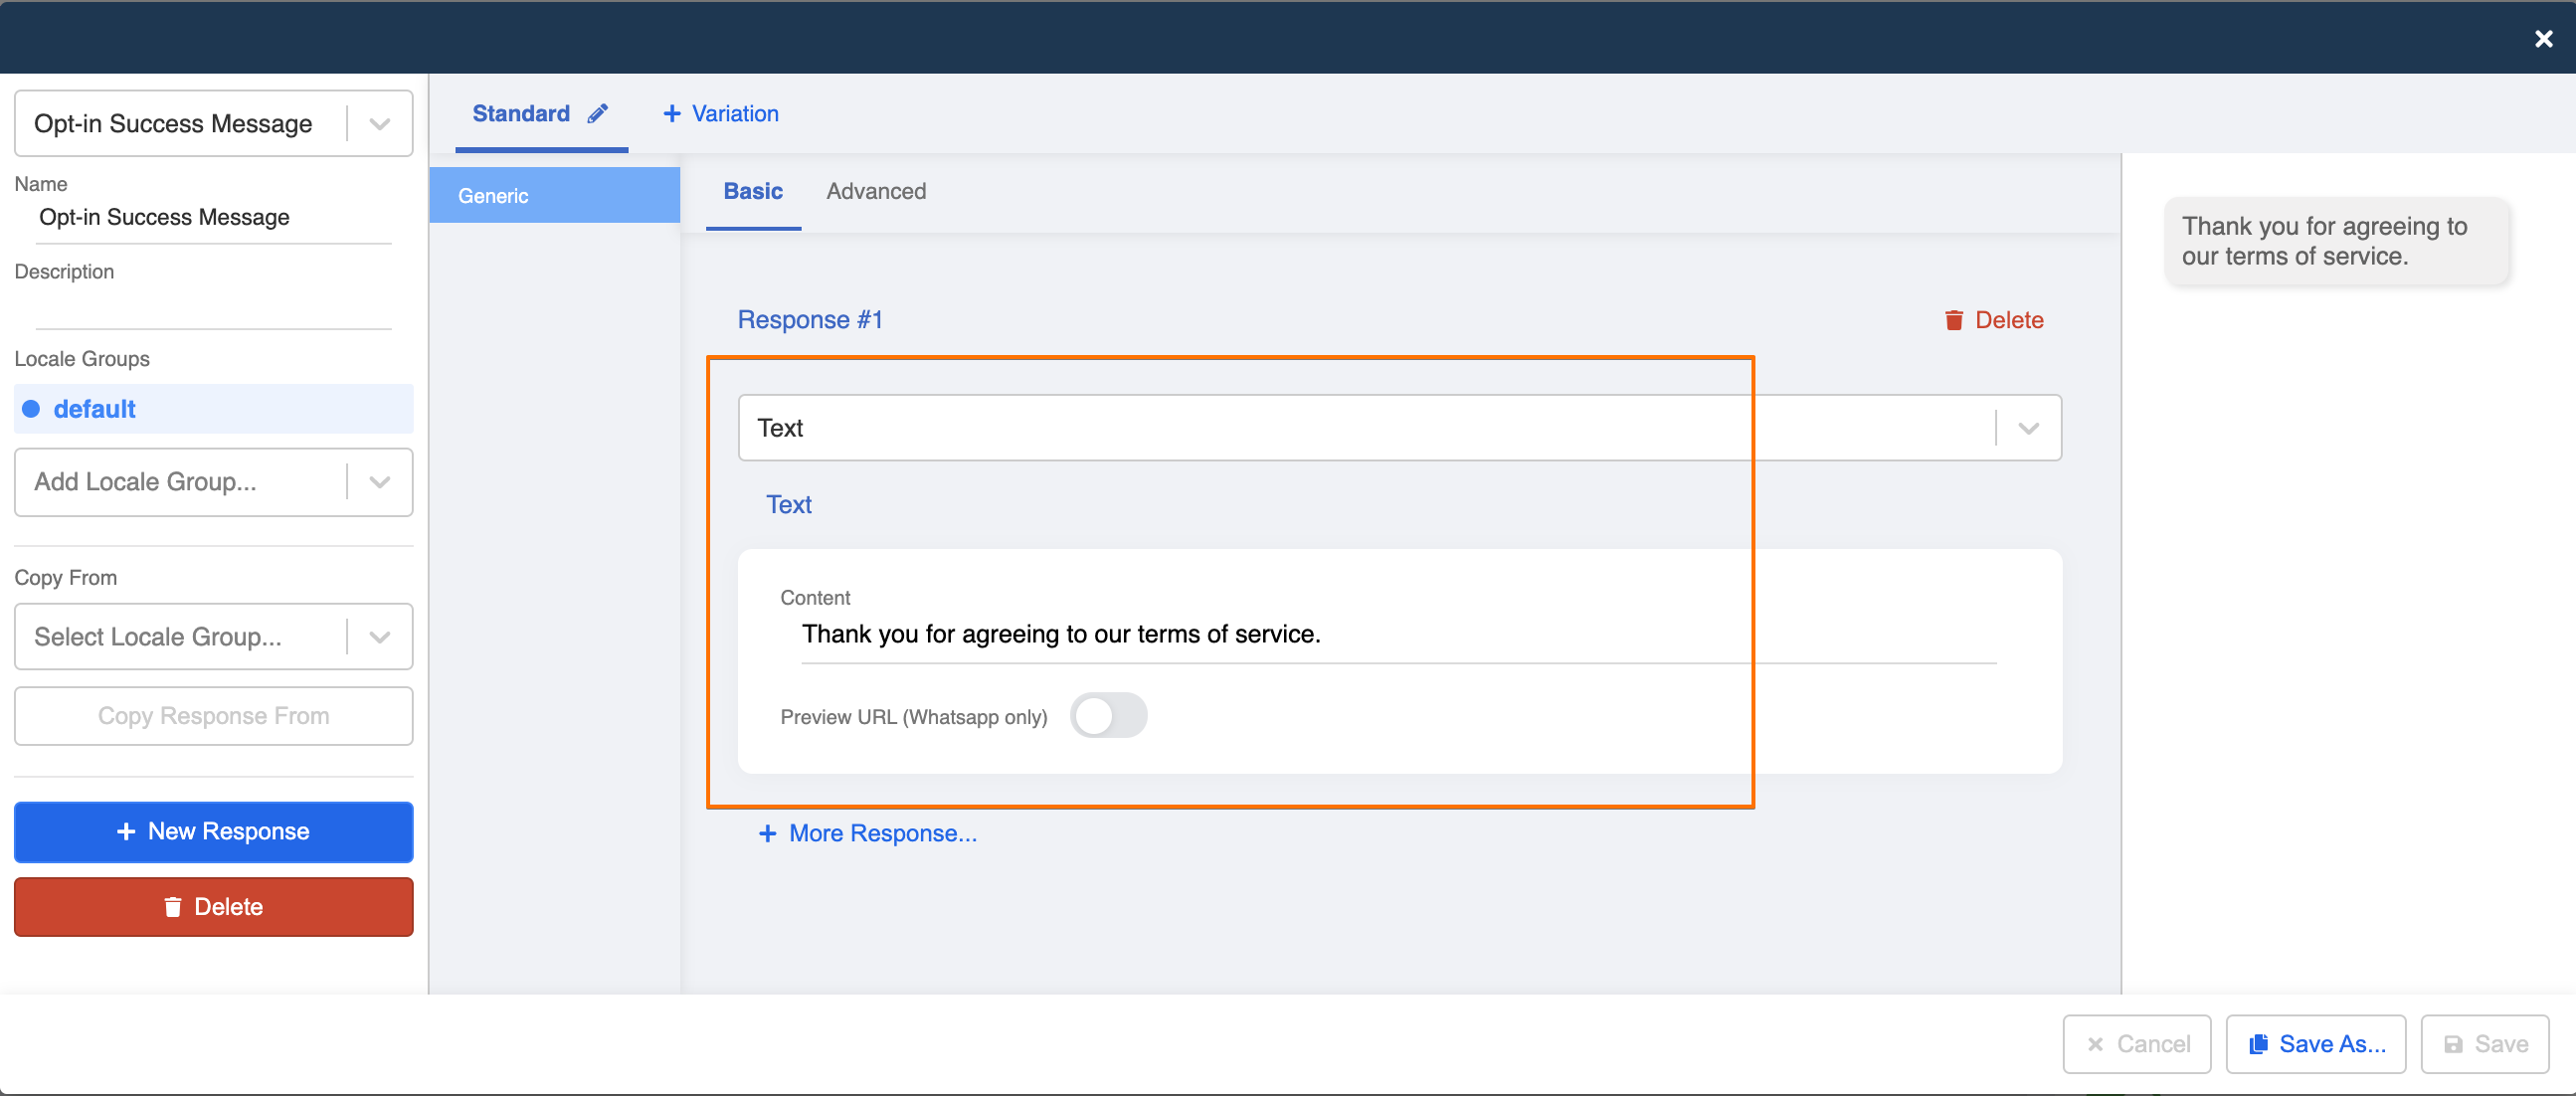
- Create a response for stating to users that the opt-in has been completed.
- You may choose to toggle on "Redirect" back to the start of chatbot service, so that user can continue the conversation seamlessly.
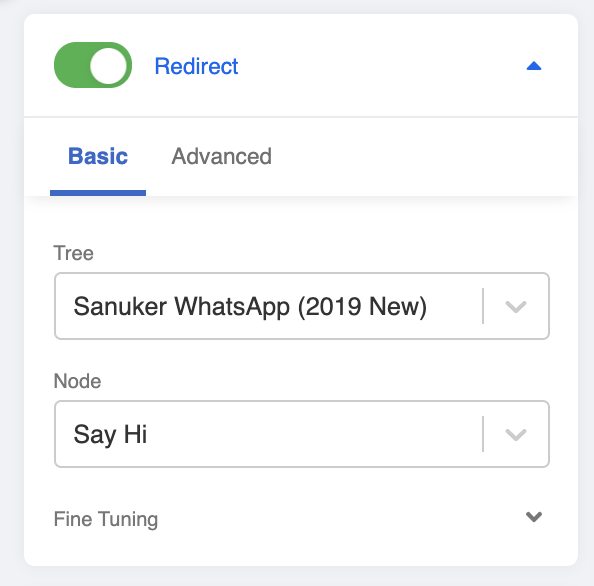
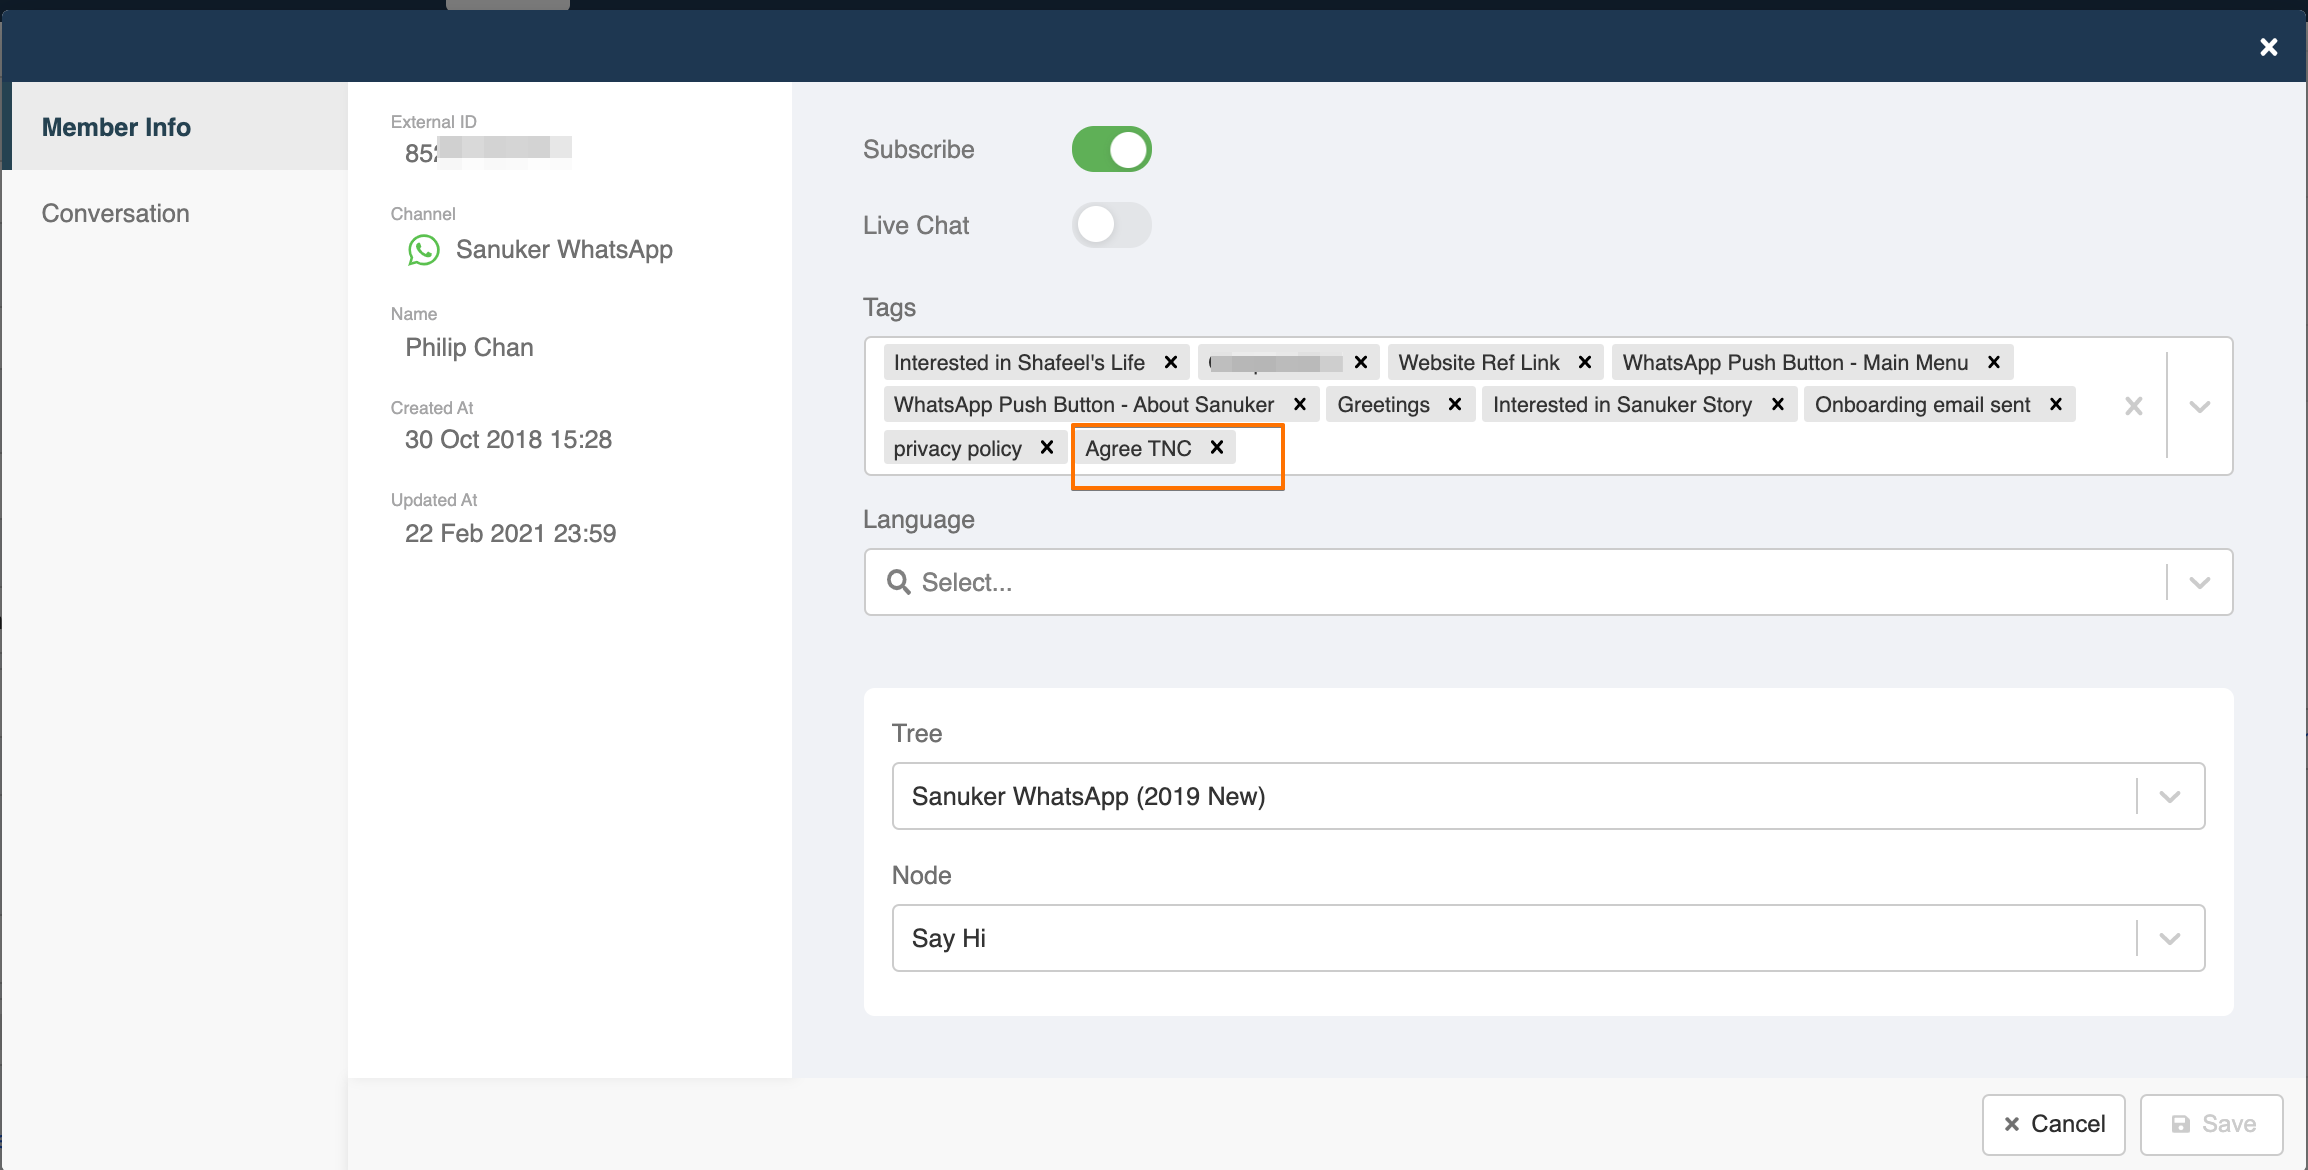
- Toggle on "Member Tagging" and set the tag as "Agree TNC".
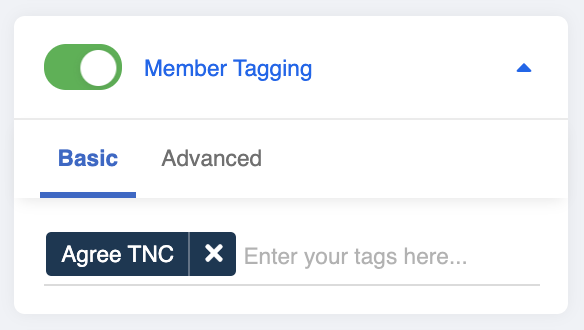
- Save the Tree Node.
Create a Tree Node - TNC Disagree
- Create a Tree Node and rename it as "TNC Disagree".

- Create a Trigger for detecting keywords that contitutes as disagreement. Rename the Trigger as "Disagree Only". You may take reference to the following condition:
this.messageEvent.type === "TEXT" && /^(2|disagree|不同意|n)$/i.test(this.messageEvent.data.text)
- Create a response for stating to users that the opt-in has failed.
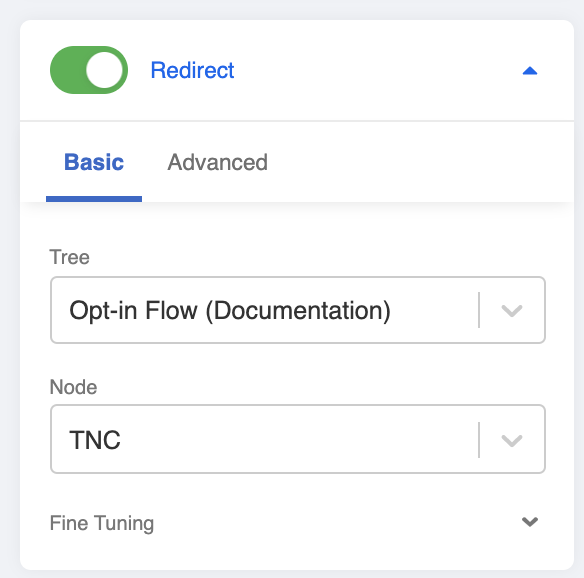
- You may choose to toggle on "Redirect" back to the start of the opt-in flow, so that user can decide for the second time.
- Toggle on "Member Tagging" and set the tag as "Disagree TNC".

- Save the Tree Node.
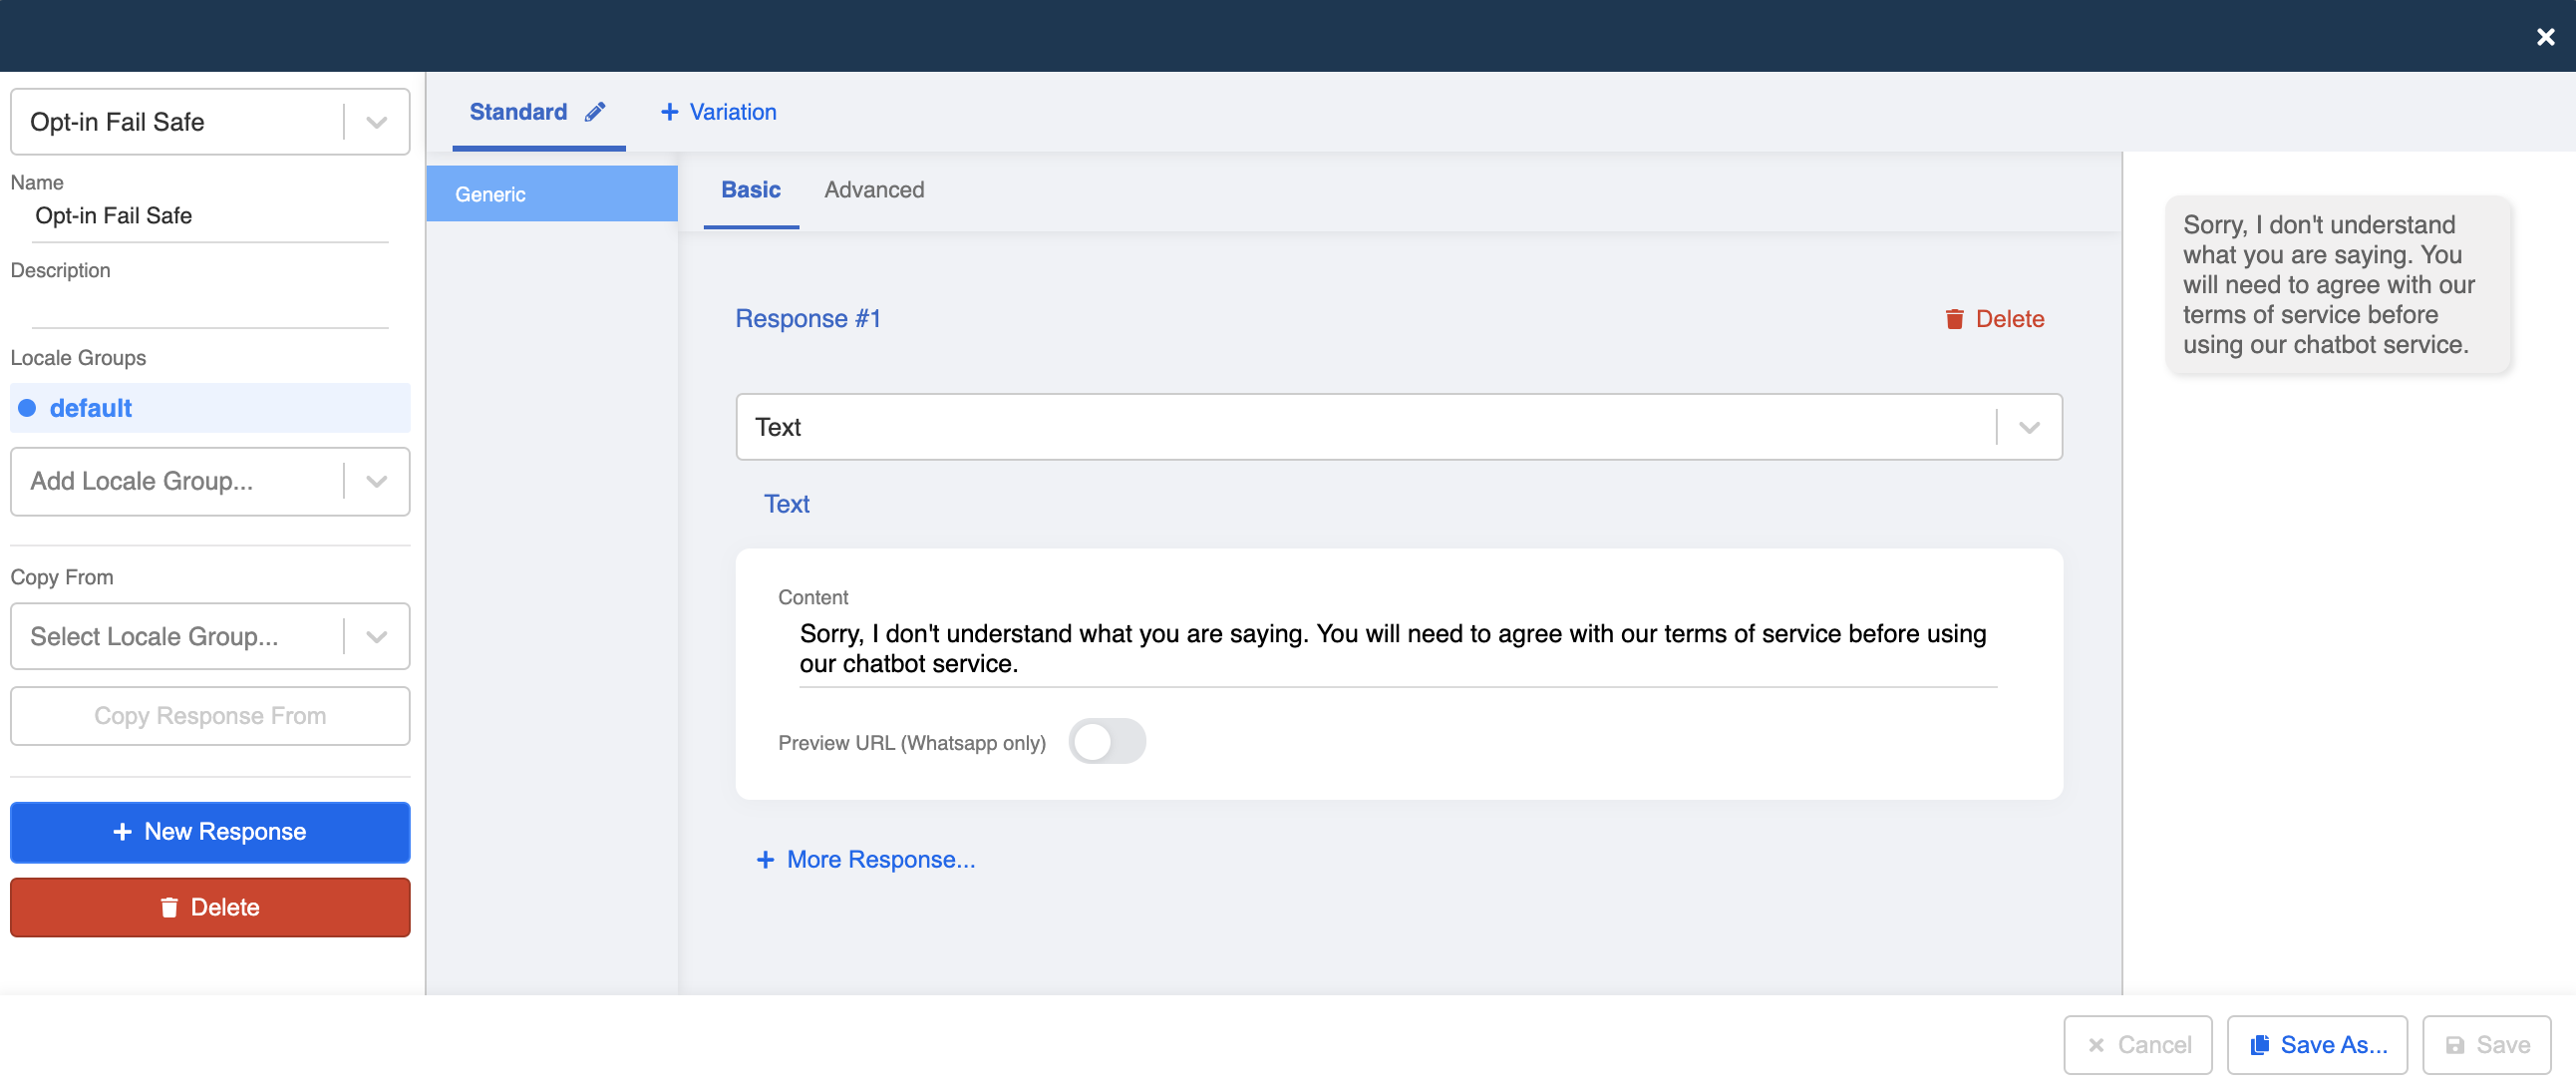
Create a Tree Node - TNC failsafe
Create a Tree Node and rename it as "TNC failsafe".
Create a Trigger for any text, any payload or any media. Rename the Trigger as "Type all".
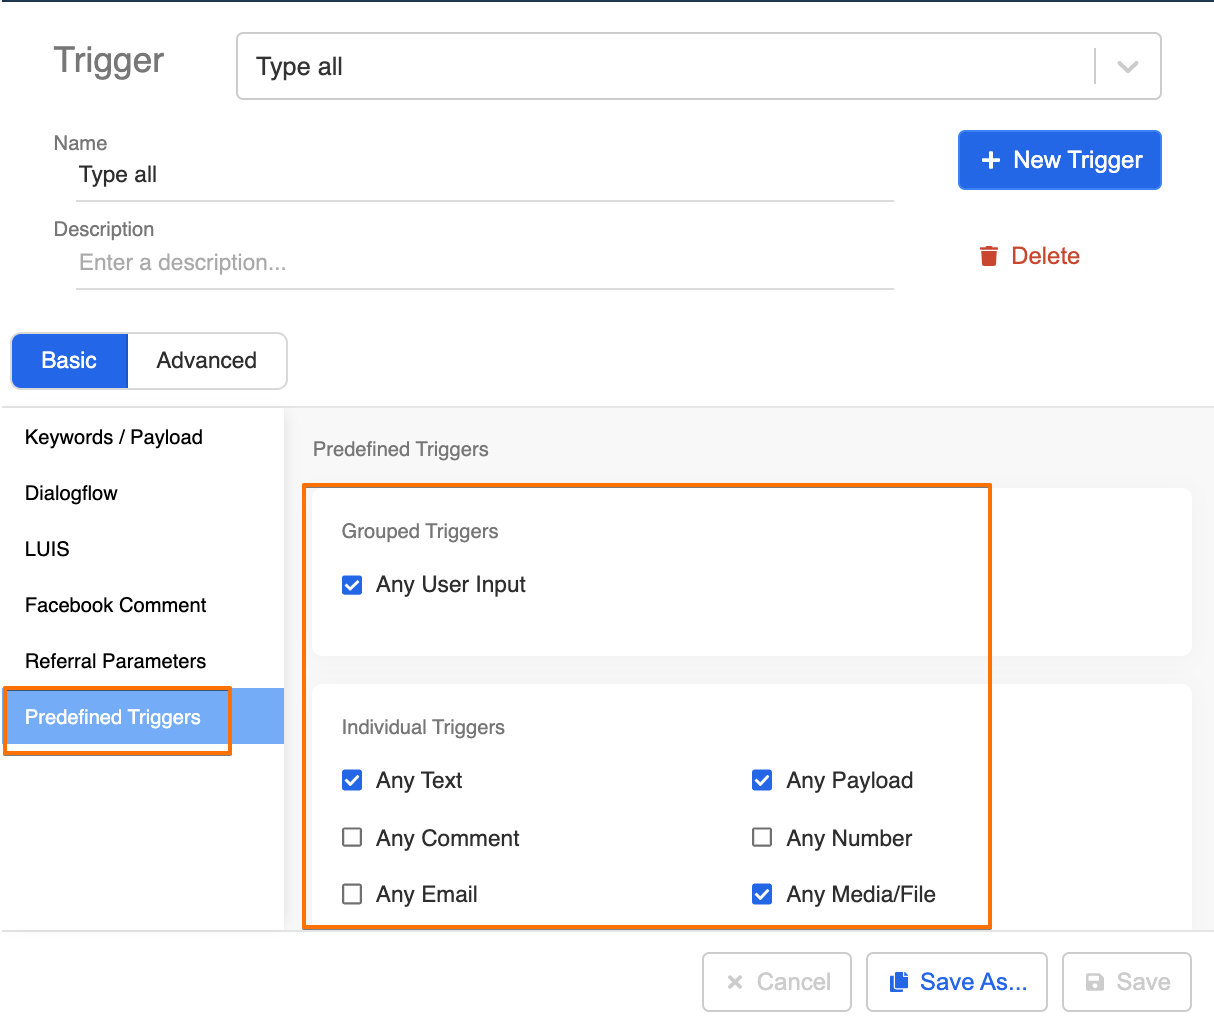
- Create a response for stating to users that the chatbot does not comprehend user's input.
- Toggle on "Redirect" back to the start of the opt-in flow, so that user can input for the second time.
- Save the Tree Node.
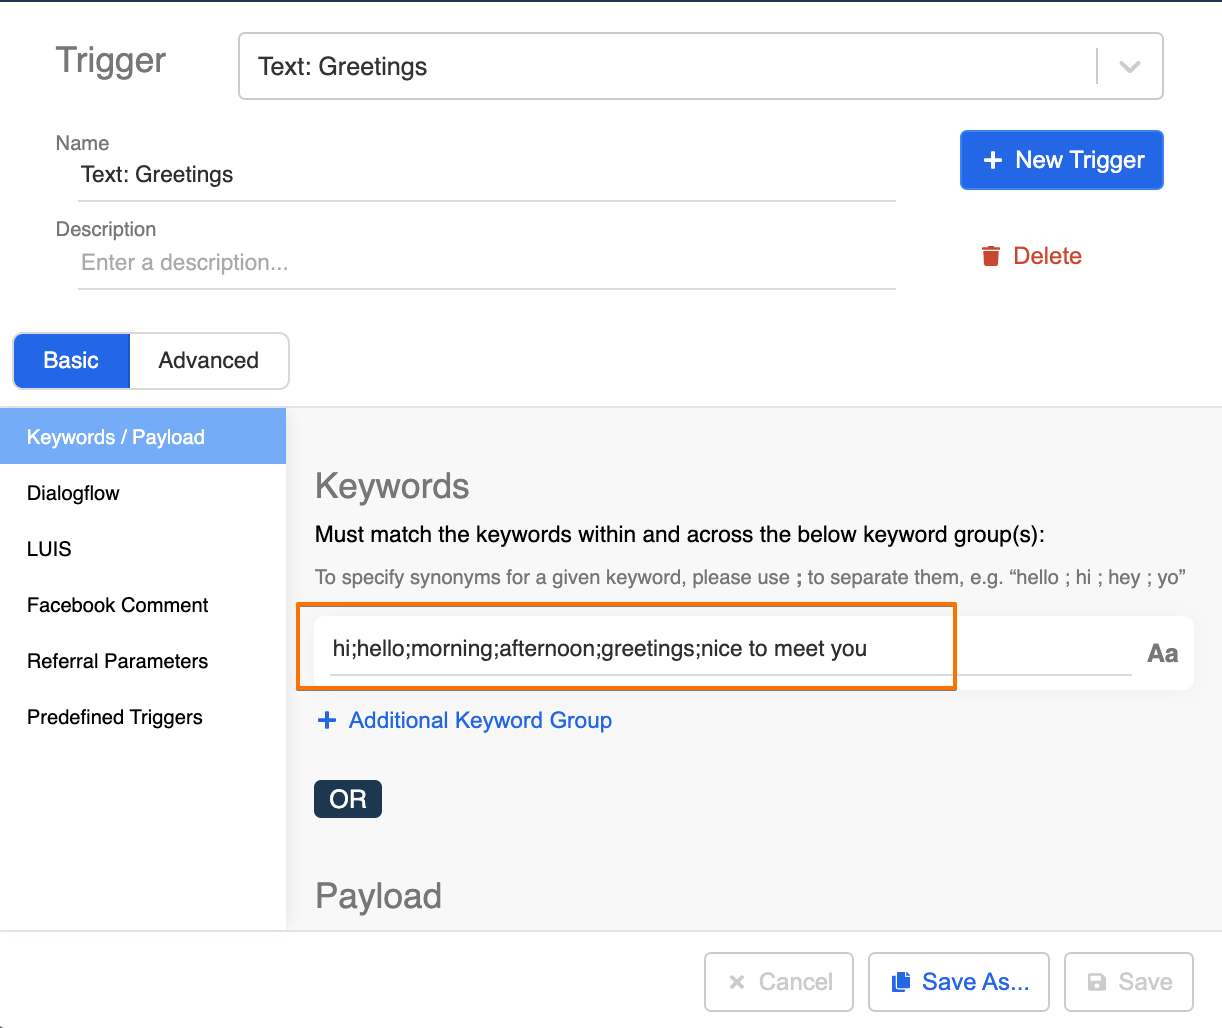
Create a Global Node - Greetings Keywords
Create a Global Node and rename it as "Greetings Keywords". This Global Node is to determine if the user has opted-in before. If the member tag "Agree TNC" is present, it means the user has opted in and then the system will redirect user to the start of chatbot service. Otherwise, the system will redirect user to the Tree Node - "TNC".
Create a Trigger for detecting greetings keywords. Rename the Trigger as "Text: Greetings".
- Toggle on "Redirect" and copy the following code to the "Advanced" tab:
return new Promise (resolve => {
  const memberTagArray = this.lodash.get(this.member, "tags", [])
  if (memberTagArray.includes("Agree TNC")) {
    resolve({
      tree: "Insert Tree ID here or this.node.tree", // Tree ID of the start of chatbot service
      nodeCompositeId: "Insert Node Composite ID Here", // Node Composite ID of the start of chatbot service
      runPreAction: true,
      sendResponse: true,
      runPostAction: true,
    })
  }
  resolve({
      tree: this.node.tree,
      nodeCompositeId: "Insert Node Composite ID Here", // Node Composite ID of TNC
      runPreAction: true,
      sendResponse: true,
      runPostAction: true,
    })
})
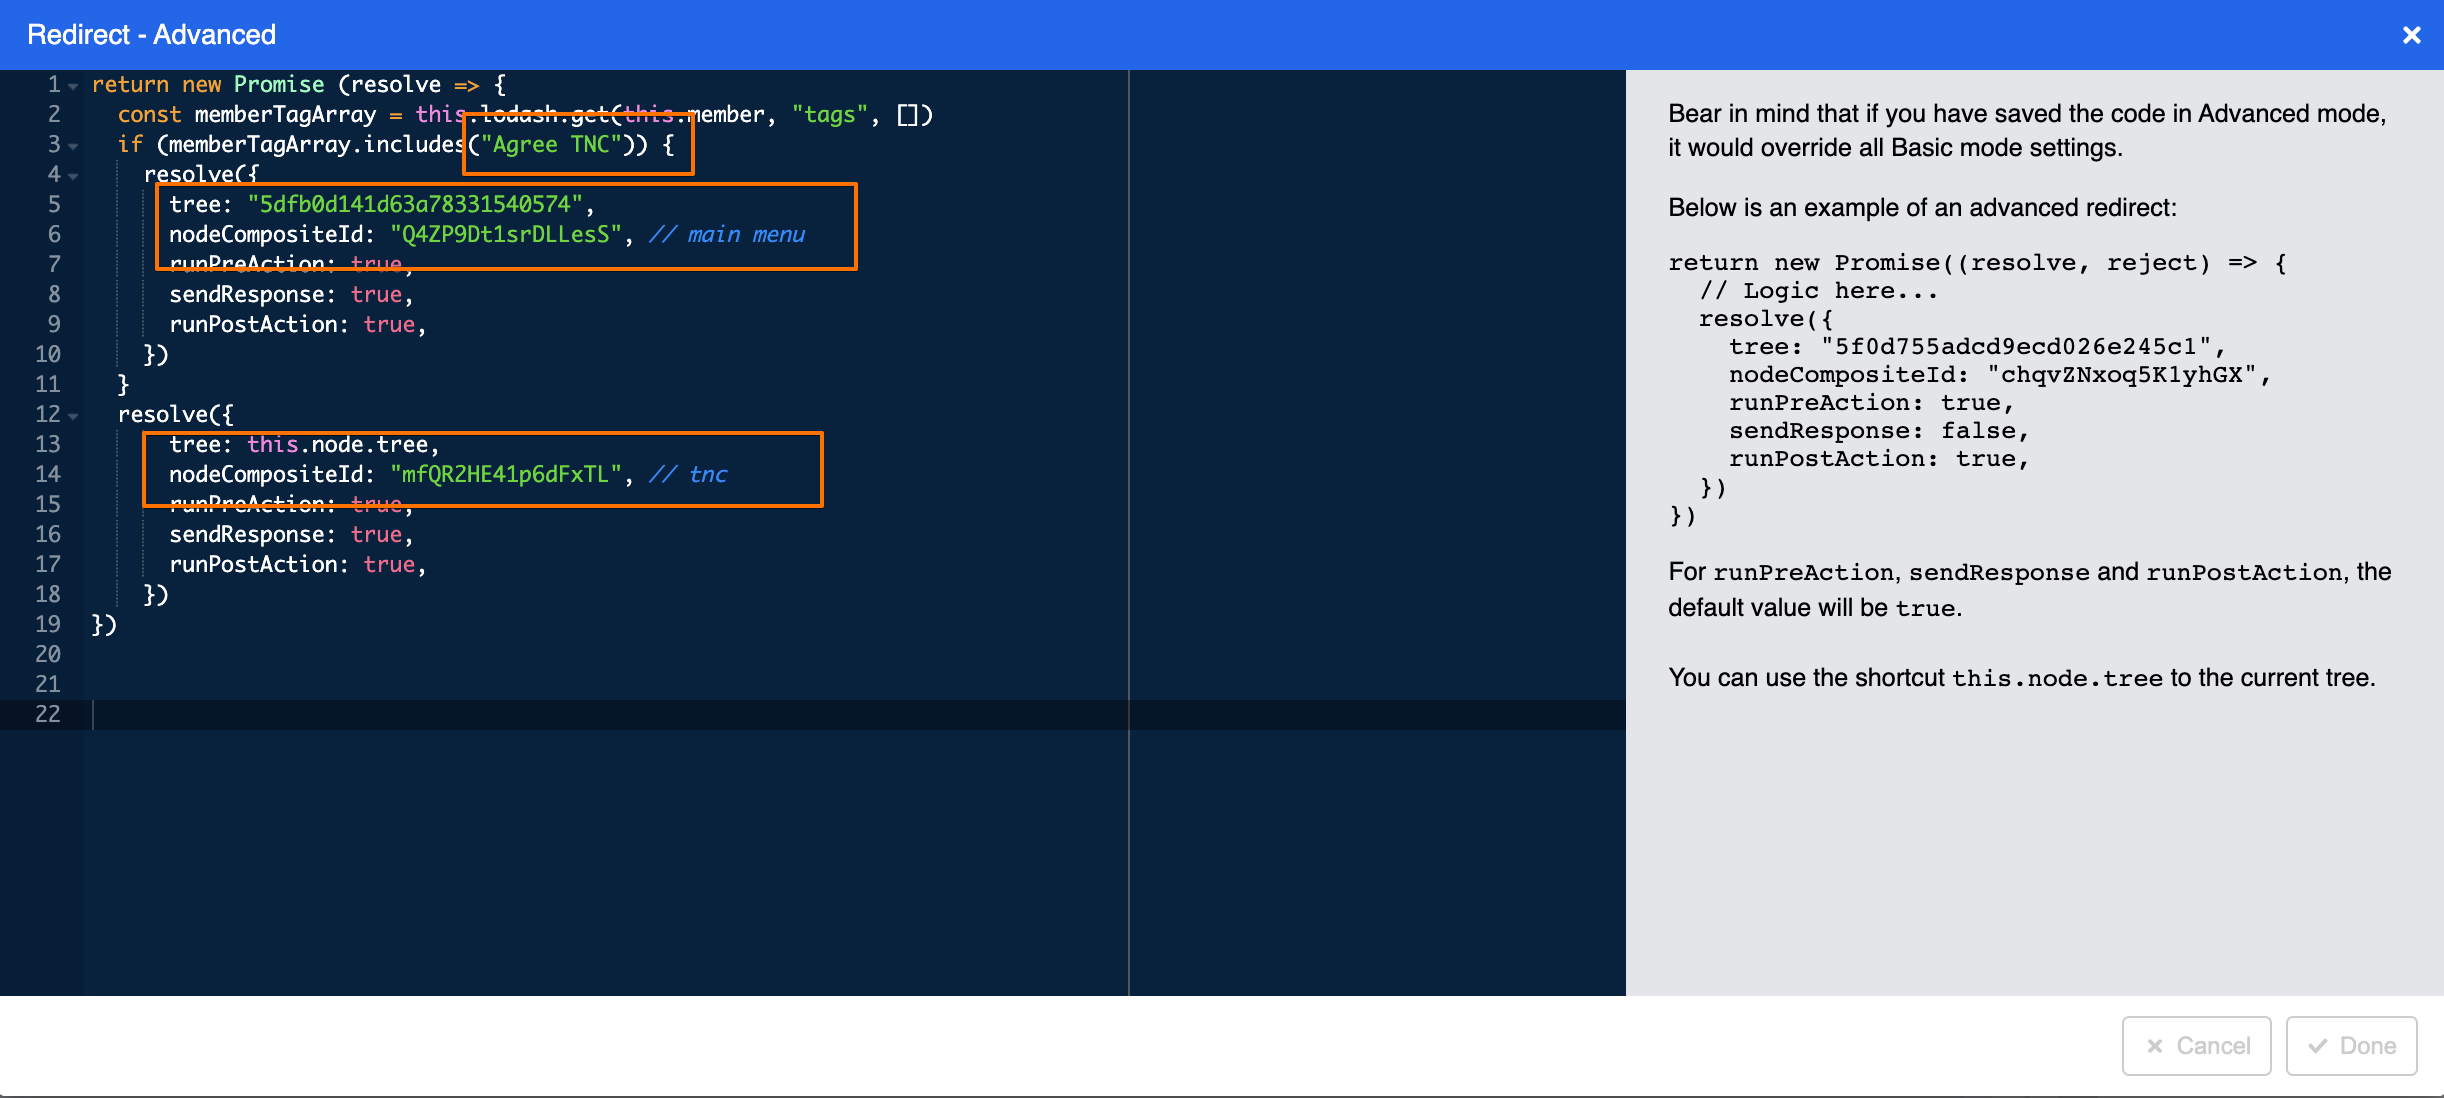
For this section, you may set which Tree Node the chatbot should redirect to. Insert a Tree ID if it is not in the same Opt-in Flow tree. Otherwise, type
this.node.tree.
- Save the Global Node and see if you can produce the expected outcome.