Stella Platform Documentation

Stella Platform Documentation

  • Docs
  • Procedures
  • Reference
  • FAQ
  • Bot API
  • API
  • Languages iconEnglish
    • 中文

›Slack Live Chat Tree Setup

Get Started

  • Build your First Chatbot

Basic Facebook Chatbot Setup

  • Overview
  • 1.1: Connect to Channels
  • 1.2: Create New Tree
  • 1.3: Build the First Node
  • 1.4: Create a Global Node
  • 1.5: Build Child Nodes
  • 2.1: Production Channel
  • 3.1: Draft a Post
  • 3.2: Create Comment Reply

Basic Instagram Chatbot Setup

  • Overview
  • 1.1: Connect to Channels
  • 1.2: Create New Tree
  • 1.3: Build the First Node
  • 1.4: Create Global Node
  • 1.5: Build Child Nodes
  • 2.1: Create Story Mention
  • 2.2: Create Comment Reply
  • 2.3: Send Push Message

Basic Web Chat Chatbot Setup

  • Overview
  • 1.1: Connect to Channels
  • 1.2: Create New Tree
  • 1.3: Build the First Node
  • 1.4: Create a Global Node
  • 1.5: Build Child Nodes

Basic WhatsApp Chatbot Setup

  • Overview
  • 1.1: WABA Subscription
  • 1.2: Connect WABA
  • 1.3: Check Approval Status of WABA
  • 1.4: Setup WABA with Used WhatsApp Number
  • 1.5: Reset / Terminate WABA
  • 2.1: Create New Tree
  • 2.2: Build the First Node
  • 2.3: Create a Global Node
  • 2.4: Build Child Nodes
  • 2.5: Connect to Datasource
  • 3.1: Create Priority Group
  • 4.1: Create Product Message

Common Use Case Application

  • Overview
  • 1.1: Apply Fail-Safe to Chatbot
  • 1.2: Apply Member Unsubscription Flow to Chatbot

Advanced Chatbot Application

  • Overview
  • Apply Datasource to Chatbot
  • Apply Payload Value to Chatbot
  • Apply API to Chatbot
  • Apply Custom Locale to Chatbot
  • Apply Opt-in Flow to Chatbot
  • Apply Agenda to Chatbot
  • Apply Stella API to Chatbot
  • Apply Web Event to Webchat Chatbot

Error Handling

  • Handle Errors for Chatbot

Stella Partner Portal Setup

  • Overview
  • 1.1: Partner Portal Setup
  • 1.2: New Customer Onboarding
  • 1.3: WABA Setup
  • 1.4: Check Approval Status of WABA
  • 1.5: Setup WABA with Used WhatsApp Number
  • 1.6: Reset / Terminate WABA

Template Tree

  • Overview
  • Create Template Tree
  • Manage Proxy Tree

Chatbot Testing & Deployment

  • Overview
  • Stage One - Tree Building
  • Stage Two - Testing Stage
  • Stage Three - Production Deployment

Slack Live Chat Tree Setup

  • Overview
  • 1.1: Create Tree for Live Chat Assignment
  • 2.1: Set Up Pick Ticket Status
  • 2.2: Create Done Command
  • 2.3: Create Transfer Command
  • 2.4: Create Archive Function
  • 2.5: Create Member Tagging/Remarks Command
  • 3.1: Automatic End Live Chat Function

Zendesk Live Chat Tree Setup

  • Overview
  • 1.1: Create Tree for Assignment
  • 2.1: Create Done Command
  • 2.2: Auto End Live Chat Function

FAQ Chatbot Setup

  • Overview
  • 1.1: Exact Keyword Match
  • 1.2: Keyword Groups Match & Diversion
  • 2.1: Redirect to Existing Chatbot Tree
  • 2.2: Data Analytics for FAQ Chatbot
  • 2.3: NLP for FAQ Chatbot
  • 3.1: Filtering Questions for FAQ Chatbot

NLP Chatbot Setup

  • Overview
  • 1.1: Apply NLP to your Chatbot
  • 2.1: Set Up an NLP Fallback Tree
  • 3.1: NLP Fallback to Other Languages

Connect Shopify Store to Stella

  • Overview
  • 1.1: Integrate Stella to Shopify
  • 2.1: Setup Facebook Messenger Chatbot for Shopify
  • 2.2: Setup WhatsApp Chatbot for Shopify
  • 2.3: WhatsApp Customer Care Notification for Shopify

Stella Inbox Setup

  • Overview
  • 1.1: Connect Channel to Slack
  • 1.2: Access Control & Admin Panel
  • 1.3: Set up Customizable Message
  • 1.4: Inbox Channel
  • 2.1: Turn on Live Chat Directly
  • 2.2: End Live Chat Mode
  • 2.3: Ticketing
  • 2.4: Manage Ticket Helper
  • 2.5: Add Member Tag
  • 3.1: Send Chatbot Message

Create Member Tagging/Remarks Command

You can always add a custom remarks/member tag to a user who requires a follow-up or special attention. The tag will allow your agent to pinpoint any marked user easily on Stella.

Please set up this command in the Slack Command Tree you've created in 2.1.

What is your Result?

  1. In the case that the agent needs to add a remarks to a user, they can do so by typing the @[bot] remarks command.
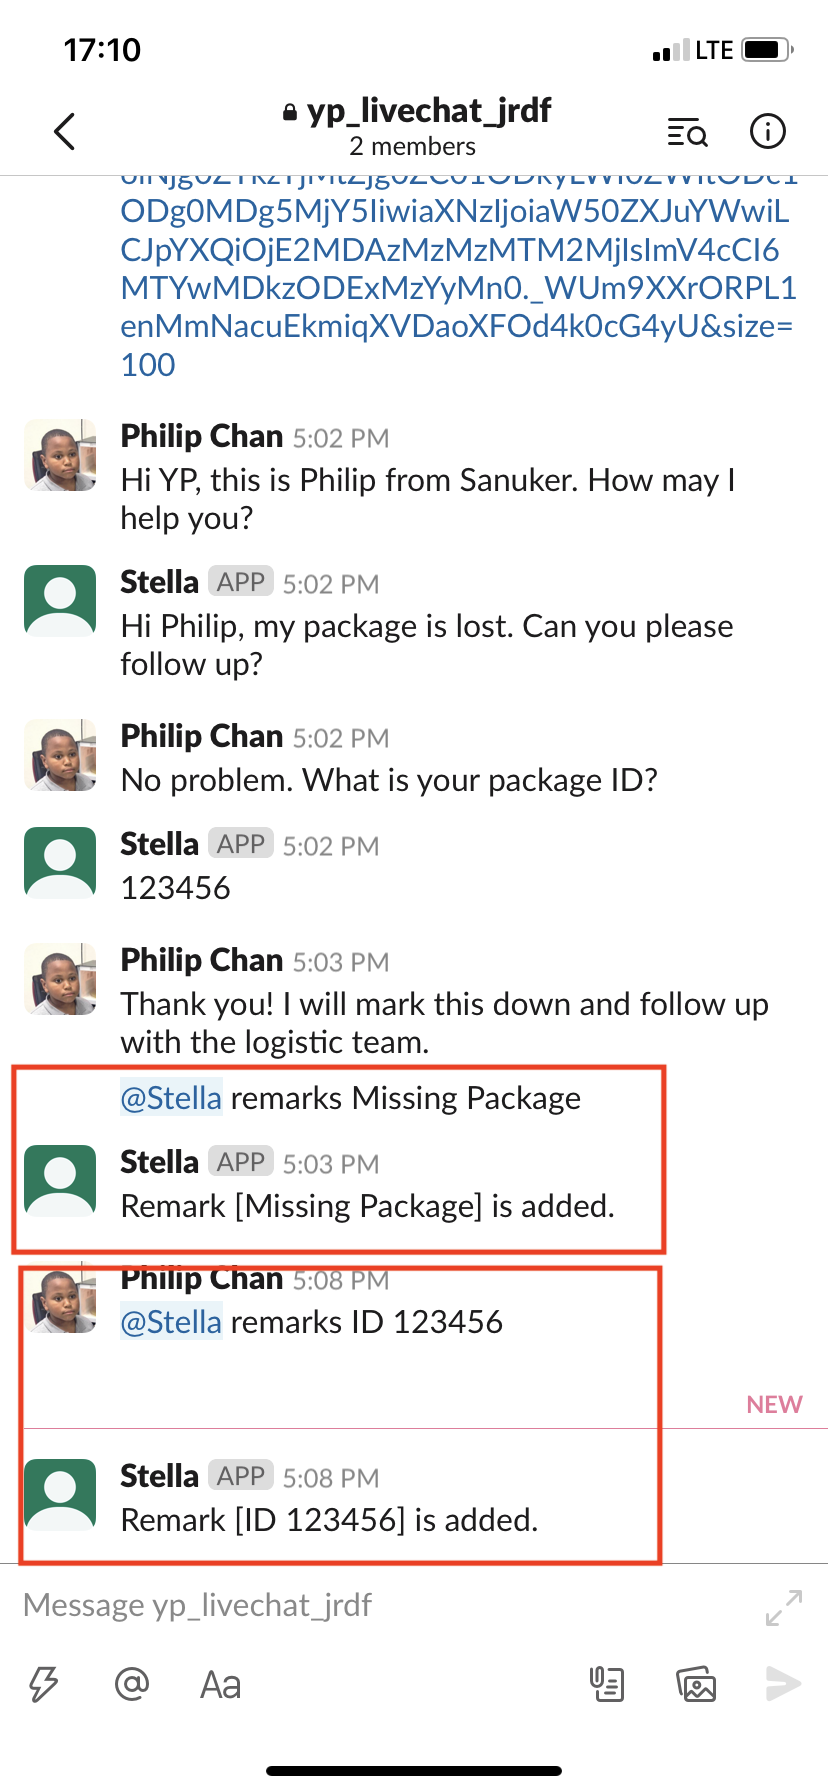
The agent add a custom member tag to the user by typing @[bot]remarks
  1. Once the member tagging/remarks command is entered, the tag will be appeared on Stella's "Members" page.

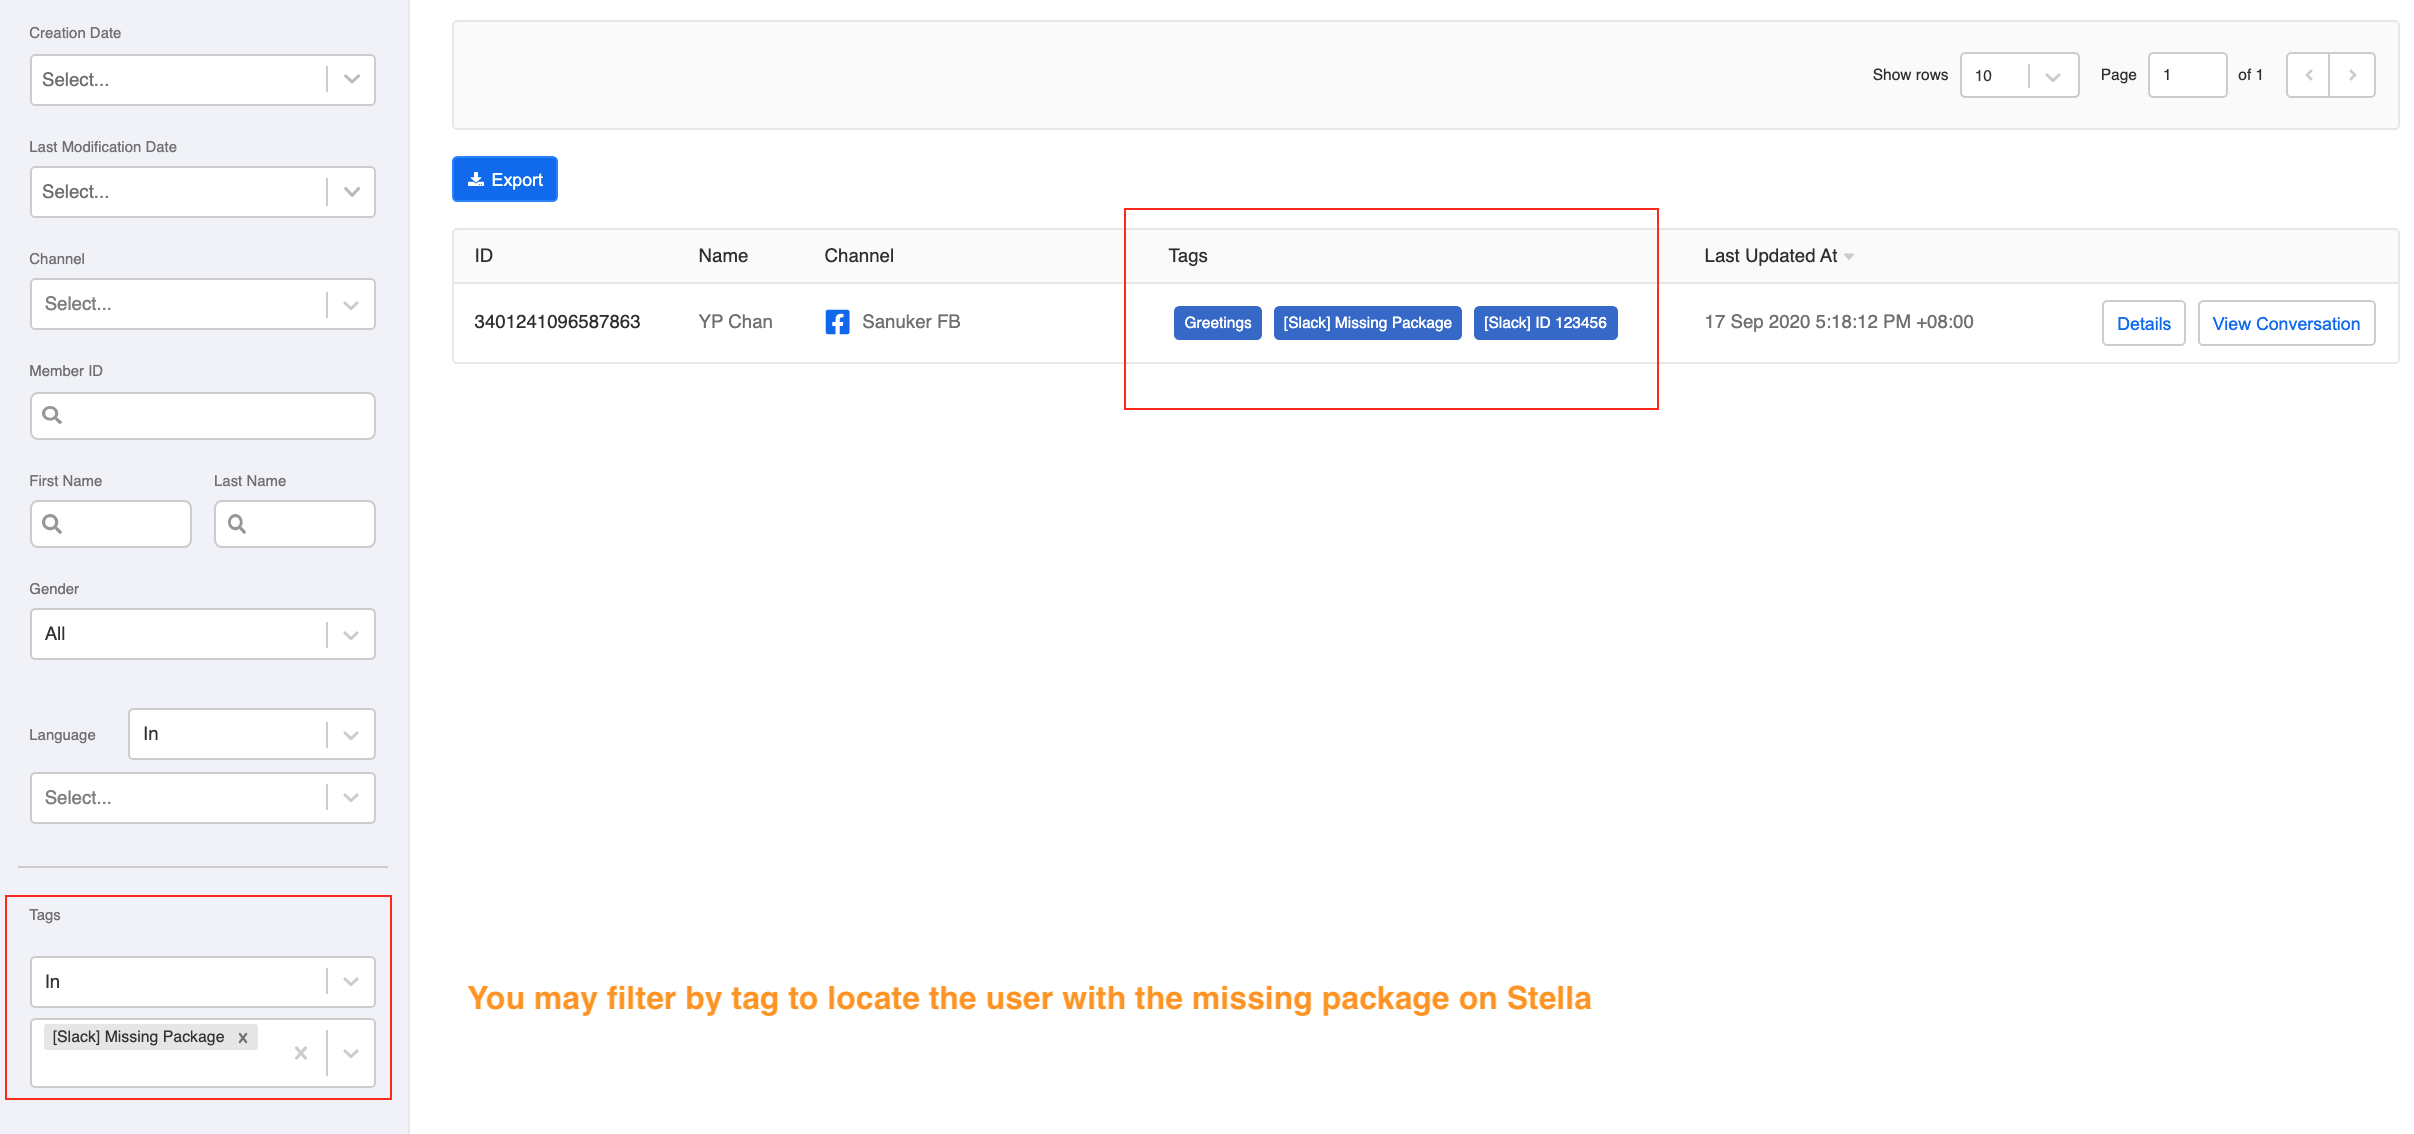
You can check the custom member tag on Stella.
  • Please remember to connect your Slack Channel on Stella before testing for the result.

Sample Tree Structure - Member Tagging/Remarks Command

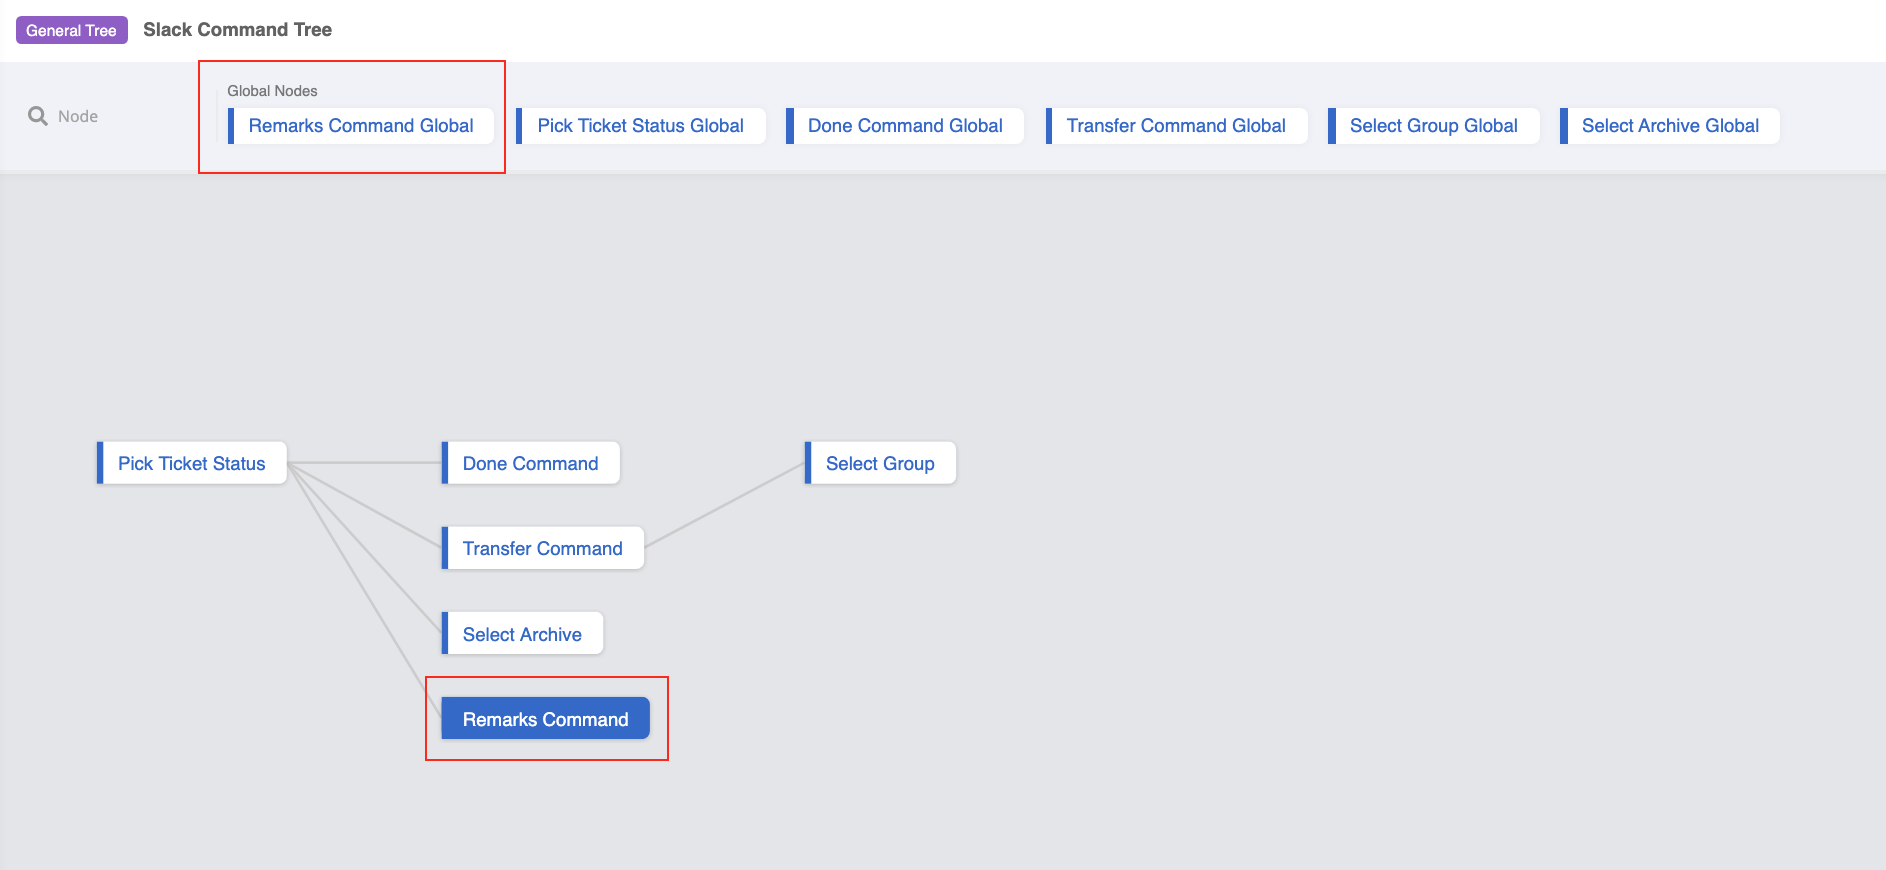
Slack Command Tree Structure for Member Tagging/Remarks Command

You can click here to download the sample tree.

Getting Hands-on

Click here to build your tree.

Create a Tree Node - Member Tagging/Remarks Command

  1. Create a tree node and name it as "Remarks Command".

  2. Create a Pre-action for saving the remarks with the following code:

return new Promise(async (resolve, reject) => {
  try {
    const match = /(remarks)\s(.*)/.exec(this.messageEvent.data.text)
    const tag = match[2]
    const memberTag = `[Slack] ${tag}`
    let group
    if (this.channel.exclusiveLiveChat === false) {
        group = await this.getGroupByExternalId({
          groupId: this.messageEvent.to,
          type: this.channel.type,
          channelId: this.channel._id,
        })
      } else {
        group = await this.getGroupByExternalId({
          adminExternalId: this.messageEvent.from,
          groupId: this.messageEvent.to,
          type: this.channel.type,
          channelId: this.channel._id,
        })
      }
    const member = await this.getMember({ memberId: group.member })
    const newMember = await this.addMemberTag({
      filter: {
        _id: member._id,
      },
      patch: {
        $addToSet: {
          "tags": memberTag
        }
      },
      withModifier: true,
      option: { new: true }
    })
    if (newMember.ok === 1) {
      this.member.addTag = true
      this.member.slackTag = tag
    }
    resolve({
      member: this.member
    })
  } catch (e) {
    reject(e)
  }
})
  1. Create a response for remarks sucessfully added message under Advanced > Response Object with the following code:
return new Promise((resolve) => {
 if (this.member.addTag) {
   resolve({
     "type": "TEXT",
     "text": `Remark [${this.member.slackTag}] is added.`
   })
 } else {
   resolve()
 }
})
  1. Save this Tree Node.

Create a Global Node - Member Tagging/Remarks Command Global

  1. Create a global node and then create a trigger with two conditions (for details on creating conditions, please click here) with the and operator:

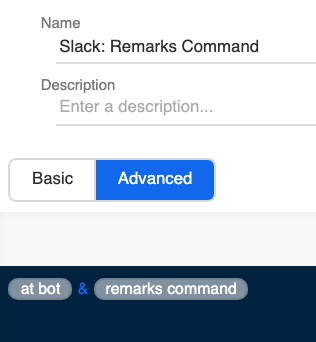
Member Tagging/Remarks Command Trigger for Slack

First condition - at bot:

new RegExp(`<@${this.channel.info.botId}`).test(this.messageEvent.data.text)

Second condition - remarks command:

new RegExp("remarks", "i").test(this.messageEvent.data.text)
  1. Toggle Redirect to the tree node you have created for member tagging/remarks command.

Redirect to Slack Member Tagging/Remarks Command Tree Node

Before testing, please remember to update the tree and global node in the Slack Channel.

  1. Check and see if you can produce the expected outcome.
← 2.4: Create Archive Function3.1: Automatic End Live Chat Function →
  • What is your Result?
  • Sample Tree Structure - Member Tagging/Remarks Command
  • Getting Hands-on
    • Create a Tree Node - Member Tagging/Remarks Command
    • Create a Global Node - Member Tagging/Remarks Command Global
Stella Platform Documentation
Docs
Get StartedBot API ReferenceAPI ReferenceStandard Procedures
Community
FAQUser ShowcaseChat with Us
Copyright © 2023 Sanuker Inc. Limited