Stella Platform Documentation

Stella Platform Documentation

  • Docs
  • Procedures
  • Reference
  • FAQ
  • Bot API
  • API
  • Languages iconEnglish
    • 中文

›Slack Live Chat Tree Setup

Get Started

  • Build your First Chatbot

Basic Facebook Chatbot Setup

  • Overview
  • 1.1: Connect to Channels
  • 1.2: Create New Tree
  • 1.3: Build the First Node
  • 1.4: Create a Global Node
  • 1.5: Build Child Nodes
  • 2.1: Production Channel
  • 3.1: Draft a Post
  • 3.2: Create Comment Reply

Basic Instagram Chatbot Setup

  • Overview
  • 1.1: Connect to Channels
  • 1.2: Create New Tree
  • 1.3: Build the First Node
  • 1.4: Create Global Node
  • 1.5: Build Child Nodes
  • 2.1: Create Story Mention
  • 2.2: Create Comment Reply
  • 2.3: Send Push Message

Basic Web Chat Chatbot Setup

  • Overview
  • 1.1: Connect to Channels
  • 1.2: Create New Tree
  • 1.3: Build the First Node
  • 1.4: Create a Global Node
  • 1.5: Build Child Nodes

Basic WhatsApp Chatbot Setup

  • Overview
  • 1.1: WABA Subscription
  • 1.2: Connect WABA
  • 1.3: Check Approval Status of WABA
  • 1.4: Setup WABA with Used WhatsApp Number
  • 1.5: Reset / Terminate WABA
  • 2.1: Create New Tree
  • 2.2: Build the First Node
  • 2.3: Create a Global Node
  • 2.4: Build Child Nodes
  • 2.5: Connect to Datasource
  • 3.1: Create Priority Group
  • 4.1: Create Product Message

Common Use Case Application

  • Overview
  • 1.1: Apply Fail-Safe to Chatbot
  • 1.2: Apply Member Unsubscription Flow to Chatbot

Advanced Chatbot Application

  • Overview
  • Apply Datasource to Chatbot
  • Apply Payload Value to Chatbot
  • Apply API to Chatbot
  • Apply Custom Locale to Chatbot
  • Apply Opt-in Flow to Chatbot
  • Apply Agenda to Chatbot
  • Apply Stella API to Chatbot
  • Apply Web Event to Webchat Chatbot

Error Handling

  • Handle Errors for Chatbot

Stella Partner Portal Setup

  • Overview
  • 1.1: Partner Portal Setup
  • 1.2: New Customer Onboarding
  • 1.3: WABA Setup
  • 1.4: Check Approval Status of WABA
  • 1.5: Setup WABA with Used WhatsApp Number
  • 1.6: Reset / Terminate WABA

Template Tree

  • Overview
  • Create Template Tree
  • Manage Proxy Tree

Chatbot Testing & Deployment

  • Overview
  • Stage One - Tree Building
  • Stage Two - Testing Stage
  • Stage Three - Production Deployment

Slack Live Chat Tree Setup

  • Overview
  • 1.1: Create Tree for Live Chat Assignment
  • 2.1: Set Up Pick Ticket Status
  • 2.2: Create Done Command
  • 2.3: Create Transfer Command
  • 2.4: Create Archive Function
  • 2.5: Create Member Tagging/Remarks Command
  • 3.1: Automatic End Live Chat Function

Zendesk Live Chat Tree Setup

  • Overview
  • 1.1: Create Tree for Assignment
  • 2.1: Create Done Command
  • 2.2: Auto End Live Chat Function

FAQ Chatbot Setup

  • Overview
  • 1.1: Exact Keyword Match
  • 1.2: Keyword Groups Match & Diversion
  • 2.1: Redirect to Existing Chatbot Tree
  • 2.2: Data Analytics for FAQ Chatbot
  • 2.3: NLP for FAQ Chatbot
  • 3.1: Filtering Questions for FAQ Chatbot

NLP Chatbot Setup

  • Overview
  • 1.1: Apply NLP to your Chatbot
  • 2.1: Set Up an NLP Fallback Tree
  • 3.1: NLP Fallback to Other Languages

Connect Shopify Store to Stella

  • Overview
  • 1.1: Integrate Stella to Shopify
  • 2.1: Setup Facebook Messenger Chatbot for Shopify
  • 2.2: Setup WhatsApp Chatbot for Shopify
  • 2.3: WhatsApp Customer Care Notification for Shopify

Stella Inbox Setup

  • Overview
  • 1.1: Connect Channel to Slack
  • 1.2: Access Control & Admin Panel
  • 1.3: Set up Customizable Message
  • 1.4: Inbox Channel
  • 2.1: Turn on Live Chat Directly
  • 2.2: End Live Chat Mode
  • 2.3: Ticketing
  • 2.4: Manage Ticket Helper
  • 2.5: Add Member Tag
  • 3.1: Send Chatbot Message

Create Tree for Assignment

The first step of setting up the live chat function is to incorporate the function itself into your chatbot flow.

You may put the live chat settings in a separate individual tree, or incorporate the live chat nodes into your existing tree for inlet channel (i.e. WhatsApp).

What is your Result?

A ticket will be created on Slack when the user requests for live chat on Messenger
  • Please remember to connect your Slack Channel on Stella before testing for the result.

Getting Hands-on

Create An Action On the Node to Perform Live Chat

  1. Create a new tree node or select any existing tree node reserved for live chat.

Add a New Post-action
  1. Add a pre-action for creating the ticket assignment with the following code:
Please refer to the following sample if you are using the Core Version v2.6 or below
return new Promise(async (resolve, reject) => {
  try {
    let groupName = "live chat group name_"
    let requestText = "request text sending to ticketing group or admin"
    let summary = "a summary send to admin in a live chat channel"
    let ticketButtonTitle = "Chat with user"
    const result = await this.findAndModifyMember({
      filter: {
        _id: this.member._id,
        "botMeta.liveChat": false
      },
      withModifier: true,
      patch: {
        $set: {
          "botMeta.liveChat": true
        }
      }
    })
    if (!result.value) {
      throw new Error("Ticket creation in process")
    }
    this.createAssignment({
      history: true,
      member: this.member,
      assignmentDetails: {
        summary,
        groupName: groupName,
        relayMessage: {
          slack: {
            type: "BUTTON",
            text: requestText,
            buttons: [{
              type: "postback",
              title: ticketButtonTitle,
              payload: {
                payload: "PICK_TICKET"
              }
            }]
          }
        }
      },
      label: "default"
    }).then((json) => {
      console.log(json)
      this.member.assignmentId = json.assignmentId
      resolve(json)
    })
  } catch (e) {
    reject(e)
  }
});

Please refer to the following sample if you are using the Core Version v2.7 or v2.8.
return new Promise(async (resolve, reject) => {
  try {
    let groupName = "live chat group name_"
    let requestText = "request text sending to ticketing group or admin"
    let summary = "a summary send to admin in a live chat channel"
    let ticketButtonTitle = "Chat with user"
    const result = await this.findAndModifyMember({
      filter: {
        _id: this.member._id,
        "botMeta.liveChat": false
      },
      withModifier: true,
      patch: {
        $set: {
          "botMeta.liveChat": true
        }
      }
    })
    if (!result.member) {
      throw new Error("Ticket creation in process")
    }
    this.createAssignment({
      history: true,
      member: this.member,
      assignmentDetails: {
        summary,
        groupName: groupName,
        relayMessage: {
          slack: {
            type: "BUTTON",
            text: requestText,
            buttons: [{
              type: "postback",
              title: ticketButtonTitle,
              payload: {
                payload: "PICK_TICKET"
              }
            }]
          }
        }
      },
      label: "default"
    }).then((json) => {
      console.log(json)
      this.member.assignmentId = json.assignmentId
      resolve(json)
    })
  } catch (e) {
    reject(e)
  }
});
  1. The label you have set up in the code should match with the label that you will see in the Broadcast Group Settings. If you toggle on "Default" in Broadcast Group Settings, the label in the code should be "default".

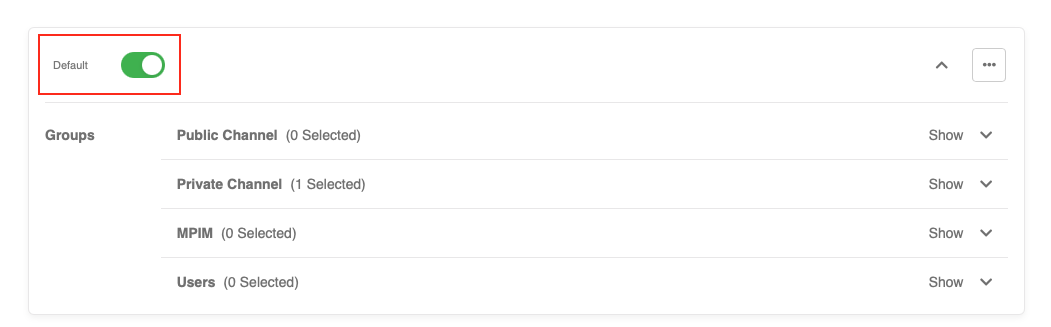
Default Label and Default Broadcast Group

If you turn off "Default", you can enter a custom label in Broadcast Group Settings, the label in the code should match with this custom label.

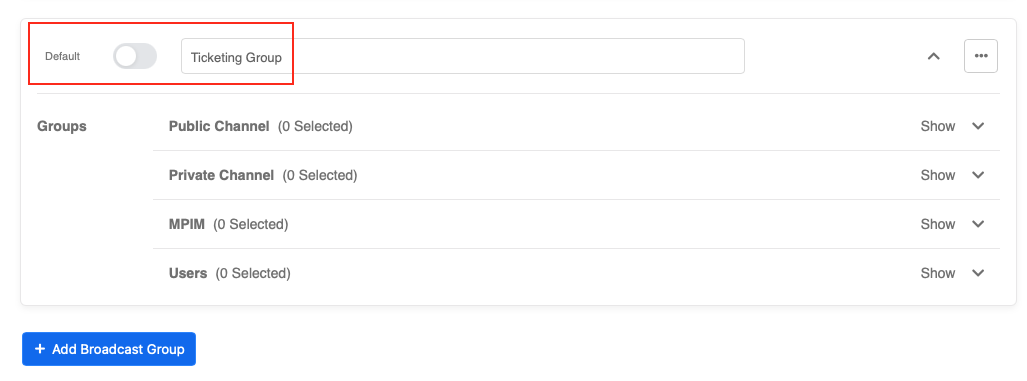
Custom Label and Custom Broadcast Group

You may edit your code to customize the following display:

  • groupName:

The Name of the Private Channel between User and Agent
  • requestText & ticketButtonTitle:
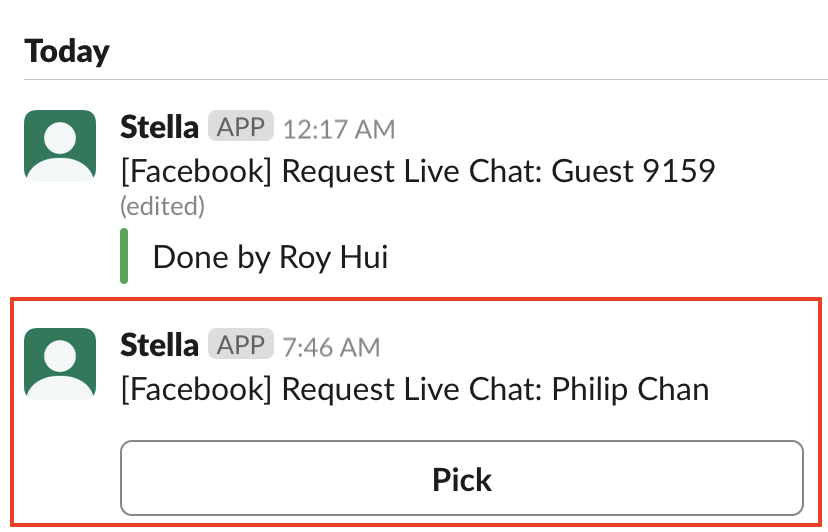
Slack Ticket
  • summary:

Summary in the Private Channel
  1. Create a basic text response in the same node to notify users that they are being connected to live chat. (This message will be sent to your client-facing channel, i.e. Facebook Messenger.)
  1. Check and see if you can produce the expected outcome
Please send a email to support@stellabot.com with a title “Request for Slack team inbox” if you could like to add more than 1 agent to the private channel and reply to customer as well.
← Overview2.1: Set Up Pick Ticket Status →
  • What is your Result?
  • Getting Hands-on
    • Create An Action On the Node to Perform Live Chat
Stella Platform Documentation
Docs
Get StartedBot API ReferenceAPI ReferenceStandard Procedures
Community
FAQUser ShowcaseChat with Us
Copyright © 2023 Sanuker Inc. Limited