Stella Platform Documentation

Stella Platform Documentation

  • Docs
  • Procedures
  • Reference
  • FAQ
  • Bot API
  • API
  • Languages iconEnglish
    • 中文

›Template Tree

Get Started

  • Build your First Chatbot

Basic Facebook Chatbot Setup

  • Overview
  • 1.1: Connect to Channels
  • 1.2: Create New Tree
  • 1.3: Build the First Node
  • 1.4: Create a Global Node
  • 1.5: Build Child Nodes
  • 2.1: Production Channel
  • 3.1: Draft a Post
  • 3.2: Create Comment Reply

Basic Instagram Chatbot Setup

  • Overview
  • 1.1: Connect to Channels
  • 1.2: Create New Tree
  • 1.3: Build the First Node
  • 1.4: Create Global Node
  • 1.5: Build Child Nodes
  • 2.1: Create Story Mention
  • 2.2: Create Comment Reply
  • 2.3: Send Push Message

Basic Web Chat Chatbot Setup

  • Overview
  • 1.1: Connect to Channels
  • 1.2: Create New Tree
  • 1.3: Build the First Node
  • 1.4: Create a Global Node
  • 1.5: Build Child Nodes

Basic WhatsApp Chatbot Setup

  • Overview
  • 1.1: WABA Subscription
  • 1.2: Connect WABA
  • 1.3: Check Approval Status of WABA
  • 1.4: Setup WABA with Used WhatsApp Number
  • 1.5: Reset / Terminate WABA
  • 2.1: Create New Tree
  • 2.2: Build the First Node
  • 2.3: Create a Global Node
  • 2.4: Build Child Nodes
  • 2.5: Connect to Datasource
  • 3.1: Create Priority Group
  • 4.1: Create Product Message

Common Use Case Application

  • Overview
  • 1.1: Apply Fail-Safe to Chatbot
  • 1.2: Apply Member Unsubscription Flow to Chatbot

Advanced Chatbot Application

  • Overview
  • Apply Datasource to Chatbot
  • Apply Payload Value to Chatbot
  • Apply API to Chatbot
  • Apply Custom Locale to Chatbot
  • Apply Opt-in Flow to Chatbot
  • Apply Agenda to Chatbot
  • Apply Stella API to Chatbot
  • Apply Web Event to Webchat Chatbot

Error Handling

  • Handle Errors for Chatbot

Stella Partner Portal Setup

  • Overview
  • 1.1: Partner Portal Setup
  • 1.2: New Customer Onboarding
  • 1.3: WABA Setup
  • 1.4: Check Approval Status of WABA
  • 1.5: Setup WABA with Used WhatsApp Number
  • 1.6: Reset / Terminate WABA

Template Tree

  • Overview
  • Create Template Tree
  • Manage Proxy Tree

Chatbot Testing & Deployment

  • Overview
  • Stage One - Tree Building
  • Stage Two - Testing Stage
  • Stage Three - Production Deployment

Slack Live Chat Tree Setup

  • Overview
  • 1.1: Create Tree for Live Chat Assignment
  • 2.1: Set Up Pick Ticket Status
  • 2.2: Create Done Command
  • 2.3: Create Transfer Command
  • 2.4: Create Archive Function
  • 2.5: Create Member Tagging/Remarks Command
  • 3.1: Automatic End Live Chat Function

Zendesk Live Chat Tree Setup

  • Overview
  • 1.1: Create Tree for Assignment
  • 2.1: Create Done Command
  • 2.2: Auto End Live Chat Function

FAQ Chatbot Setup

  • Overview
  • 1.1: Exact Keyword Match
  • 1.2: Keyword Groups Match & Diversion
  • 2.1: Redirect to Existing Chatbot Tree
  • 2.2: Data Analytics for FAQ Chatbot
  • 2.3: NLP for FAQ Chatbot
  • 3.1: Filtering Questions for FAQ Chatbot

NLP Chatbot Setup

  • Overview
  • 1.1: Apply NLP to your Chatbot
  • 2.1: Set Up an NLP Fallback Tree
  • 3.1: NLP Fallback to Other Languages

Connect Shopify Store to Stella

  • Overview
  • 1.1: Integrate Stella to Shopify
  • 2.1: Setup Facebook Messenger Chatbot for Shopify
  • 2.2: Setup WhatsApp Chatbot for Shopify
  • 2.3: WhatsApp Customer Care Notification for Shopify

Stella Inbox Setup

  • Overview
  • 1.1: Connect Channel to Slack
  • 1.2: Access Control & Admin Panel
  • 1.3: Set up Customizable Message
  • 1.4: Inbox Channel
  • 2.1: Turn on Live Chat Directly
  • 2.2: End Live Chat Mode
  • 2.3: Ticketing
  • 2.4: Manage Ticket Helper
  • 2.5: Add Member Tag
  • 3.1: Send Chatbot Message

Manage Proxy Tree

Proxy Tree is a tree created from the Template Tree. Any proxy tree is created with a blank config map but with a chatbot flow exactly the same as the one in Template Tree.

Create Proxy Tree

You can easily copy a Proxy Tree from a Template Tree via Tree Manager.
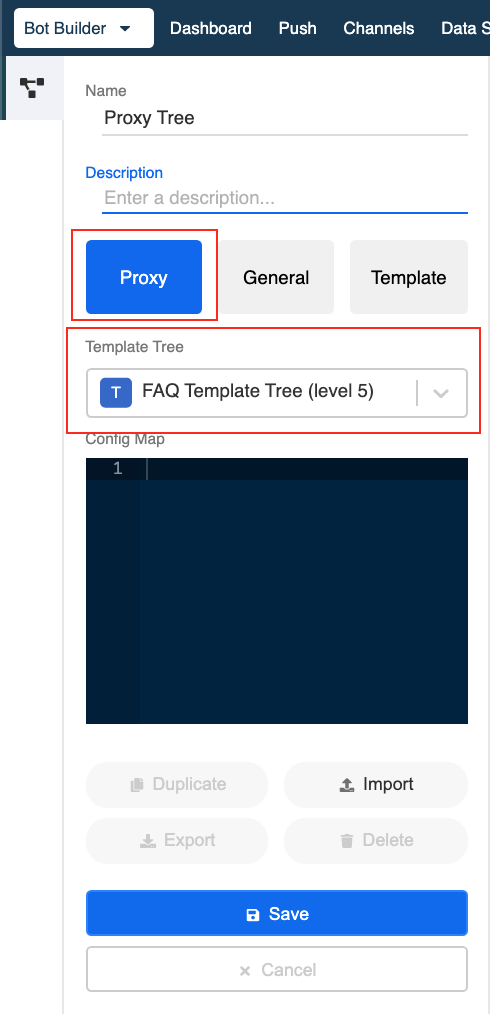
Proxy Tree

After copying, you will be able to locate the copied proxy tree in the drop down list of the Tree Manager. A label Template Tree will also be add on top the of the workspace.

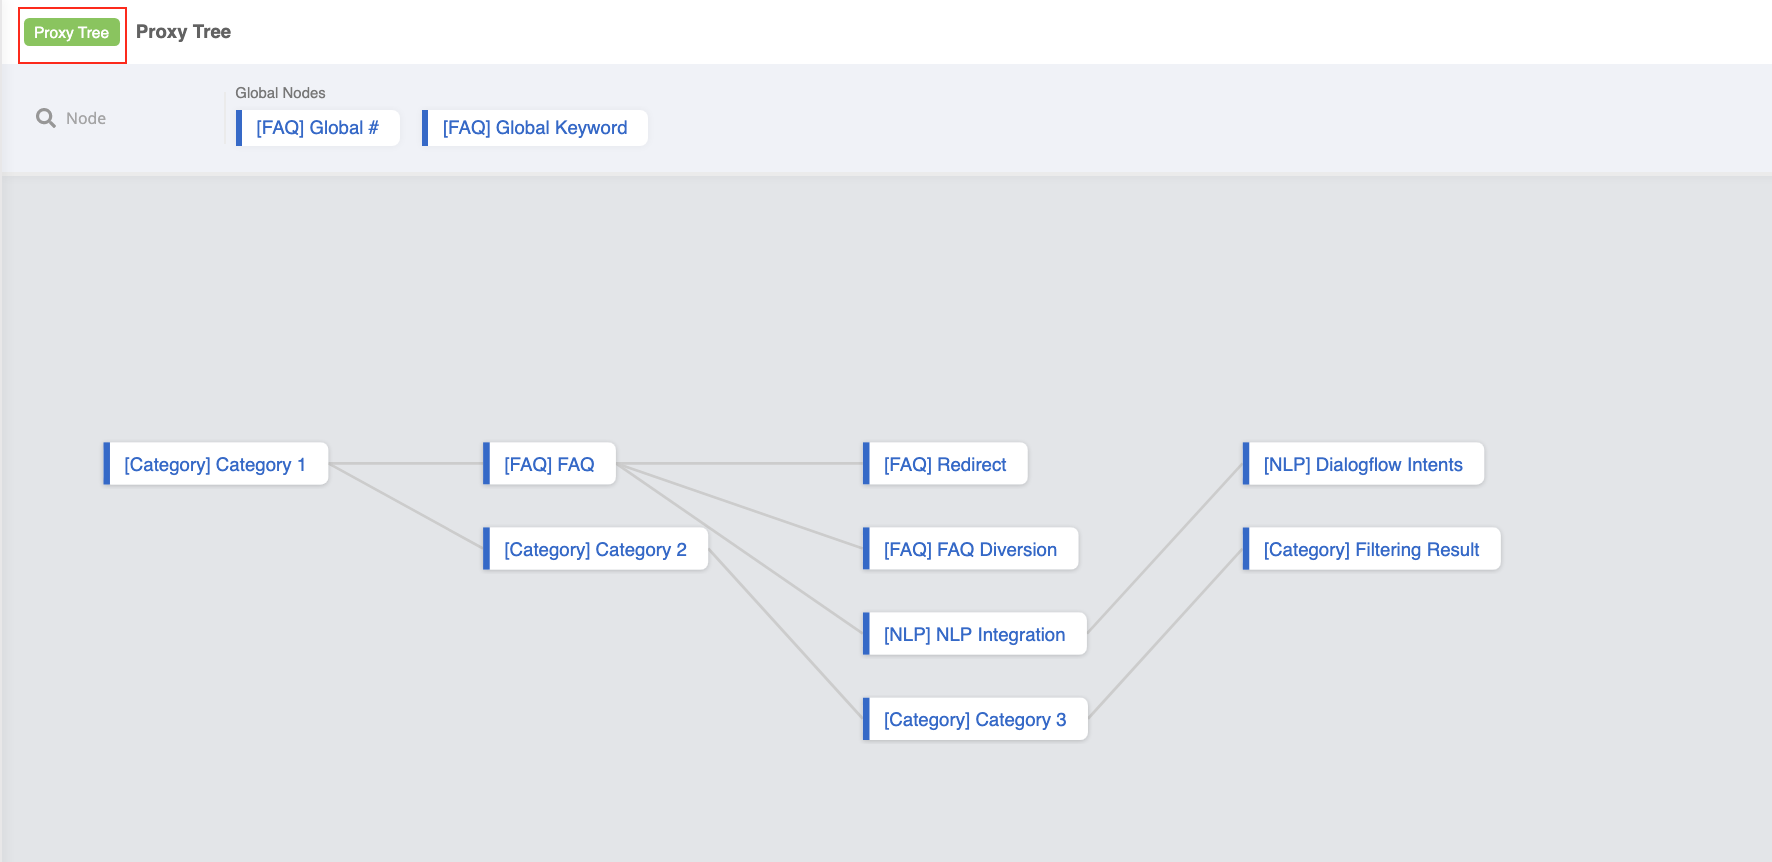
Proxy Tree Structure

Manage Proxy Tree

Before you can manage your proxy tree, remember to add back the config map schema you have created from your template tree back to the proxy tree. After that, you can edit the variables to fit your page. Below is an example:

{
  "datasourceId": "5ea26a9d5423750009c88801_faq_level_5",
  "noAnswer": "Sorry, I don't have an answer for your question.",
  "question": "Please select a suitable question: ",
  "categoryOneHeader": "Please select your option: ",
  "categoryOneFooter": "Type \"0\" for main menu.",
  "categoryTwoHeader": "Please select your option: ",
  "categoryTwoFooter": "Type \"0\" for main menu.",
  "categoryThreeHeader": "Please select your option: ",
  "categoryThreeFooter": "Type \"0\" for main menu.",
  "greetingMessage": "Hi there! This is an FAQ Chatbot"
}

Deploy Proxy Tree

Deploying Proxy Tree is the same as adding a general tree to a channel.

← Create Template TreeOverview →
  • Create Proxy Tree
  • Manage Proxy Tree
  • Deploy Proxy Tree
Stella Platform Documentation
Docs
Get StartedBot API ReferenceAPI ReferenceStandard Procedures
Community
FAQUser ShowcaseChat with Us
Copyright © 2023 Sanuker Inc. Limited